Powerful No-Bake Coconut Energy Bites Recipe Guide
Looking for a quick and tasty snack that boosts energy? You’ve found it! My Powerful No-Bake Coconut Energy Bites recipe is simple and packed with flavor. Not only do they take minutes to make, but they are also healthy and customizable. Read on to learn about the ingredients, step-by-step instructions, and tips to make your energy bites perfect. Let’s get started on this delicious journey together!
Ingredients
List of Ingredients
To make these no-bake coconut energy bites, you need the following items:
– 1 cup rolled oats
– 1/2 cup unsweetened shredded coconut
– 1/2 cup almond butter (or substitute with peanut butter)
– 1/4 cup honey (or maple syrup for vegan)
– 1/4 cup dark chocolate chips (optional)
– 1/4 teaspoon vanilla extract
– 1/4 teaspoon sea salt
– Extra unsweetened shredded coconut for coating
Nutritional Benefits of Ingredients
These ingredients pack a nutritious punch. Here’s why they are good for you:
– Rolled oats provide fiber. They help keep you full and support digestion.
– Unsweetened shredded coconut offers healthy fats. These fats can boost your energy.
– Almond butter gives protein. It helps build and repair muscles.
– Honey adds natural sweetness. It’s a quick energy source.
– Dark chocolate chips provide antioxidants. They can improve heart health.
– Vanilla extract adds flavor. It can also uplift your mood.
– Sea salt enhances taste. It helps balance hydration.
Substitutions for Common Allergens
You can easily swap ingredients for allergies or preferences:
– For nut allergies, use sunflower seed butter or tahini instead of almond butter.
– If you can’t have honey, maple syrup is a great vegan option.
– For gluten-free diets, ensure your oats are certified gluten-free.
– If you want to avoid chocolate, leave it out or use dried fruit for sweetness.
These coconut energy bites are not only tasty but also tailored to fit many dietary needs. Enjoy making them!
Step-by-Step Instructions
Preparation Overview
Making No-Bake Coconut Energy Bites is simple and quick. You will need just a few bowls and a spoon. Gather your ingredients first. This helps you stay organized. The key is to work in stages. Mixing dry and wet ingredients separately is a good start.
Detailed Mixing and Forming Process
1. Mix Dry Ingredients: Start by adding the rolled oats and shredded coconut to a medium bowl. Stir them together well.
2. Prepare Wet Mixture: In another bowl, blend the almond butter and honey. If you want it vegan, use maple syrup. Add the vanilla and sea salt. Whisk until smooth and creamy.
3. Combine Ingredients: Pour the wet mix into the dry bowl. Stir gently until everything is well mixed. If you like chocolate, add the dark chocolate chips now. Fold them in carefully.
4. Form Bites: Take small amounts of the mixture and roll them into balls. Aim for about 1 inch in size. If the mix is sticky, wet your hands a bit to help.
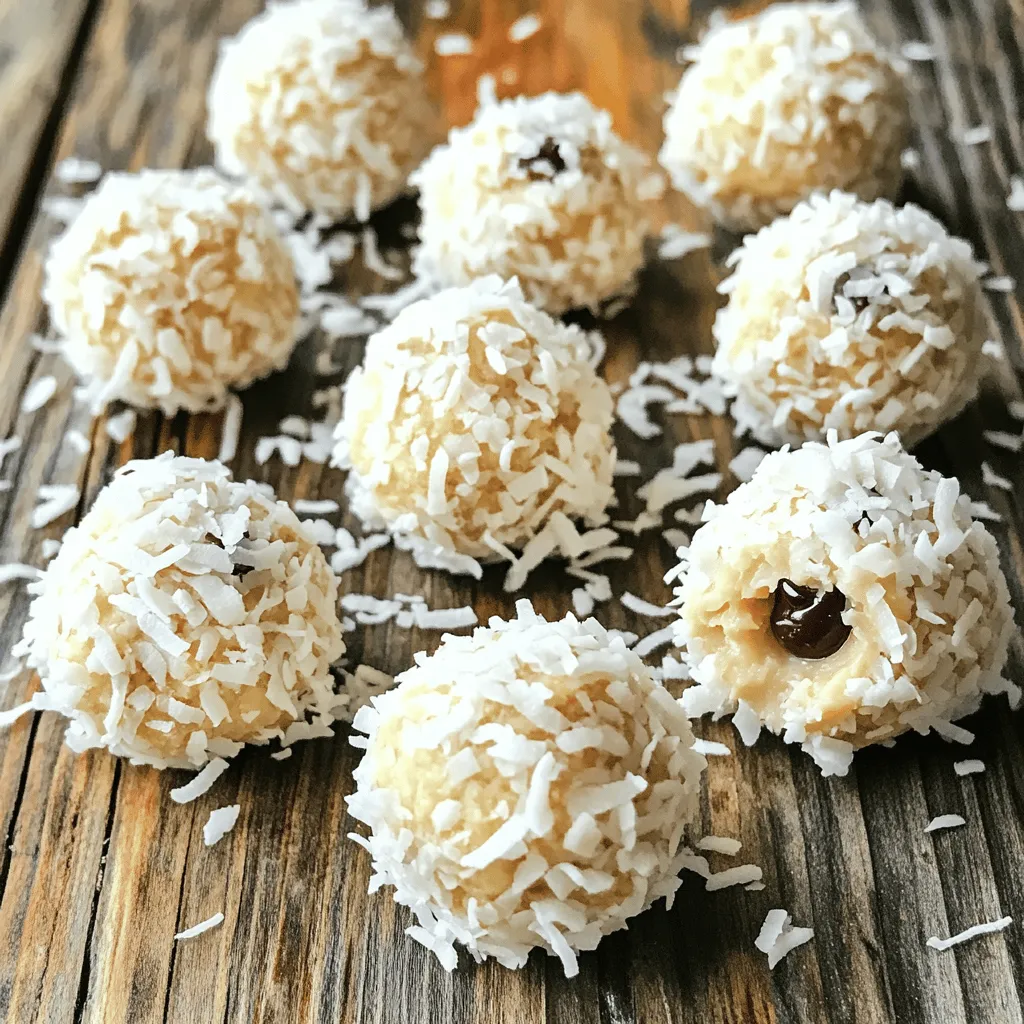
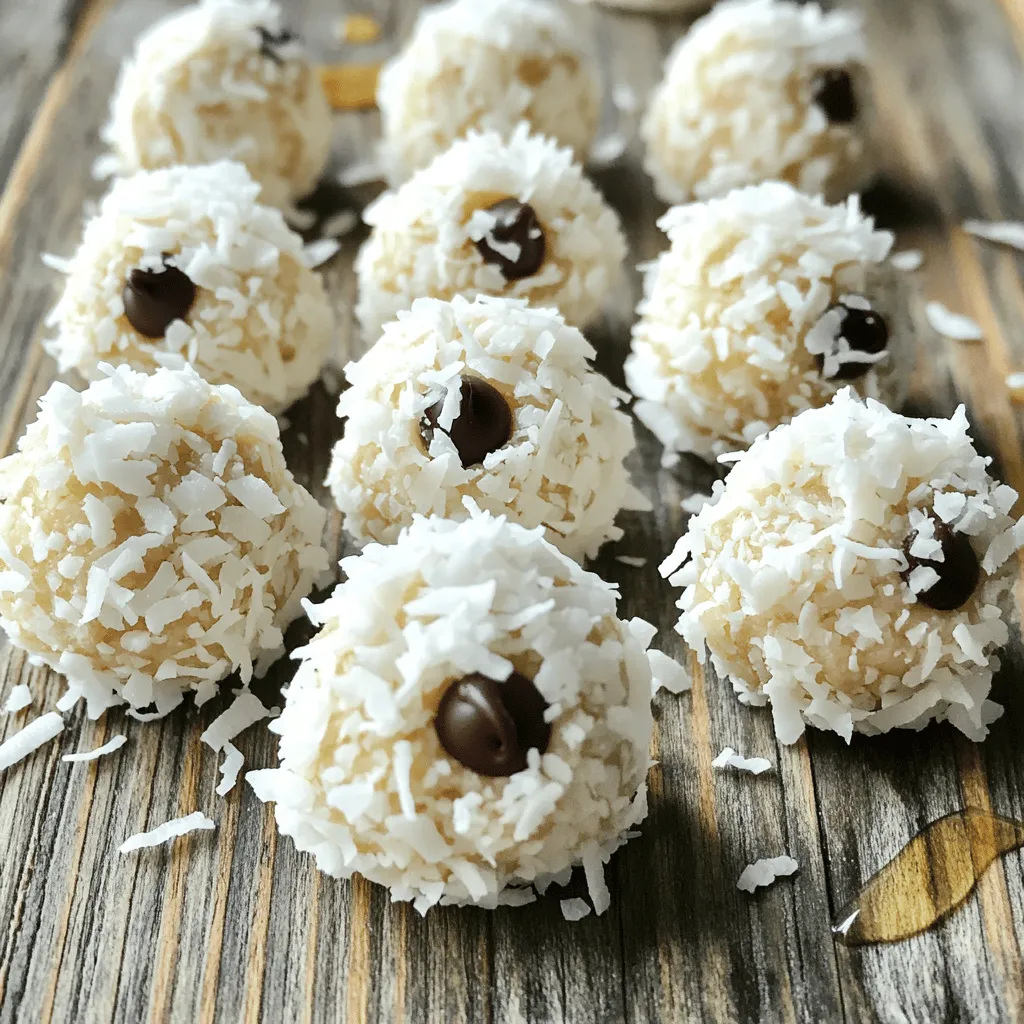
5. Coat in Coconut: Roll each ball in extra shredded coconut. This adds flavor and texture. Make sure they are coated well.
Chilling and Storage Instructions
Place the energy bites on a baking sheet with parchment paper. Put them in the fridge for at least 30 minutes. This helps them firm up. Once they are set, move them to an airtight container. These bites last up to a week in the fridge. You can also freeze them for longer storage. Enjoy your tasty and healthy treats!
Tips & Tricks
Best Practices for Easier Preparation
To make your coconut energy bites easier to prepare, keep these tips in mind:
– Use a non-stick bowl: This helps the mixture come together better.
– Measure ingredients properly: Accurate measurements ensure the right texture.
– Dampen your hands: If the mixture is sticky, wet hands help form perfect balls.
– Chill your bowl: A cold bowl can help keep the mixture firm while you work.
Enhancing Flavor and Texture
You can boost the flavor and texture of your energy bites with a few simple tweaks:
– Add spices: A pinch of cinnamon or nutmeg can elevate the taste.
– Include seeds: Chia seeds or flaxseeds add nutrition and crunch.
– Mix in dried fruit: Raisins, cranberries, or chopped dates provide sweetness and chewiness.
– Swap for different nut butters: Try cashew or sunflower seed butter for variety.
Serving Suggestions for Maximum Appeal
Make your energy bites look as good as they taste with these serving ideas:
– Presentation: Place them in a decorative bowl and sprinkle extra coconut on top.
– Gift them: Package bites in small jars with a ribbon for a thoughtful gift.
– Pair with drinks: Serve with smoothies or herbal tea for a tasty snack combo.
– Offer variety: Create a platter with different flavors to please all guests.
Variations
Flavor Variations
You can easily change the taste of your energy bites. Here are some ideas:
– Add Spices: Try cinnamon or nutmeg for warmth. A pinch of cayenne adds heat.
– Mix in Seeds: Chia or flaxseeds boost nutrition and add crunch.
– Use Dried Fruit: Chopped dates or cranberries give a sweet twist.
– Experiment with Nut Butters: Cashew or sunflower butter can change the flavor profile.
These small adjustments can make each batch unique, giving you endless options to enjoy.
Dietary Adaptations
You can make these energy bites fit many diets:
– Vegan: Use maple syrup instead of honey. This makes them vegan-friendly.
– Nut-Free: Replace almond butter with sunflower seed butter. This keeps them safe for nut allergies.
– Gluten-Free: Ensure your oats are certified gluten-free if needed.
These adaptations let everyone enjoy these tasty bites, regardless of dietary needs.
Energy Bite Size Options
You can make your energy bites in different sizes to suit your needs:
– Mini Bites: Roll smaller balls for a quick snack. These are great for kids.
– Larger Bites: Make bigger balls for a more filling treat. These work well as meal replacements on the go.
– Different Shapes: Use a cookie cutter for fun shapes. This can make them more appealing for parties or events.
By varying the size and shape, you can keep things interesting and cater to different occasions.
Storage Info
How to Store No-Bake Coconut Energy Bites
To keep your no-bake coconut energy bites fresh, place them in an airtight container. You can store them in the fridge for up to a week. Make sure to separate layers with parchment paper. This keeps them from sticking together. If you want to enjoy them later, freezing is a great option.
Freezing Instructions for Longer Shelf Life
For longer shelf life, you can freeze these bites. First, arrange them in a single layer on a baking sheet. Freeze them for about one hour. Once frozen, transfer them to a freezer-safe bag. They can stay frozen for up to three months. Just remember to label the bag with the date.
Best Practices for Maintaining Freshness
To keep your energy bites fresh, always use clean utensils when handling them. Avoid exposing them to moisture. If they start to feel dry, you can add a little more almond butter to the mix. Storing them in a cool, dark place also helps maintain their taste and texture.
FAQs
How long do No-Bake Coconut Energy Bites last?
No-Bake Coconut Energy Bites last about one week in the fridge. Store them in an airtight container to keep them fresh. If you freeze them, they can last for up to three months. This makes them great for meal prep or quick snacks!
Can I use other nut butters instead of almond butter?
Yes, you can use other nut butters. Peanut butter works well and adds a nice flavor. Cashew butter or sunflower seed butter are great options too. Just keep in mind that each nut butter has a unique taste and texture. You may need to adjust the amount based on how thick the nut butter is.
What is the best way to enhance the chocolate flavor?
To boost the chocolate flavor, try adding cocoa powder to the mixture. Start with one tablespoon and mix it in with the dry ingredients. You can also use chocolate chips, but make sure they are high-quality. For a richer taste, consider using dark chocolate chips or even a drizzle of melted chocolate on top.
We explored how to make No-Bake Coconut Energy Bites, including key ingredients and their benefits. You learned about preparation steps, tips for flavor enhancement, and storage methods. Remember, these bites are versatile. Change flavors or adapt for any diet. Enjoy them fresh or store them for later. Keep experimenting to find what you love most. Simple, tasty, and healthy snacks are just a mix away. Embrace your creativity and keep those energy levels up!

![To make these brown butter pumpkin blondies, you need a mix of simple and tasty ingredients. Here’s what you will need: - 1 cup unsalted butter - 1 cup packed brown sugar - 1/2 cup granulated sugar - 2 large eggs - 1 teaspoon pure vanilla extract - 1 cup pumpkin puree - 2 cups all-purpose flour - 1 teaspoon baking powder - 1 teaspoon baking soda - 1 teaspoon ground cinnamon - 1/2 teaspoon ground nutmeg - 1/2 teaspoon sea salt - Optional: 1 cup white chocolate chips, 1/2 cup chopped walnuts or pecans These ingredients come together to create a warm and cozy treat. The brown butter gives the blondies a rich, nutty flavor. Pumpkin puree adds moisture and a hint of fall spice. You can also add white chocolate chips or nuts for extra texture and sweetness. For the full recipe, check the section above. - Preheat the oven to 350°F (175°C). - Prepare a 9x13 inch baking pan by greasing it lightly. Line the bottom with parchment paper for easy removal. - Melt 1 cup of unsalted butter in a medium saucepan over medium heat. - Stir constantly and watch for browning. It takes about 5-7 minutes. - The butter will foam and turn a golden-brown color. - Remove it from heat and let cool slightly before using. - In a large bowl, pour in the cooled brown butter. - Add 1 cup packed brown sugar and 1/2 cup granulated sugar. - Whisk together until smooth. - Add 2 large eggs one at a time, whisking well after each. - Stir in 1 teaspoon pure vanilla extract and 1 cup pumpkin puree. - Mix until the batter is creamy and smooth. - In a separate bowl, sift together 2 cups all-purpose flour, 1 teaspoon baking powder, 1 teaspoon baking soda, 1 teaspoon ground cinnamon, 1/2 teaspoon ground nutmeg, and 1/2 teaspoon sea salt. - Gradually fold this dry mix into the wet mixture. - Be careful not to overmix; stir just until combined for a tender texture. - If you like, fold in 1 cup white chocolate chips and 1/2 cup chopped walnuts or pecans. - Carefully pour the batter into the prepared baking pan. - Use a spatula to smooth the top. - Place the pan in the preheated oven and bake for 25-30 minutes. - Check doneness with a toothpick; it should come out clean. - Let the blondies cool in the pan for about 15 minutes. - Then, transfer them to a wire rack to cool completely. - Once cool, slice into squares and serve. - For extra flair, dust the tops with powdered sugar or serve with whipped cream. For the full recipe, click [Full Recipe]. To make your blondies soft, mix gently. Overmixing makes them tough. Stir until the flour disappears. If you use a glass pan, lower the oven to 325°F. This helps your blondies bake evenly. Want more autumn vibes? Add spices! A pinch of ginger or allspice boosts the flavor. You can also mix in chopped apples or dried cranberries. For toppings, think about adding nuts or drizzling caramel sauce. For a lovely presentation, dust the tops with powdered sugar. Pair each piece with whipped cream. You can also create a dessert platter. Add cookies, fruit, or mini pastries for a fun spread. Try out the full recipe for an easy way to impress your guests! {{image_4}} You can make these blondies gluten-free. Just swap the all-purpose flour for a gluten-free flour blend. Look for blends that work well in baking. They usually mix well and keep the texture nice. This change will still give you that lovely, soft bite. Want a vegan treat? You can replace the eggs with flax eggs. To make a flax egg, mix one tablespoon of ground flaxseed with three tablespoons of water. Let it sit until it thickens. For the butter, use a plant-based butter. This will keep your blondies rich and tasty without any animal products. Get creative with spices! Adding ginger or cloves can give a fun twist to the flavor. You can also try using different types of chocolate. Dark chocolate chips can add a deeper taste, while milk chocolate offers sweetness. Consider adding nuts like pecans or almonds for extra crunch. Each change can make your blondies special and unique. To keep your Brown Butter Pumpkin Blondies fresh, store them in an airtight container. This helps them stay moist and flavorful. Avoid stacking them if possible, as that can make them stick together. If you want to gift them, use a decorative box lined with parchment paper. This adds a nice touch and keeps them safe during transport. Freezing blondies is simple. Start by slicing them into squares. Place each square on a baking sheet in a single layer. Freeze them for about an hour until solid. Then, wrap each blondie in plastic wrap and place them in a freezer bag. This method prevents freezer burn. To reheat, remove a blondie from the bag and let it thaw at room temperature for about 30 minutes. For a warm treat, heat it in the microwave for about 10-15 seconds. Brown Butter Pumpkin Blondies can last up to five days at room temperature. Keep them in a cool, dry place. If you refrigerate them, they can last up to seven days. The cool air helps keep them fresh for longer. Just remember, blondies may dry out slightly in the fridge, so enjoy them sooner for the best taste! For the full recipe, check out the details above. To cut blondies cleanly, use a sharp knife. Here are some tips: - Cool completely: Let the blondies cool in the pan. - Use a ruler: Measure to make even squares. - Wipe the knife: Clean the knife between cuts to reduce crumbs. - Score before cutting: Lightly mark where you will cut. These steps help you get neat, beautiful blondies. Yes, you can make blondies ahead of time. Here’s how: - Bake and cool: Bake as usual and let them cool completely. - Store in an airtight container: This keeps them fresh. - Refrigerate or freeze: They last longer when stored this way. You can enjoy your blondies for days! To check if your blondies are done, look for these signs: - Golden edges: The edges should be lightly browned. - Set center: The center should not jiggle when you shake the pan. - Toothpick test: Insert a toothpick in the center; it should come out clean. If you see these signs, your blondies are ready! Yes, you can substitute pumpkin puree. Here are some options: - Applesauce: Use the same amount for moisture. - Sweet potato puree: This gives a different flavor but works well. - Mashed banana: This adds sweetness and moisture. Choose based on your taste! Blondies can be both! Here’s how to get each texture: - For chewy blondies: Use less flour and don’t overmix the batter. - For cakey blondies: Add a bit more flour and mix well. Experiment to find your favorite texture! For the full recipe, check out the Brown Butter Pumpkin Blondies. This blog post covered everything you need to make delicious pumpkin blondies. We explored key ingredients, step-by-step instructions, and tips for achieving the perfect texture. You can even try variations for gluten-free and vegan options. In closing, these blondies are perfect for any fall gathering. Use the techniques shared to impress your friends and family. Enjoy baking, experimenting, and sharing these delightful treats!](https://blissfulmeal.com/wp-content/uploads/2025/07/e40eac7c-6e96-4c1b-88f9-4ac0da3c90ba-768x768.webp)