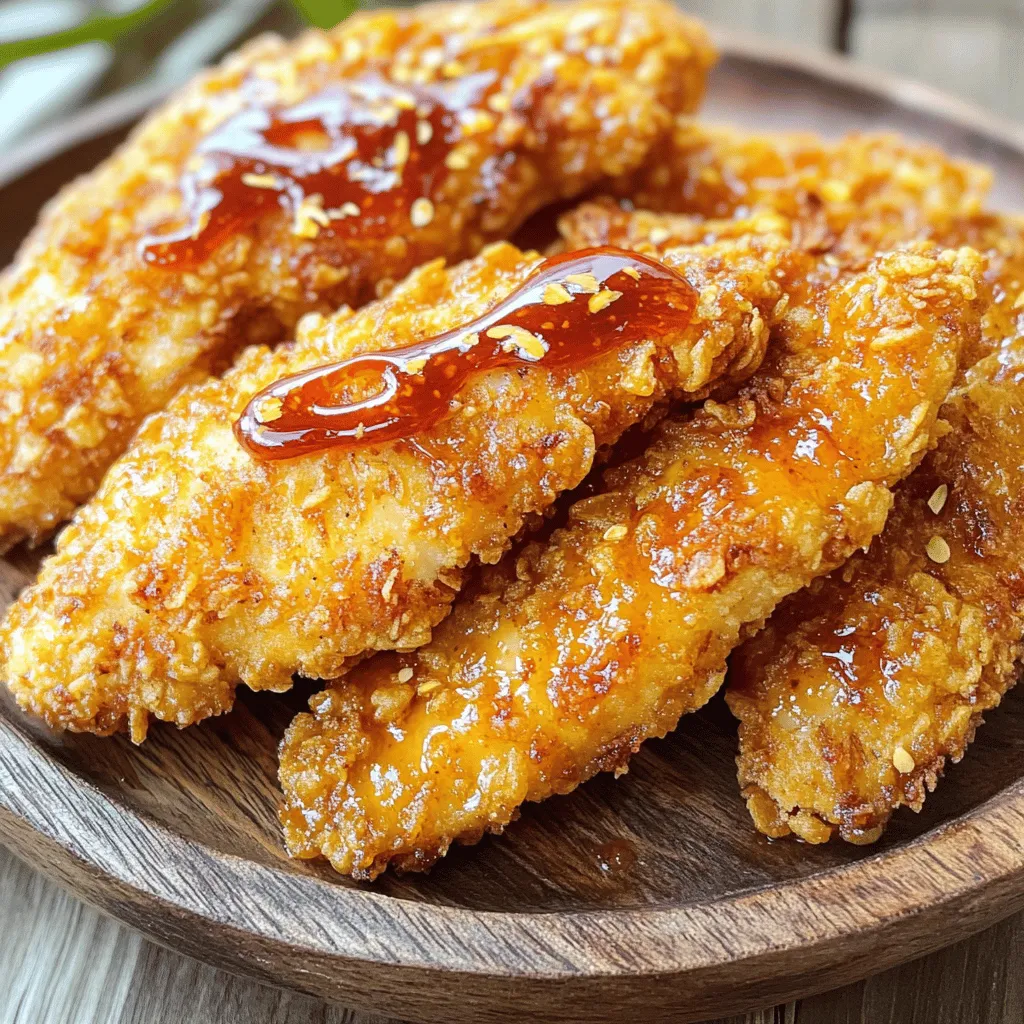
Honey Sriracha Chicken Tenders Irresistible Flavor Boost

Get ready to spice up your dinner with Honey Sriracha Chicken Tenders! This dish combines sweet honey and fiery Sriracha for a flavor explosion you can’t resist. Whether you’re cooking for a crowd or just a quick weeknight meal, these tenders deliver crunch and taste. I’ll guide you through simple steps and tips to make your tenders juicy and crispy. Let’s dive into the recipe and make some magic in the kitchen!
Ingredients
Main Ingredients for Honey Sriracha Chicken Tenders
– 1 pound chicken tenders
– 1/4 cup honey
– 2 tablespoons sriracha sauce
– 1 tablespoon soy sauce
– 1 teaspoon garlic powder
– 1 teaspoon smoked paprika
– 1/2 teaspoon salt
– 1/2 teaspoon black pepper
– 1 cup panko breadcrumbs
– 1/2 cup all-purpose flour
– 2 large eggs, beaten
– Vegetable oil
The main ingredients create a sweet and spicy flavor. The honey adds sweetness. Sriracha gives it heat. The seasonings enhance the taste. Panko breadcrumbs add crunch, while the flour helps the coating stick.
Optional Ingredients for Extra Flavor
– Fresh ginger, grated
– Lime juice or zest
– Sesame oil
– Chopped green onions
Adding fresh ginger gives a zesty kick. Lime juice or zest brightens the flavor. Sesame oil adds depth. Chopped green onions provide freshness and color.
Recommended Cooking Oils
– Vegetable oil
– Canola oil
– Peanut oil
I recommend vegetable oil for frying. It has a high smoke point. Canola oil is also great for frying. Peanut oil adds a nutty flavor. Choose an oil that works best for your taste and needs.
Step-by-Step Instructions
Marinating the Chicken Tenders
To start, I mix the marinade in a medium bowl. I whisk together 1/4 cup honey, 2 tablespoons sriracha, 1 tablespoon soy sauce, and spices. These spices include 1 teaspoon garlic powder, 1 teaspoon smoked paprika, 1/2 teaspoon salt, and 1/2 teaspoon black pepper. This mix creates a sweet and spicy flavor. I add the chicken tenders to the bowl, making sure they are well coated. Then, I cover the bowl with plastic wrap and place it in the fridge. The chicken needs at least 30 minutes to soak up the flavors. If you can wait, two hours gives a deeper taste.
Setting Up the Breading Station
Next, I set up my breading station. I grab three shallow dishes for this step. In the first dish, I add 1/2 cup all-purpose flour. The second dish gets 2 beaten eggs. In the last dish, I pour in 1 cup of panko breadcrumbs. This setup helps me coat the chicken easily. I keep everything close to make the process smooth.
Frying the Chicken Tenders
Now it’s time to fry the chicken. I heat vegetable oil in a large skillet. I pour in enough oil to cover about 1/2 inch of the pan. I heat the oil to around 350°F. I test it by dropping in a few breadcrumbs; they should sizzle. Once the oil is hot, I carefully add the coated chicken tenders. I make sure not to crowd the pan. Each tender needs space to cook evenly. I fry them for about 4-5 minutes on each side. They should turn golden brown and reach an internal temperature of 165°F.
– Cooking Tips for Perfectly Fried Chicken:
– Use a thermometer to check the oil’s heat.
– Don’t overcrowd the pan; fry in batches if needed.
– Drain cooked tenders on paper towels to keep them crispy.
After frying, I place the chicken on a plate with paper towels to absorb excess oil. This ensures a crunchy bite. For a flavor boost, I drizzle more honey and sriracha on top before serving. You can also serve the sauce on the side for dipping.
Tips & Tricks
Achieving the Crispiest Coating
To get that perfect crunch, use panko breadcrumbs. They are light and airy, giving your tenders a great texture. Make sure to press the panko onto the chicken firmly. This helps it stick better during frying. If you want even more crunch, double-bread the chicken. After the first coat, dip it back in the egg and then into the panko again. This extra layer makes a big difference!
Flavor Enhancements for the Sauce
The sauce is the star of this dish. To make it even better, try adding a splash of lime juice. This gives a fresh twist. You can also mix in some ginger for warmth or sesame oil for depth. For a sweeter sauce, add more honey. If you like it spicy, increase the sriracha. Taste the sauce as you mix it to find your perfect balance.
Serving Suggestions and Presentation Ideas
When serving, think about color and texture. Lay the chicken tenders on a platter with fresh lettuce for a nice contrast. Sprinkle sesame seeds or chopped green onions on top for a pop of color. Pair them with crunchy veggies or creamy coleslaw. You can also serve extra sauce on the side for dipping. This makes your meal fun and interactive.
Variations
Spicy Alternatives with Different Sauces
You can switch up the sauce for a new twist. Try using chipotle sauce for a smoky flavor. If you want more heat, go for a spicy garlic sauce. You can also mix honey with gochujang for a Korean flair. Each option gives a unique taste to the chicken tenders.
Baked Version of Honey Sriracha Chicken Tenders
If you want a lighter option, try baking the chicken tenders. After marinating, set them on a baking sheet lined with parchment. Spray them lightly with cooking spray for crispiness. Bake at 400°F for about 20-25 minutes. You’ll get crispy tenders without frying!
Gluten-Free Options
For a gluten-free version, swap the all-purpose flour and panko for gluten-free alternatives. Use almond flour or coconut flour instead of regular flour. For breadcrumbs, try crushed gluten-free crackers or cornflakes. This way, everyone can enjoy the great taste of honey sriracha chicken tenders.
Storage Info
Refrigerating Leftovers
You can store leftover honey sriracha chicken tenders in the fridge. Place them in an airtight container. They will stay fresh for about 3 to 4 days. Make sure the tenders cool down before sealing them. This helps keep them crispy for your next meal.
Freezing Honey Sriracha Chicken Tenders
If you want to save some for later, freezing works well. Lay the cooked chicken tenders on a baking sheet in a single layer. Freeze them for about 1 hour until solid. Then, transfer them to a freezer-safe bag. They can last for up to 3 months. Just remember to label the bag with the date.
Reheating Tips for Maintaining Crispiness
When it’s time to eat your leftovers, I recommend reheating them in an oven. Preheat the oven to 400°F. Place the chicken tenders on a baking sheet lined with parchment paper. Bake for about 10 minutes or until they’re heated through and crispy again. Avoid using a microwave, as it can make the coating soggy. Enjoy the crunch!
FAQs
What can I serve with Honey Sriracha Chicken Tenders?
You can serve these tasty chicken tenders with many sides. I love pairing them with fresh coleslaw or crispy fries. A side of steamed rice also works well to soak up the sauce. For a lighter option, try a mixed green salad with a tangy dressing. You can even serve them on a bed of lettuce for a fun twist. Dipping sauces like ranch or blue cheese add a nice touch too.
Can I make Honey Sriracha Chicken Tenders ahead of time?
Yes, you can prepare these chicken tenders ahead of time. Marinate the chicken and bread it a few hours before frying. Keep them in the fridge until you’re ready to cook. You can also cook them in advance, store them in the fridge, and reheat when needed. Just remember that freshly fried tenders taste best!
How do I know when the chicken tenders are fully cooked?
To check if the chicken is done, use a meat thermometer. The internal temperature should reach 165°F. If you don’t have a thermometer, cut one tender in half to check. The meat should be white and juicy, with no pink inside. If you see any pink, cook them a bit longer.
In this post, we explored how to make tasty Honey Sriracha Chicken Tenders. We covered the best ingredients, easy steps for cooking, and tips for great flavor. You learned how to achieve a crispy coating and even tried different sauce options. Don’t forget, storing leftovers properly keeps them fresh. I hope you feel inspired to make this dish your own. Enjoy cooking and sharing it with family and friends!


![- 2 medium zucchinis, coarsely grated - 1 teaspoon salt - 1/2 cup all-purpose flour - 1/4 cup freshly grated Parmesan cheese - 2 large eggs - 1/4 cup green onions, finely chopped - 1/2 teaspoon garlic powder - 1/2 teaspoon onion powder - 1/4 teaspoon black pepper - 1/4 teaspoon cayenne pepper (optional) - Olive oil, for frying - Greek yogurt or sour cream, for serving When making zucchini fritters, you need fresh ingredients for the best taste. Start with two medium zucchinis. Grate them coarsely for texture. Salt helps draw out water, making the fritters crispier. For binding, we add all-purpose flour and Parmesan cheese. The cheese also adds a nice flavor. You’ll need two large eggs to hold everything together. Chopped green onions bring a fresh crunch, while garlic powder and onion powder add depth. If you like a little heat, cayenne pepper gives a kick, but it's optional. Olive oil is key for frying; it helps achieve that golden brown color. Lastly, a dollop of Greek yogurt or sour cream adds creaminess. These ingredients come together to create delicious bites that are perfect for any meal. For the complete recipe, check out the [Full Recipe]. First, we need to prepare the zucchini. Grate the zucchinis using the large holes of a grater. Place the grated zucchini in a clean kitchen towel or cheesecloth. Sprinkle the salt over the zucchini and mix it in lightly. This helps to draw out moisture. Let the zucchini rest for about 10-15 minutes. After the resting time, gather the edges of the towel to make a pouch. Twist tightly to squeeze out as much liquid as possible from the zucchini. This step is key for crispy fritters. If you skip it, your fritters may turn out soggy. Now, let’s mix our batter. In a large bowl, combine the squeezed zucchini, flour, grated Parmesan cheese, and eggs. Then, add chopped green onions, garlic powder, onion powder, black pepper, and cayenne pepper if you like some heat. Stir everything until well blended. The mixture should be thick but still scoopable. It’s time to cook! Heat a couple of tablespoons of olive oil in a large skillet over medium heat. When the oil shimmers, drop spoonfuls of the zucchini mixture into the skillet. Flatten each fritter slightly with the back of the spoon. This ensures even cooking. Cook the fritters for about 3-4 minutes on each side. Look for a golden brown color and a crispy texture. Keep an eye on the heat and adjust as needed to avoid burning. Once cooked, transfer the fritters onto a paper towel-lined plate. This helps absorb any extra oil. Serve the fritters warm with Greek yogurt or sour cream for a tasty dip. For the complete guide, check the Full Recipe. To get that perfect crunch, you must squeeze moisture from the zucchini. If you skip this step, your fritters will turn out soggy. After grating the zucchini, sprinkle it with salt and let it sit for about 10-15 minutes. This helps draw out excess water. Then, use a kitchen towel to squeeze out the liquid. The drier the zucchini, the crispier your fritters will be. Adjusting the heat while frying is also key. Start with medium heat to avoid burning. If you notice the fritters browning too fast, lower the heat. Cooking them too quickly can lead to a raw center, which is not tasty. Zucchini fritters shine with the right dips. A dollop of Greek yogurt or sour cream pairs perfectly. You could also try salsa or a garlic aioli for extra flavor. For side dishes, think fresh salads or roasted vegetables. They add color and balance to your meal. Mixing textures enhances the dining experience. One common mistake is overcooking or undercooking the fritters. Keep an eye on the cooking time; aim for about 3-4 minutes on each side. When they turn golden brown, they are ready. Not seasoning properly is another issue. The fritters need salt and pepper to bring out the flavors. Don't forget to taste the mixture before cooking. Adjust the seasoning if needed. For the full recipe, check out the details above. Enjoy your cooking! {{image_4}} To make your zucchini fritters extra tasty, try adding herbs and spices. Fresh herbs like basil, parsley, or dill can add a burst of flavor. You can mix in spices like paprika or cumin for a warm kick. Another fun twist is to incorporate different types of cheese. Feta or cheddar can change the taste and texture. Cheese can also help the fritters hold together better. If you want gluten-free fritters, use almond or coconut flour instead of regular flour. Both options give a nice texture and taste. For vegan fritters, you can replace eggs with a flaxseed mixture. Combine one tablespoon of ground flaxseed with three tablespoons of water and let it sit for a few minutes. This mix will help bind the fritters. Zucchini is great, but feel free to experiment with different types of squash. Yellow squash or pattypan squash can add new flavors. Mixing in colorful veggies like bell peppers or corn not only adds taste but also makes the dish look vibrant. Seasonal ingredients make the fritters fresh and fun! For the full recipe, check out the Zesty Zucchini Fritters . To store leftover fritters, let them cool completely first. Place them in an airtight container. This keeps them fresh and prevents sogginess. You can store them in the fridge for up to three days. If you want them to last longer, freezing is a great option. When you reheat fritters, keep them crispy. Use a skillet for the best results. Heat a little oil over medium heat. Place the fritters in the skillet. Cook until they are hot and crisp again, usually around two minutes per side. Avoid using a microwave as it can make them soggy. To freeze fritters, let them cool completely. Arrange them in a single layer on a baking sheet. Place the baking sheet in the freezer until they are firm. Once frozen, transfer them to a freezer-safe bag or container. They can last up to three months. To thaw, place them in the fridge overnight before reheating. This method helps preserve their texture. For the full details on making zesty zucchini fritters, check the Full Recipe. To keep your zucchini fritters from falling apart, remove extra moisture. After grating the zucchini, sprinkle salt on it. Let it sit for about 10-15 minutes. This will help draw out the water. Next, use a clean towel to squeeze the zucchini. This step is key for a firm fritter. Mix in flour, eggs, and cheese to bind the fritters. The right ratio of these ingredients will help them hold together. Yes, you can bake zucchini fritters! Preheat your oven to 400°F (200°C). Place the fritters on a baking sheet lined with parchment paper. Lightly spray the fritters with cooking oil. Bake for about 20-25 minutes. Flip them halfway through for even cooking. They may not be as crispy as fried fritters, but they will still taste great! Zucchini fritters pair well with many sides. Here are some ideas: - Greek yogurt or sour cream for dipping - A fresh salad with lemon dressing - Tomato salsa for a zesty twist - Garlic aioli for extra flavor These sides will complement the fritters and add variety to your meal. To check if your fritters are done, look for a golden brown color. They should be crispy on the outside. Gently press them with a spatula; they should feel firm. If they are still soft, give them a couple more minutes. When both sides are golden and the inside feels set, your fritters are ready to enjoy. Zucchini fritters are easy and fun to make. You need simple ingredients like zucchini, eggs, and cheese. I covered steps for preparing, cooking, and storing them. I also shared tips to keep them crispy and made ideas for serving. When trying this recipe, remember to squeeze out moisture and season well. Enjoy experimenting with flavors and serving them with your favorite dips. Zucchini fritters will surely be a tasty treat!](https://blissfulmeal.com/wp-content/uploads/2025/06/740b6982-93cf-4d85-aa9e-f90b206acf44-768x768.webp)