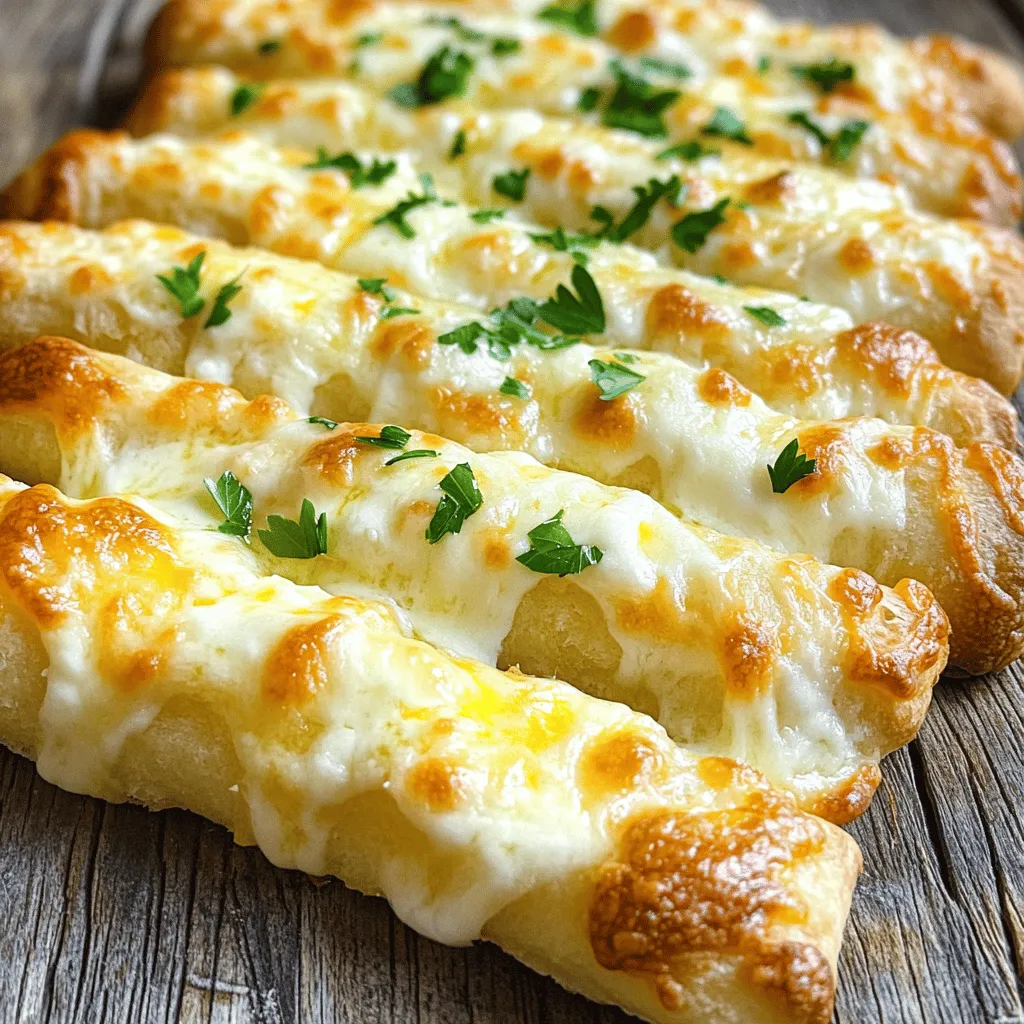
Cheesy Garlic Breadsticks Simple and Flavorful Snack
![- 2 cups all-purpose flour - 1 packet active dry yeast - 1 cup warm water - 1 tablespoon granulated sugar - 1 tablespoon extra virgin olive oil - 1 teaspoon fine sea salt - 1 teaspoon garlic powder - 1 cup shredded mozzarella cheese - 1/2 cup freshly grated Parmesan cheese - Fresh parsley for garnish - 2 tablespoons unsalted butter, melted I love using fresh and simple ingredients for my cheesy garlic breadsticks. The main ingredients create the perfect base for the dough. You start with all-purpose flour for structure. The active dry yeast makes the bread rise. Warm water helps activate the yeast. The sugar feeds the yeast, creating a lovely flavor. Extra virgin olive oil adds richness, while fine sea salt brings it all together. For flavor, garlic powder is a must. It gives that classic garlic taste. The mozzarella cheese melts beautifully and creates that gooey texture we crave. Freshly grated Parmesan cheese tops it off with a savory bite. Fresh parsley makes a lovely garnish and adds a splash of color. Don't forget the melted butter! It enhances the flavor and gives the breadsticks a nice, golden finish. All these ingredients work together to create a snack that is simple yet full of flavor. For the full recipe, check out the detailed instructions! To start, combine warm water, sugar, and yeast in a bowl. Use water that feels warm to the touch, about 110°F (45°C). Stir gently with a spoon. Now, let it sit for 5 to 10 minutes. You should see bubbles forming on top. This frothy layer shows that the yeast is active. In a large mixing bowl, add the dry ingredients. Combine 2 cups of all-purpose flour, 1 teaspoon of fine sea salt, and 1 teaspoon of garlic powder. Whisk these together until mixed well. Next, add the yeast mixture and 1 tablespoon of extra virgin olive oil. Mix with a spoon until a dough starts to form. Transfer the dough onto a floured surface. Knead the dough for about 5 minutes. Work it until it feels smooth and elastic. This step helps develop the gluten in the dough. Now, shape the dough into a ball. Place it in a greased bowl and cover it with a clean towel. Let it rise in a warm spot for about 1 hour. The dough should double in size. While the dough rises, preheat your oven to 425°F (220°C). Once the dough has risen, punch it down gently. Roll it out on a floured surface into a rectangle, about 1/2 inch thick. Using a pizza cutter, cut the dough into strips about 1 inch wide. Line a baking sheet with parchment paper and arrange the strips with space between each. Brush melted butter on top of each strip. Then, sprinkle shredded mozzarella and grated Parmesan evenly over the dough. Now, bake the breadsticks in the preheated oven for 12 to 15 minutes. Watch closely until they turn golden brown and the cheese bubbles. Once done, remove them from the oven and let them cool for a few minutes. Enjoy your cheesy garlic breadsticks! For the full recipe, check out the [Full Recipe]. Kneading the dough is key. Use your palms to push and fold the dough. Keep it on a floured surface for less stickiness. Aim for five minutes of kneading. This helps create a smooth texture. You can tell it's ready when it bounces back after you poke it. The first rise is very important. Place the dough in a greased bowl. Cover it with a kitchen towel. Let it sit in a warm spot for an hour. This helps the dough grow and become fluffy. A good rise gives you soft and airy breadsticks. To get a golden crust, preheat your oven to 425°F (220°C). Bake the breadsticks for 12 to 15 minutes. Keep an eye on them. They should turn golden and the cheese should bubble. If your oven runs cooler, you may need to add a few minutes. Check the color to know when they're done. If you notice uneven baking, rotate the baking sheet halfway through. This ensures all sides bake evenly. For different ovens, you might need to adjust the temperature. Always trust your nose; if they smell great, they’re likely close to being done. For a nice presentation, serve the warm breadsticks on a wooden board. You can also use a cute breadbasket. This makes them look inviting. Pair them with marinara sauce or garlic butter for dipping. The saucy flavors complement the cheesy goodness very well. Feel free to sprinkle fresh parsley on top for color. It adds a nice touch and some freshness. A great snack can be even more fun with a little creativity in serving! For more ideas, check out the Full Recipe. {{image_4}} You can change the cheese for more flavor. Mix mozzarella and cheddar for a sharp taste. For a richer option, use gouda or fontina. If you're vegan, try cashew cheese or almond-based cheese. These options melt well and taste great. Herbs and spices can elevate your breadsticks. Add dried oregano or basil to the dough for a fresh twist. You could also sprinkle red pepper flakes for a kick. Top your breadsticks with sun-dried tomatoes or olives for extra flavor. If you need gluten-free breadsticks, use gluten-free flour blends. They work well and taste delicious. Whole wheat flour is another option for a healthier twist. It gives a nutty flavor and more nutrients. Just remember, the texture may be a bit different with these changes. For the full recipe, check the Garlicky Cheese-Stuffed Breadsticks section. To store leftover cheesy garlic breadsticks, place them in an airtight container. You can also wrap them in plastic wrap or aluminum foil. This keeps them fresh for a few days. Store them in the fridge. When you are ready to enjoy them again, just take them out. If you want to save breadsticks for a longer time, freezing is the best option. First, let the breadsticks cool completely. Then, wrap each one tightly in plastic wrap. You can also put them in a freezer bag. Make sure to remove as much air as possible. When you want to eat them, thaw them in the fridge overnight. For the best texture, reheat them in the oven at 350°F (175°C) for about 10 minutes. This helps them become warm and crispy again. When stored properly, cheesy garlic breadsticks can last in the fridge for about 3-4 days. In the freezer, they can stay fresh for up to 3 months. Always check for any signs of spoilage before eating. Enjoy your tasty treats! For the full recipe, check above. You can make cheesy garlic breadsticks without yeast by using a baking powder dough. Baking powder acts as a leavening agent, making the dough rise without waiting. Alternative recipes without yeast: - Use 2 cups of all-purpose flour. - Mix in 1 tablespoon of baking powder, 1 teaspoon of salt, and 1 teaspoon of garlic powder. - Blend in 1 cup of milk and 1/4 cup of melted butter. - Knead the dough briefly and roll it out. - Cut into strips and top with cheese. - Bake at 425°F for about 15 minutes. This method is quick and easy, perfect for a last-minute snack. Yes, you can use store-bought dough for cheesy garlic breadsticks. This saves time and effort. Pros and cons of using pre-made dough: - Pros: - Quick and easy to use. - No need to wait for dough to rise. - Consistent results. - Cons: - Less control over texture and flavor. - May contain preservatives. - Not as fresh as homemade dough. Using store-bought dough can be a great shortcut when you want cheesy garlic breadsticks fast. Dipping sauces can enhance the flavor of cheesy garlic breadsticks. Here are some popular choices: - Marinara Sauce: Classic tomato sauce adds a zesty touch. - Garlic Butter: Melted butter with garlic brings rich flavor. - Ranch Dressing: Creamy ranch offers a cool contrast. - Pesto: Fresh basil pesto adds a vibrant taste. Try these dips to elevate your cheesy garlic breadsticks experience. Making cheesy garlic breadsticks is simple and fun. We've covered the key ingredients, from all-purpose flour to mozzarella, that make these sticks flavorful. You learned step-by-step instructions for dough preparation and baking. The tips helped you perfect your technique for a golden crust. Now, enjoy exploring variations and storage tips to keep them fresh longer. Cheesy garlic breadsticks are versatile; customize them to suit your taste. Try different cheese blends or serve with tasty dips to elevate your meal. Get creative and enjoy this delicious treat!](https://blissfulmeal.com/wp-content/uploads/2025/06/13ada63a-89f1-4fbe-8965-71133ae09ab3.webp)
If you love snacks that are simple yet full of flavor, you’re in for a treat! These Cheesy Garlic Breadsticks are quick to make and even better to eat. With just a few common ingredients, you can whip up a warm, cheesy, and garlic-filled delight. Whether for game day or a movie night, this recipe is sure to impress. Ready to get started? Let’s dive into the cheesy goodness!
Ingredients
Main Ingredients
– 2 cups all-purpose flour
– 1 packet active dry yeast
– 1 cup warm water
– 1 tablespoon granulated sugar
– 1 tablespoon extra virgin olive oil
– 1 teaspoon fine sea salt
Flavoring Ingredients
– 1 teaspoon garlic powder
– 1 cup shredded mozzarella cheese
– 1/2 cup freshly grated Parmesan cheese
– Fresh parsley for garnish
Additional Ingredients
– 2 tablespoons unsalted butter, melted
I love using fresh and simple ingredients for my cheesy garlic breadsticks. The main ingredients create the perfect base for the dough. You start with all-purpose flour for structure. The active dry yeast makes the bread rise. Warm water helps activate the yeast. The sugar feeds the yeast, creating a lovely flavor. Extra virgin olive oil adds richness, while fine sea salt brings it all together.
For flavor, garlic powder is a must. It gives that classic garlic taste. The mozzarella cheese melts beautifully and creates that gooey texture we crave. Freshly grated Parmesan cheese tops it off with a savory bite. Fresh parsley makes a lovely garnish and adds a splash of color.
Don’t forget the melted butter! It enhances the flavor and gives the breadsticks a nice, golden finish. All these ingredients work together to create a snack that is simple yet full of flavor.
Step-by-Step Instructions
Activating the Yeast
To start, combine warm water, sugar, and yeast in a bowl. Use water that feels warm to the touch, about 110°F (45°C). Stir gently with a spoon. Now, let it sit for 5 to 10 minutes. You should see bubbles forming on top. This frothy layer shows that the yeast is active.
Mixing and Kneading the Dough
In a large mixing bowl, add the dry ingredients. Combine 2 cups of all-purpose flour, 1 teaspoon of fine sea salt, and 1 teaspoon of garlic powder. Whisk these together until mixed well. Next, add the yeast mixture and 1 tablespoon of extra virgin olive oil. Mix with a spoon until a dough starts to form.
Transfer the dough onto a floured surface. Knead the dough for about 5 minutes. Work it until it feels smooth and elastic. This step helps develop the gluten in the dough.
Rising and Baking
Now, shape the dough into a ball. Place it in a greased bowl and cover it with a clean towel. Let it rise in a warm spot for about 1 hour. The dough should double in size.
While the dough rises, preheat your oven to 425°F (220°C). Once the dough has risen, punch it down gently. Roll it out on a floured surface into a rectangle, about 1/2 inch thick.
Using a pizza cutter, cut the dough into strips about 1 inch wide. Line a baking sheet with parchment paper and arrange the strips with space between each. Brush melted butter on top of each strip. Then, sprinkle shredded mozzarella and grated Parmesan evenly over the dough.
Now, bake the breadsticks in the preheated oven for 12 to 15 minutes. Watch closely until they turn golden brown and the cheese bubbles. Once done, remove them from the oven and let them cool for a few minutes. Enjoy your cheesy garlic breadsticks!
Tips & Tricks
Perfecting the Dough
Kneading the dough is key. Use your palms to push and fold the dough. Keep it on a floured surface for less stickiness. Aim for five minutes of kneading. This helps create a smooth texture. You can tell it’s ready when it bounces back after you poke it.
The first rise is very important. Place the dough in a greased bowl. Cover it with a kitchen towel. Let it sit in a warm spot for an hour. This helps the dough grow and become fluffy. A good rise gives you soft and airy breadsticks.
Baking Techniques
To get a golden crust, preheat your oven to 425°F (220°C). Bake the breadsticks for 12 to 15 minutes. Keep an eye on them. They should turn golden and the cheese should bubble. If your oven runs cooler, you may need to add a few minutes. Check the color to know when they’re done.
If you notice uneven baking, rotate the baking sheet halfway through. This ensures all sides bake evenly. For different ovens, you might need to adjust the temperature. Always trust your nose; if they smell great, they’re likely close to being done.
Serving Suggestions
For a nice presentation, serve the warm breadsticks on a wooden board. You can also use a cute breadbasket. This makes them look inviting. Pair them with marinara sauce or garlic butter for dipping. The saucy flavors complement the cheesy goodness very well.
Feel free to sprinkle fresh parsley on top for color. It adds a nice touch and some freshness. A great snack can be even more fun with a little creativity in serving!
Variations
Cheese Variations
You can change the cheese for more flavor. Mix mozzarella and cheddar for a sharp taste. For a richer option, use gouda or fontina. If you’re vegan, try cashew cheese or almond-based cheese. These options melt well and taste great.
Flavor Additions
Herbs and spices can elevate your breadsticks. Add dried oregano or basil to the dough for a fresh twist. You could also sprinkle red pepper flakes for a kick. Top your breadsticks with sun-dried tomatoes or olives for extra flavor.
Dough Substitutions
If you need gluten-free breadsticks, use gluten-free flour blends. They work well and taste delicious. Whole wheat flour is another option for a healthier twist. It gives a nutty flavor and more nutrients. Just remember, the texture may be a bit different with these changes.
Storage Info
Short Term Storage
To store leftover cheesy garlic breadsticks, place them in an airtight container. You can also wrap them in plastic wrap or aluminum foil. This keeps them fresh for a few days. Store them in the fridge. When you are ready to enjoy them again, just take them out.
Long Term Storage
If you want to save breadsticks for a longer time, freezing is the best option. First, let the breadsticks cool completely. Then, wrap each one tightly in plastic wrap. You can also put them in a freezer bag. Make sure to remove as much air as possible. When you want to eat them, thaw them in the fridge overnight. For the best texture, reheat them in the oven at 350°F (175°C) for about 10 minutes. This helps them become warm and crispy again.
Shelf Life
When stored properly, cheesy garlic breadsticks can last in the fridge for about 3-4 days. In the freezer, they can stay fresh for up to 3 months. Always check for any signs of spoilage before eating. Enjoy your tasty treats!
FAQs
How to make cheesy garlic breadsticks without yeast?
You can make cheesy garlic breadsticks without yeast by using a baking powder dough. Baking powder acts as a leavening agent, making the dough rise without waiting.
Alternative recipes without yeast:
– Use 2 cups of all-purpose flour.
– Mix in 1 tablespoon of baking powder, 1 teaspoon of salt, and 1 teaspoon of garlic powder.
– Blend in 1 cup of milk and 1/4 cup of melted butter.
– Knead the dough briefly and roll it out.
– Cut into strips and top with cheese.
– Bake at 425°F for about 15 minutes.
This method is quick and easy, perfect for a last-minute snack.
Can I use store-bought dough for this recipe?
Yes, you can use store-bought dough for cheesy garlic breadsticks. This saves time and effort.
Pros and cons of using pre-made dough:
– Pros:
– Quick and easy to use.
– No need to wait for dough to rise.
– Consistent results.
– Cons:
– Less control over texture and flavor.
– May contain preservatives.
– Not as fresh as homemade dough.
Using store-bought dough can be a great shortcut when you want cheesy garlic breadsticks fast.
What dips pair well with cheesy garlic breadsticks?
Dipping sauces can enhance the flavor of cheesy garlic breadsticks. Here are some popular choices:
– Marinara Sauce: Classic tomato sauce adds a zesty touch.
– Garlic Butter: Melted butter with garlic brings rich flavor.
– Ranch Dressing: Creamy ranch offers a cool contrast.
– Pesto: Fresh basil pesto adds a vibrant taste.
Try these dips to elevate your cheesy garlic breadsticks experience.
Making cheesy garlic breadsticks is simple and fun. We’ve covered the key ingredients, from all-purpose flour to mozzarella, that make these sticks flavorful. You learned step-by-step instructions for dough preparation and baking. The tips helped you perfect your technique for a golden crust.
Now, enjoy exploring variations and storage tips to keep them fresh longer. Cheesy garlic breadsticks are versatile; customize them to suit your taste. Try different cheese blends or serve with tasty dips to elevate your meal. Get creative and enjoy this delicious treat!
![- 2 cups all-purpose flour - 1 packet active dry yeast - 1 cup warm water - 1 tablespoon granulated sugar - 1 tablespoon extra virgin olive oil - 1 teaspoon fine sea salt - 1 teaspoon garlic powder - 1 cup shredded mozzarella cheese - 1/2 cup freshly grated Parmesan cheese - Fresh parsley for garnish - 2 tablespoons unsalted butter, melted I love using fresh and simple ingredients for my cheesy garlic breadsticks. The main ingredients create the perfect base for the dough. You start with all-purpose flour for structure. The active dry yeast makes the bread rise. Warm water helps activate the yeast. The sugar feeds the yeast, creating a lovely flavor. Extra virgin olive oil adds richness, while fine sea salt brings it all together. For flavor, garlic powder is a must. It gives that classic garlic taste. The mozzarella cheese melts beautifully and creates that gooey texture we crave. Freshly grated Parmesan cheese tops it off with a savory bite. Fresh parsley makes a lovely garnish and adds a splash of color. Don't forget the melted butter! It enhances the flavor and gives the breadsticks a nice, golden finish. All these ingredients work together to create a snack that is simple yet full of flavor. For the full recipe, check out the detailed instructions! To start, combine warm water, sugar, and yeast in a bowl. Use water that feels warm to the touch, about 110°F (45°C). Stir gently with a spoon. Now, let it sit for 5 to 10 minutes. You should see bubbles forming on top. This frothy layer shows that the yeast is active. In a large mixing bowl, add the dry ingredients. Combine 2 cups of all-purpose flour, 1 teaspoon of fine sea salt, and 1 teaspoon of garlic powder. Whisk these together until mixed well. Next, add the yeast mixture and 1 tablespoon of extra virgin olive oil. Mix with a spoon until a dough starts to form. Transfer the dough onto a floured surface. Knead the dough for about 5 minutes. Work it until it feels smooth and elastic. This step helps develop the gluten in the dough. Now, shape the dough into a ball. Place it in a greased bowl and cover it with a clean towel. Let it rise in a warm spot for about 1 hour. The dough should double in size. While the dough rises, preheat your oven to 425°F (220°C). Once the dough has risen, punch it down gently. Roll it out on a floured surface into a rectangle, about 1/2 inch thick. Using a pizza cutter, cut the dough into strips about 1 inch wide. Line a baking sheet with parchment paper and arrange the strips with space between each. Brush melted butter on top of each strip. Then, sprinkle shredded mozzarella and grated Parmesan evenly over the dough. Now, bake the breadsticks in the preheated oven for 12 to 15 minutes. Watch closely until they turn golden brown and the cheese bubbles. Once done, remove them from the oven and let them cool for a few minutes. Enjoy your cheesy garlic breadsticks! For the full recipe, check out the [Full Recipe]. Kneading the dough is key. Use your palms to push and fold the dough. Keep it on a floured surface for less stickiness. Aim for five minutes of kneading. This helps create a smooth texture. You can tell it's ready when it bounces back after you poke it. The first rise is very important. Place the dough in a greased bowl. Cover it with a kitchen towel. Let it sit in a warm spot for an hour. This helps the dough grow and become fluffy. A good rise gives you soft and airy breadsticks. To get a golden crust, preheat your oven to 425°F (220°C). Bake the breadsticks for 12 to 15 minutes. Keep an eye on them. They should turn golden and the cheese should bubble. If your oven runs cooler, you may need to add a few minutes. Check the color to know when they're done. If you notice uneven baking, rotate the baking sheet halfway through. This ensures all sides bake evenly. For different ovens, you might need to adjust the temperature. Always trust your nose; if they smell great, they’re likely close to being done. For a nice presentation, serve the warm breadsticks on a wooden board. You can also use a cute breadbasket. This makes them look inviting. Pair them with marinara sauce or garlic butter for dipping. The saucy flavors complement the cheesy goodness very well. Feel free to sprinkle fresh parsley on top for color. It adds a nice touch and some freshness. A great snack can be even more fun with a little creativity in serving! For more ideas, check out the Full Recipe. {{image_4}} You can change the cheese for more flavor. Mix mozzarella and cheddar for a sharp taste. For a richer option, use gouda or fontina. If you're vegan, try cashew cheese or almond-based cheese. These options melt well and taste great. Herbs and spices can elevate your breadsticks. Add dried oregano or basil to the dough for a fresh twist. You could also sprinkle red pepper flakes for a kick. Top your breadsticks with sun-dried tomatoes or olives for extra flavor. If you need gluten-free breadsticks, use gluten-free flour blends. They work well and taste delicious. Whole wheat flour is another option for a healthier twist. It gives a nutty flavor and more nutrients. Just remember, the texture may be a bit different with these changes. For the full recipe, check the Garlicky Cheese-Stuffed Breadsticks section. To store leftover cheesy garlic breadsticks, place them in an airtight container. You can also wrap them in plastic wrap or aluminum foil. This keeps them fresh for a few days. Store them in the fridge. When you are ready to enjoy them again, just take them out. If you want to save breadsticks for a longer time, freezing is the best option. First, let the breadsticks cool completely. Then, wrap each one tightly in plastic wrap. You can also put them in a freezer bag. Make sure to remove as much air as possible. When you want to eat them, thaw them in the fridge overnight. For the best texture, reheat them in the oven at 350°F (175°C) for about 10 minutes. This helps them become warm and crispy again. When stored properly, cheesy garlic breadsticks can last in the fridge for about 3-4 days. In the freezer, they can stay fresh for up to 3 months. Always check for any signs of spoilage before eating. Enjoy your tasty treats! For the full recipe, check above. You can make cheesy garlic breadsticks without yeast by using a baking powder dough. Baking powder acts as a leavening agent, making the dough rise without waiting. Alternative recipes without yeast: - Use 2 cups of all-purpose flour. - Mix in 1 tablespoon of baking powder, 1 teaspoon of salt, and 1 teaspoon of garlic powder. - Blend in 1 cup of milk and 1/4 cup of melted butter. - Knead the dough briefly and roll it out. - Cut into strips and top with cheese. - Bake at 425°F for about 15 minutes. This method is quick and easy, perfect for a last-minute snack. Yes, you can use store-bought dough for cheesy garlic breadsticks. This saves time and effort. Pros and cons of using pre-made dough: - Pros: - Quick and easy to use. - No need to wait for dough to rise. - Consistent results. - Cons: - Less control over texture and flavor. - May contain preservatives. - Not as fresh as homemade dough. Using store-bought dough can be a great shortcut when you want cheesy garlic breadsticks fast. Dipping sauces can enhance the flavor of cheesy garlic breadsticks. Here are some popular choices: - Marinara Sauce: Classic tomato sauce adds a zesty touch. - Garlic Butter: Melted butter with garlic brings rich flavor. - Ranch Dressing: Creamy ranch offers a cool contrast. - Pesto: Fresh basil pesto adds a vibrant taste. Try these dips to elevate your cheesy garlic breadsticks experience. Making cheesy garlic breadsticks is simple and fun. We've covered the key ingredients, from all-purpose flour to mozzarella, that make these sticks flavorful. You learned step-by-step instructions for dough preparation and baking. The tips helped you perfect your technique for a golden crust. Now, enjoy exploring variations and storage tips to keep them fresh longer. Cheesy garlic breadsticks are versatile; customize them to suit your taste. Try different cheese blends or serve with tasty dips to elevate your meal. Get creative and enjoy this delicious treat!](https://blissfulmeal.com/wp-content/uploads/2025/06/13ada63a-89f1-4fbe-8965-71133ae09ab3-300x300.webp)