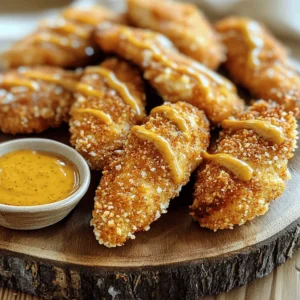
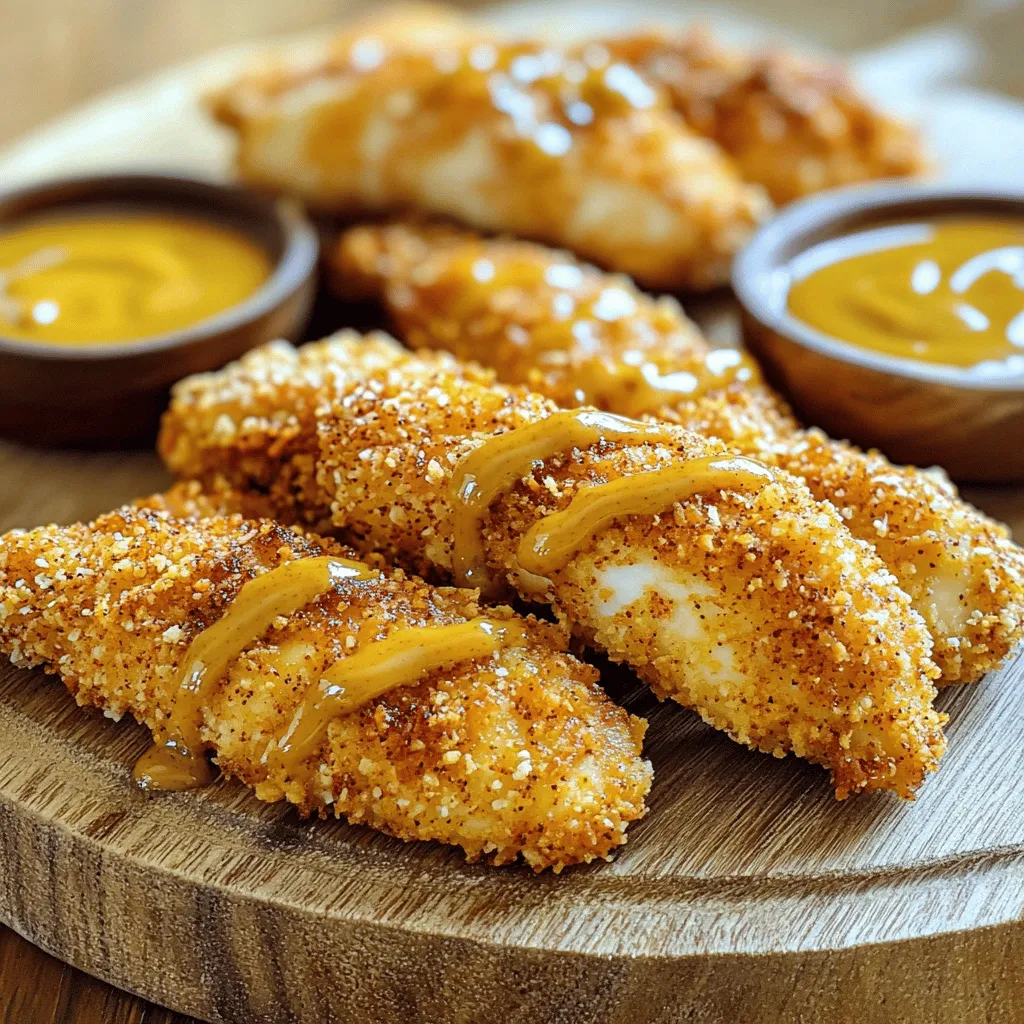
Savory Honey Mustard Chicken Tenders Easy and Crisp

- 1 pound chicken tenderloins - 1/3 cup honey - 1/3 cup Dijon mustard - 1 tablespoon apple cider vinegar - 1 teaspoon garlic powder - 1 teaspoon onion powder - 1/2 teaspoon smoked paprika - Salt and freshly ground black pepper to taste The main stars here are chicken tenderloins. They are juicy and cook quickly. Honey and Dijon mustard bring sweet and tangy flavors. Apple cider vinegar adds a nice kick. Garlic and onion powder enhance the taste without being too strong. Smoked paprika gives a warm, smoky flavor. Don’t forget to add salt and pepper to your liking! - 1 cup breadcrumbs (use panko for added crunch) - 1/2 cup all-purpose flour - 2 large eggs, beaten Next, we set up for coating. Breadcrumbs are key for that crispiness. I love using panko; it creates a great crunch. You also need flour to help the coating stick. Beaten eggs act as glue for the breadcrumbs. For an extra touch, consider garnishing your dish with fresh herbs or lemon wedges. You can find the full recipe to guide you through this process! Preheat the Oven and Prepare the Baking Sheet First, set your oven to 400°F (200°C). This heat makes the chicken crispy. Next, grab a baking sheet. Line it with parchment paper or spray it lightly with cooking spray. This step helps the tenders not stick. Make the Honey Mustard Sauce In a mixing bowl, combine the following: - 1/3 cup honey - 1/3 cup Dijon mustard - 1 tablespoon apple cider vinegar - 1 teaspoon garlic powder - 1 teaspoon onion powder - 1/2 teaspoon smoked paprika - Salt and freshly ground black pepper to taste Whisk until smooth. This sauce adds a sweet and tangy flavor. Reserve half for later. You will drizzle it on the chicken after baking. Setting Up the Dredging Station You need three shallow bowls. Fill one with flour, one with beaten eggs, and one with breadcrumbs. Get your chicken tenderloins ready. Coating Each Chicken Tender Take a chicken tender. Dip it in flour first. Shake off the extra flour. Next, dip it in the egg. Let any excess drip off. Finally, coat it with breadcrumbs. Press gently to stick the crumbs well. Repeat this for all chicken tenders. Baking Time and Temperature Place the coated chicken tenders on the prepared baking sheet. For extra flavor, drizzle a bit of the honey mustard sauce on top. Bake in the oven for 15-20 minutes. The chicken should turn golden brown and reach an internal temperature of 165°F (74°C). Presentation Tips and Serving Suggestions Once done, take the tenders out of the oven. Let them cool for a few minutes. Arrange them on a platter. For color, line the platter with fresh greens. Add a sprig of parsley for a pop of color. Reserved Sauce for Dipping Serve the reserved honey mustard sauce in a small bowl in the center of the platter. This sauce is perfect for dipping. Enjoy your homemade Honey Mustard Chicken Tenders! For the complete recipe, check the Full Recipe. - Using Panko Breadcrumbs Panko breadcrumbs make a big difference. They are larger and flakier than regular ones. This helps create a crispier texture. When you coat the chicken tenderloins, panko gives them a nice crunch. It’s like a tasty armor for your chicken! - Baking vs. Frying Baking your chicken is a healthier choice. It allows the chicken to cook evenly without added oil. Frying can give a great crunch too, but it adds fat. If you want a crispy finish, bake them until golden brown. The oven does the hard work while you relax! - Importance of Internal Temperature Always check the chicken’s internal temperature. You want it to reach 165°F (74°C). This ensures that your chicken is safe to eat and stays juicy. Use a meat thermometer for the best results. It takes away the guesswork! - Marinating Tips for Extra Flavor Marinate your chicken tenderloins for at least 30 minutes. This adds flavor and keeps them moist. Use the honey mustard sauce you made for marinating. The longer it sits, the better the taste! - Adding Herbs or Additional Spices Want to spice things up? Add herbs like thyme or rosemary. They pair well with honey mustard. You can also try adding a pinch of cayenne pepper for some heat. Small changes can make your dish stand out! - Ideas for Flavor Variations Think outside the box! You can swap honey for maple syrup for a different taste. Or, use spicy mustard instead of Dijon for a kick. These simple swaps will keep your honey mustard chicken tenders exciting. Explore and enjoy the process! For the full recipe, check out the detailed steps above. {{image_4}} For a twist on the classic dish, try making spicy honey mustard chicken tenders. To achieve this, simply mix in a tablespoon of hot sauce or paprika with your honey mustard sauce. This adds a delightful kick! You’ll love the balance of sweet and spicy flavors. Another fun option is honey mustard chicken tenders with a BBQ twist. Just add a bit of your favorite BBQ sauce to the honey mustard mix. This will give the tenders a smoky flavor that complements the sweetness of the honey. You can also make these tenders in an air fryer. Set the air fryer to 400°F (200°C). Cook the chicken tenders in a single layer for about 10-12 minutes. This method gives you a crispy outside with less oil. It's quick and easy! If you prefer grilling, you can do that too. Marinate the chicken tenders in the honey mustard sauce for at least 30 minutes. Preheat your grill and cook the tenders for 5-7 minutes on each side. This will give them a nice char and a smoky flavor. To make this dish healthier, you can skip the breadcrumbs. Instead, coat the chicken tenders with just the honey mustard sauce. This keeps them juicy and lowers the calorie count. Your kids will still enjoy the sweet and tangy taste! Another fun idea is using alternate coatings like crushed cornflakes. This gives a fun crunch and makes the dish more appealing to kids. Just crush the cornflakes and use them in place of breadcrumbs. It’s a simple change that kids love! After enjoying your honey mustard chicken tenders, store any leftovers in the fridge. Place them in an airtight container. They stay fresh for up to three days. If you want to keep them crispy, avoid stacking them. Give each tender space to breathe. This helps prevent sogginess. If you want to save them for later, freezing works well. Wrap the chicken tenders in plastic wrap. Then, put them in a freezer bag. This way, they won’t get freezer burn. They can last up to three months in the freezer. When you're ready to eat, just thaw them in the fridge overnight. When reheating, the oven is your best friend. Preheat your oven to 375°F (190°C). Place the chicken tenders on a baking sheet. Heat them for about 10-12 minutes. This keeps them crispy. The microwave works too, but it can make them soft. If you use a microwave, heat them for about 1-2 minutes on medium power. For crispy tenders, always use the oven. You can cover them lightly with foil to prevent drying out. Remove the foil for the last few minutes. This allows the outside to crisp up nicely. If you're using a microwave, place a cup of water inside. This can help keep the tenders from drying out. Leftover chicken tenders are great in new dishes. You can chop them up for salads. They also work well in wraps or sandwiches. Try adding them to a pasta dish with some veggies. The flavor adds a nice twist. You can use leftover chicken tenders for meal prep. Add them to bowls with rice and veggies. They make a quick lunch for work or school. Pack them in separate containers. This helps keep everything fresh and tasty. For a fun snack, slice them into strips and serve with the honey mustard sauce. It’s perfect for dipping! To get those chicken tenders crispy, focus on the coating. Use panko breadcrumbs for a nice crunch. Here are some tips: - Dry the Chicken: Pat the chicken tenders dry with paper towels. This helps the coating stick better. - Dredging: Dip each tender in flour, then egg, and finally panko. Press firmly to ensure a good coat. - Space Them Out: Place tenders in a single layer on the baking sheet. Crowding them makes them steam. - Use Oil: Lightly spray the tenders with cooking oil before baking. This adds to the crispiness. Yes, you can use chicken breasts. Just cut them into strips. Chicken breasts take longer to cook than tenderloins. You might need to bake them for 5-10 extra minutes. Watch for an internal temperature of 165°F (74°C). This keeps your chicken juicy and safe to eat. These tasty tenders pair well with many sides. Here are some ideas: - Fries or Sweet Potato Fries: A classic combo that everyone loves. - Salad: A fresh green salad adds crunch and color. - Veggies: Roasted or steamed veggies make a healthy side. - Mac and Cheese: For a comforting meal, serve with creamy mac and cheese. Leftover chicken tenders last about 3-4 days in the fridge. Store them in an airtight container. To keep them safe, make sure they cool down before sealing. If you want to keep them longer, freeze them. They can last up to 3 months in the freezer. Absolutely! You can prepare the honey mustard sauce ahead of time. Simply mix the ingredients and store it in the fridge for up to a week. This makes meal prep easy. Just remember to stir it before serving. You can also use the sauce as a dip for veggies or sandwiches. In this post, we explored how to make delicious honey mustard chicken tenders. We covered the main ingredients, prep steps, and baking tips. You learned valuable tricks for crispiness and flavor enhancements. We also shared variations and storage tips. You now have everything you need to impress at your next meal. Enjoy cooking and have fun experimenting with this tasty dish!

WANT TO SAVE THIS RECIPE?

Are you ready to savor the best Honey Mustard Chicken Tenders? In this easy and crisp recipe, you’ll learn how to turn simple ingredients into a tasty meal that delights everyone. I will guide you through each step, from prepping the chicken to creating that irresistible honey mustard sauce. These tenders are perfect for dinner or as a fun snack. Let’s dive in and make something delicious together!

Ingredients

Main Ingredients for Honey Mustard Chicken Tenders

– 1 pound chicken tenderloins

– 1/3 cup honey

– 1/3 cup Dijon mustard

– 1 tablespoon apple cider vinegar

– 1 teaspoon garlic powder

– 1 teaspoon onion powder

– 1/2 teaspoon smoked paprika

– Salt and freshly ground black pepper to taste

The main stars here are chicken tenderloins. They are juicy and cook quickly. Honey and Dijon mustard bring sweet and tangy flavors. Apple cider vinegar adds a nice kick. Garlic and onion powder enhance the taste without being too strong. Smoked paprika gives a warm, smoky flavor. Don’t forget to add salt and pepper to your liking!

Additional Ingredients for Serving

– 1 cup breadcrumbs (use panko for added crunch)

– 1/2 cup all-purpose flour

– 2 large eggs, beaten

Next, we set up for coating. Breadcrumbs are key for that crispiness. I love using panko; it creates a great crunch. You also need flour to help the coating stick. Beaten eggs act as glue for the breadcrumbs. For an extra touch, consider garnishing your dish with fresh herbs or lemon wedges. You can find the full recipe to guide you through this process!

Step-by-Step Instructions

Prepping the Chicken Tenders

Preheat the Oven and Prepare the Baking Sheet

First, set your oven to 400°F (200°C). This heat makes the chicken crispy. Next, grab a baking sheet. Line it with parchment paper or spray it lightly with cooking spray. This step helps the tenders not stick.

Make the Honey Mustard Sauce

In a mixing bowl, combine the following:

– 1/3 cup honey

– 1/3 cup Dijon mustard

– 1 tablespoon apple cider vinegar

– 1 teaspoon garlic powder

– 1 teaspoon onion powder

– 1/2 teaspoon smoked paprika

– Salt and freshly ground black pepper to taste

Whisk until smooth. This sauce adds a sweet and tangy flavor. Reserve half for later. You will drizzle it on the chicken after baking.

Dredging the Chicken

Setting Up the Dredging Station

You need three shallow bowls. Fill one with flour, one with beaten eggs, and one with breadcrumbs. Get your chicken tenderloins ready.

Coating Each Chicken Tender

Take a chicken tender. Dip it in flour first. Shake off the extra flour. Next, dip it in the egg. Let any excess drip off. Finally, coat it with breadcrumbs. Press gently to stick the crumbs well. Repeat this for all chicken tenders.

Baking and Serving the Tenders

Baking Time and Temperature

Place the coated chicken tenders on the prepared baking sheet. For extra flavor, drizzle a bit of the honey mustard sauce on top. Bake in the oven for 15-20 minutes. The chicken should turn golden brown and reach an internal temperature of 165°F (74°C).

Presentation Tips and Serving Suggestions

Once done, take the tenders out of the oven. Let them cool for a few minutes. Arrange them on a platter. For color, line the platter with fresh greens. Add a sprig of parsley for a pop of color.

Reserved Sauce for Dipping

Serve the reserved honey mustard sauce in a small bowl in the center of the platter. This sauce is perfect for dipping. Enjoy your homemade Honey Mustard Chicken Tenders! For the complete recipe, check the Full Recipe.

Tips & Tricks

Perfecting the Crunch

Using Panko Breadcrumbs

Panko breadcrumbs make a big difference. They are larger and flakier than regular ones. This helps create a crispier texture. When you coat the chicken tenderloins, panko gives them a nice crunch. It’s like a tasty armor for your chicken!

Baking vs. Frying

Baking your chicken is a healthier choice. It allows the chicken to cook evenly without added oil. Frying can give a great crunch too, but it adds fat. If you want a crispy finish, bake them until golden brown. The oven does the hard work while you relax!

Keeping the Chicken Juicy

Importance of Internal Temperature

Always check the chicken’s internal temperature. You want it to reach 165°F (74°C). This ensures that your chicken is safe to eat and stays juicy. Use a meat thermometer for the best results. It takes away the guesswork!

Marinating Tips for Extra Flavor

Marinate your chicken tenderloins for at least 30 minutes. This adds flavor and keeps them moist. Use the honey mustard sauce you made for marinating. The longer it sits, the better the taste!

Enhancing the Flavor Profile

Adding Herbs or Additional Spices

Want to spice things up? Add herbs like thyme or rosemary. They pair well with honey mustard. You can also try adding a pinch of cayenne pepper for some heat. Small changes can make your dish stand out!

Ideas for Flavor Variations

Think outside the box! You can swap honey for maple syrup for a different taste. Or, use spicy mustard instead of Dijon for a kick. These simple swaps will keep your honey mustard chicken tenders exciting. Explore and enjoy the process!

For the full recipe, check out the detailed steps above.

Variations

Different Flavor Combinations

For a twist on the classic dish, try making spicy honey mustard chicken tenders. To achieve this, simply mix in a tablespoon of hot sauce or paprika with your honey mustard sauce. This adds a delightful kick! You’ll love the balance of sweet and spicy flavors.

Another fun option is honey mustard chicken tenders with a BBQ twist. Just add a bit of your favorite BBQ sauce to the honey mustard mix. This will give the tenders a smoky flavor that complements the sweetness of the honey.

Alternative Cooking Methods

You can also make these tenders in an air fryer. Set the air fryer to 400°F (200°C). Cook the chicken tenders in a single layer for about 10-12 minutes. This method gives you a crispy outside with less oil. It’s quick and easy!

If you prefer grilling, you can do that too. Marinate the chicken tenders in the honey mustard sauce for at least 30 minutes. Preheat your grill and cook the tenders for 5-7 minutes on each side. This will give them a nice char and a smoky flavor.

Kid-Friendly Versions

To make this dish healthier, you can skip the breadcrumbs. Instead, coat the chicken tenders with just the honey mustard sauce. This keeps them juicy and lowers the calorie count. Your kids will still enjoy the sweet and tangy taste!

Another fun idea is using alternate coatings like crushed cornflakes. This gives a fun crunch and makes the dish more appealing to kids. Just crush the cornflakes and use them in place of breadcrumbs. It’s a simple change that kids love!

Storage Info

Storing Leftover Chicken Tenders

Refrigeration Tips

After enjoying your honey mustard chicken tenders, store any leftovers in the fridge. Place them in an airtight container. They stay fresh for up to three days. If you want to keep them crispy, avoid stacking them. Give each tender space to breathe. This helps prevent sogginess.

Freezing for Longer Storage

If you want to save them for later, freezing works well. Wrap the chicken tenders in plastic wrap. Then, put them in a freezer bag. This way, they won’t get freezer burn. They can last up to three months in the freezer. When you’re ready to eat, just thaw them in the fridge overnight.

Reheating Instructions

Oven vs. Microwave Methods

When reheating, the oven is your best friend. Preheat your oven to 375°F (190°C). Place the chicken tenders on a baking sheet. Heat them for about 10-12 minutes. This keeps them crispy. The microwave works too, but it can make them soft. If you use a microwave, heat them for about 1-2 minutes on medium power.

Keeping the Tenders Crispy When Reheating

For crispy tenders, always use the oven. You can cover them lightly with foil to prevent drying out. Remove the foil for the last few minutes. This allows the outside to crisp up nicely. If you’re using a microwave, place a cup of water inside. This can help keep the tenders from drying out.

Using Leftovers

Recipes for Incorporating Leftover Chicken Tenders

Leftover chicken tenders are great in new dishes. You can chop them up for salads. They also work well in wraps or sandwiches. Try adding them to a pasta dish with some veggies. The flavor adds a nice twist.

Meal Prep Ideas

You can use leftover chicken tenders for meal prep. Add them to bowls with rice and veggies. They make a quick lunch for work or school. Pack them in separate containers. This helps keep everything fresh and tasty. For a fun snack, slice them into strips and serve with the honey mustard sauce. It’s perfect for dipping!

FAQs

How to make Honey Mustard Chicken Tenders crispy?

To get those chicken tenders crispy, focus on the coating. Use panko breadcrumbs for a nice crunch. Here are some tips:

Dry the Chicken: Pat the chicken tenders dry with paper towels. This helps the coating stick better.

Dredging: Dip each tender in flour, then egg, and finally panko. Press firmly to ensure a good coat.

Space Them Out: Place tenders in a single layer on the baking sheet. Crowding them makes them steam.

Use Oil: Lightly spray the tenders with cooking oil before baking. This adds to the crispiness.

Can I use chicken breasts instead of tenders?

Yes, you can use chicken breasts. Just cut them into strips. Chicken breasts take longer to cook than tenderloins. You might need to bake them for 5-10 extra minutes. Watch for an internal temperature of 165°F (74°C). This keeps your chicken juicy and safe to eat.

What to serve with Honey Mustard Chicken Tenders?

These tasty tenders pair well with many sides. Here are some ideas:

Fries or Sweet Potato Fries: A classic combo that everyone loves.

Salad: A fresh green salad adds crunch and color.

Veggies: Roasted or steamed veggies make a healthy side.

Mac and Cheese: For a comforting meal, serve with creamy mac and cheese.

How long will leftovers last in the fridge?

Leftover chicken tenders last about 3-4 days in the fridge. Store them in an airtight container. To keep them safe, make sure they cool down before sealing. If you want to keep them longer, freeze them. They can last up to 3 months in the freezer.

Can I make the sauce ahead of time?

Absolutely! You can prepare the honey mustard sauce ahead of time. Simply mix the ingredients and store it in the fridge for up to a week. This makes meal prep easy. Just remember to stir it before serving. You can also use the sauce as a dip for veggies or sandwiches.

In this post, we explored how to make delicious honey mustard chicken tenders. We covered the main ingredients, prep steps, and baking tips. You learned valuable tricks for crispiness and flavor enhancements. We also shared variations and storage tips. You now have everything you need to impress at your next meal. Enjoy cooking and have fun experimenting with this tasty dish!

- 1 pound chicken tenderloins - 1/3 cup honey - 1/3 cup Dijon mustard - 1 tablespoon apple cider vinegar - 1 teaspoon garlic powder - 1 teaspoon onion powder - 1/2 teaspoon smoked paprika - Salt and freshly ground black pepper to taste The main stars here are chicken tenderloins. They are juicy and cook quickly. Honey and Dijon mustard bring sweet and tangy flavors. Apple cider vinegar adds a nice kick. Garlic and onion powder enhance the taste without being too strong. Smoked paprika gives a warm, smoky flavor. Don’t forget to add salt and pepper to your liking! - 1 cup breadcrumbs (use panko for added crunch) - 1/2 cup all-purpose flour - 2 large eggs, beaten Next, we set up for coating. Breadcrumbs are key for that crispiness. I love using panko; it creates a great crunch. You also need flour to help the coating stick. Beaten eggs act as glue for the breadcrumbs. For an extra touch, consider garnishing your dish with fresh herbs or lemon wedges. You can find the full recipe to guide you through this process! Preheat the Oven and Prepare the Baking Sheet First, set your oven to 400°F (200°C). This heat makes the chicken crispy. Next, grab a baking sheet. Line it with parchment paper or spray it lightly with cooking spray. This step helps the tenders not stick. Make the Honey Mustard Sauce In a mixing bowl, combine the following: - 1/3 cup honey - 1/3 cup Dijon mustard - 1 tablespoon apple cider vinegar - 1 teaspoon garlic powder - 1 teaspoon onion powder - 1/2 teaspoon smoked paprika - Salt and freshly ground black pepper to taste Whisk until smooth. This sauce adds a sweet and tangy flavor. Reserve half for later. You will drizzle it on the chicken after baking. Setting Up the Dredging Station You need three shallow bowls. Fill one with flour, one with beaten eggs, and one with breadcrumbs. Get your chicken tenderloins ready. Coating Each Chicken Tender Take a chicken tender. Dip it in flour first. Shake off the extra flour. Next, dip it in the egg. Let any excess drip off. Finally, coat it with breadcrumbs. Press gently to stick the crumbs well. Repeat this for all chicken tenders. Baking Time and Temperature Place the coated chicken tenders on the prepared baking sheet. For extra flavor, drizzle a bit of the honey mustard sauce on top. Bake in the oven for 15-20 minutes. The chicken should turn golden brown and reach an internal temperature of 165°F (74°C). Presentation Tips and Serving Suggestions Once done, take the tenders out of the oven. Let them cool for a few minutes. Arrange them on a platter. For color, line the platter with fresh greens. Add a sprig of parsley for a pop of color. Reserved Sauce for Dipping Serve the reserved honey mustard sauce in a small bowl in the center of the platter. This sauce is perfect for dipping. Enjoy your homemade Honey Mustard Chicken Tenders! For the complete recipe, check the Full Recipe. - Using Panko Breadcrumbs Panko breadcrumbs make a big difference. They are larger and flakier than regular ones. This helps create a crispier texture. When you coat the chicken tenderloins, panko gives them a nice crunch. It’s like a tasty armor for your chicken! - Baking vs. Frying Baking your chicken is a healthier choice. It allows the chicken to cook evenly without added oil. Frying can give a great crunch too, but it adds fat. If you want a crispy finish, bake them until golden brown. The oven does the hard work while you relax! - Importance of Internal Temperature Always check the chicken’s internal temperature. You want it to reach 165°F (74°C). This ensures that your chicken is safe to eat and stays juicy. Use a meat thermometer for the best results. It takes away the guesswork! - Marinating Tips for Extra Flavor Marinate your chicken tenderloins for at least 30 minutes. This adds flavor and keeps them moist. Use the honey mustard sauce you made for marinating. The longer it sits, the better the taste! - Adding Herbs or Additional Spices Want to spice things up? Add herbs like thyme or rosemary. They pair well with honey mustard. You can also try adding a pinch of cayenne pepper for some heat. Small changes can make your dish stand out! - Ideas for Flavor Variations Think outside the box! You can swap honey for maple syrup for a different taste. Or, use spicy mustard instead of Dijon for a kick. These simple swaps will keep your honey mustard chicken tenders exciting. Explore and enjoy the process! For the full recipe, check out the detailed steps above. {{image_4}} For a twist on the classic dish, try making spicy honey mustard chicken tenders. To achieve this, simply mix in a tablespoon of hot sauce or paprika with your honey mustard sauce. This adds a delightful kick! You’ll love the balance of sweet and spicy flavors. Another fun option is honey mustard chicken tenders with a BBQ twist. Just add a bit of your favorite BBQ sauce to the honey mustard mix. This will give the tenders a smoky flavor that complements the sweetness of the honey. You can also make these tenders in an air fryer. Set the air fryer to 400°F (200°C). Cook the chicken tenders in a single layer for about 10-12 minutes. This method gives you a crispy outside with less oil. It's quick and easy! If you prefer grilling, you can do that too. Marinate the chicken tenders in the honey mustard sauce for at least 30 minutes. Preheat your grill and cook the tenders for 5-7 minutes on each side. This will give them a nice char and a smoky flavor. To make this dish healthier, you can skip the breadcrumbs. Instead, coat the chicken tenders with just the honey mustard sauce. This keeps them juicy and lowers the calorie count. Your kids will still enjoy the sweet and tangy taste! Another fun idea is using alternate coatings like crushed cornflakes. This gives a fun crunch and makes the dish more appealing to kids. Just crush the cornflakes and use them in place of breadcrumbs. It’s a simple change that kids love! After enjoying your honey mustard chicken tenders, store any leftovers in the fridge. Place them in an airtight container. They stay fresh for up to three days. If you want to keep them crispy, avoid stacking them. Give each tender space to breathe. This helps prevent sogginess. If you want to save them for later, freezing works well. Wrap the chicken tenders in plastic wrap. Then, put them in a freezer bag. This way, they won’t get freezer burn. They can last up to three months in the freezer. When you're ready to eat, just thaw them in the fridge overnight. When reheating, the oven is your best friend. Preheat your oven to 375°F (190°C). Place the chicken tenders on a baking sheet. Heat them for about 10-12 minutes. This keeps them crispy. The microwave works too, but it can make them soft. If you use a microwave, heat them for about 1-2 minutes on medium power. For crispy tenders, always use the oven. You can cover them lightly with foil to prevent drying out. Remove the foil for the last few minutes. This allows the outside to crisp up nicely. If you're using a microwave, place a cup of water inside. This can help keep the tenders from drying out. Leftover chicken tenders are great in new dishes. You can chop them up for salads. They also work well in wraps or sandwiches. Try adding them to a pasta dish with some veggies. The flavor adds a nice twist. You can use leftover chicken tenders for meal prep. Add them to bowls with rice and veggies. They make a quick lunch for work or school. Pack them in separate containers. This helps keep everything fresh and tasty. For a fun snack, slice them into strips and serve with the honey mustard sauce. It’s perfect for dipping! To get those chicken tenders crispy, focus on the coating. Use panko breadcrumbs for a nice crunch. Here are some tips: - Dry the Chicken: Pat the chicken tenders dry with paper towels. This helps the coating stick better. - Dredging: Dip each tender in flour, then egg, and finally panko. Press firmly to ensure a good coat. - Space Them Out: Place tenders in a single layer on the baking sheet. Crowding them makes them steam. - Use Oil: Lightly spray the tenders with cooking oil before baking. This adds to the crispiness. Yes, you can use chicken breasts. Just cut them into strips. Chicken breasts take longer to cook than tenderloins. You might need to bake them for 5-10 extra minutes. Watch for an internal temperature of 165°F (74°C). This keeps your chicken juicy and safe to eat. These tasty tenders pair well with many sides. Here are some ideas: - Fries or Sweet Potato Fries: A classic combo that everyone loves. - Salad: A fresh green salad adds crunch and color. - Veggies: Roasted or steamed veggies make a healthy side. - Mac and Cheese: For a comforting meal, serve with creamy mac and cheese. Leftover chicken tenders last about 3-4 days in the fridge. Store them in an airtight container. To keep them safe, make sure they cool down before sealing. If you want to keep them longer, freeze them. They can last up to 3 months in the freezer. Absolutely! You can prepare the honey mustard sauce ahead of time. Simply mix the ingredients and store it in the fridge for up to a week. This makes meal prep easy. Just remember to stir it before serving. You can also use the sauce as a dip for veggies or sandwiches. In this post, we explored how to make delicious honey mustard chicken tenders. We covered the main ingredients, prep steps, and baking tips. You learned valuable tricks for crispiness and flavor enhancements. We also shared variations and storage tips. You now have everything you need to impress at your next meal. Enjoy cooking and have fun experimenting with this tasty dish!

Honey Mustard Chicken Tenders

Elevate your dinner game with these delicious Honey Mustard Chicken Tenders! Perfectly crispy on the outside and juicy on the inside, this easy recipe comes together in just 35 minutes. Using simple ingredients like honey, Dijon mustard, and spices, you'll create a flavorful sauce that perfectly complements these tender bites. Click through to discover how to make this crowd-pleasing dish that everyone will love!

Ingredients
  

1 pound chicken tenderloins

1/3 cup honey

1/3 cup Dijon mustard

1 tablespoon apple cider vinegar

1 teaspoon garlic powder

1 teaspoon onion powder

1/2 teaspoon smoked paprika

Salt and freshly ground black pepper to taste

1 cup breadcrumbs (use panko for added crunch)

1/2 cup all-purpose flour

2 large eggs, beaten

Instructions
 

Prep Your Ingredients: Begin by preheating your oven to 400°F (200°C). Line a baking sheet with parchment paper or lightly grease it with cooking spray to prevent sticking.

    Make the Honey Mustard Sauce: In a mixing bowl, combine the honey, Dijon mustard, apple cider vinegar, garlic powder, onion powder, smoked paprika, and a pinch of salt and pepper. Whisk the mixture until smooth and well blended. Reserve half of this honey mustard sauce in a separate bowl for drizzling and serving later.

      Coat the Chicken:

        - Set up a dredging station with three shallow bowls: one for flour, one for beaten eggs, and one for breadcrumbs.

          - Take each chicken tenderloin and dip it in the flour first, shaking off any excess. Next, immerse it in the beaten eggs, allowing any excess to drip off, and finally, coat it with the breadcrumbs. Press gently to ensure the breadcrumbs adhere well to the chicken.

            Bake the Tenders: Arrange the coated chicken tenders in a single layer on the prepared baking sheet. For an extra layer of flavor, drizzle a little of the honey mustard sauce over the tops of the tenders before baking.

              Cooking Time: Place the baking sheet in the preheated oven and bake the chicken tenders for 15-20 minutes, or until they are golden brown and the internal temperature reaches 165°F (74°C). The tenders should be crispy on the outside and juicy on the inside.

                Serve: Once cooked, remove the chicken tenders from the oven and allow them to cool for a couple of minutes. Serve them warm, accompanied by the reserved honey mustard sauce for dipping.

                  Prep Time: 15 minutes | Total Time: 35 minutes | Servings: 4

                    - Presentation Tips: Arrange the chicken tenders on a platter lined with fresh greens for a pop of color, and garnish with a sprig of parsley for an elegant touch. Serve the dipping sauce in a small bowl placed in the center of the platter.

                      WANT TO SAVE THIS RECIPE?

                      Related Posts