
Cheesy Zucchini Roll-Ups Irresistible and Simple Recipe
![For Cheesy Zucchini Roll-Ups, you need a few simple items. Here’s what you’ll need: - 2 medium zucchinis, sliced lengthwise into thin strips (about ¼ inch thick) - 1 cup ricotta cheese - 1 cup shredded mozzarella cheese - ½ cup grated Parmesan cheese - 1 large egg, beaten - 2 cloves garlic, minced finely - 1 teaspoon dried oregano - Salt and freshly ground black pepper, to taste These ingredients work well together. Zucchini gives a nice base. The cheeses offer creaminess and flavor. Garlic and oregano add a tasty touch. You’ll want a good sauce to dip your roll-ups. Marinara sauce is perfect for this. It adds a rich, tangy flavor that pairs well with the cheesy goodness. For a fresh touch, you can also add some garnishes. Fresh basil leaves look great and add a nice flavor boost. Just sprinkle them on top before serving. This combination makes your Cheesy Zucchini Roll-Ups even more enjoyable. For the complete instructions on how to make this dish, check the Full Recipe. 1. Preheating the oven: Start by preheating your oven to 400°F (200°C). This ensures the oven is hot enough to cook the roll-ups evenly. 2. Preparing zucchini: Take your zucchini and slice it lengthwise into thin strips, about ¼ inch thick. Place the slices on a clean kitchen towel or paper towels. Lightly sprinkle them with salt and let them sit for about 10 minutes. This step draws out excess moisture. After 10 minutes, pat the slices dry with another towel to remove the salt and moisture. 1. Combining cheese ingredients: In a mixing bowl, add 1 cup of ricotta cheese, 1 cup of shredded mozzarella cheese, ½ cup of grated Parmesan cheese, and 1 large beaten egg. Then, add 2 cloves of finely minced garlic, 1 teaspoon of dried oregano, and a pinch of salt and pepper to taste. Mix everything together until you have a smooth and well-blended filling. 1. Rolling technique: Take one zucchini slice and place a generous spoonful of the cheese mixture at one end. Carefully roll the zucchini slice from the filled end, making sure to keep the filling inside. Roll it tightly but gently to secure the filling. 1. Greasing the baking dish: Lightly grease a baking dish with olive oil or cooking spray. Arrange the zucchini roll-ups seam side down in the dish. They can be close together, but don’t overcrowd them. 2. Baking time and temperature: Place the dish in the preheated oven and bake for 15-20 minutes. Look for the cheese to be bubbly and the zucchini to become tender. The edges should have a slight golden hue. Enjoy your Cheesy Zucchini Roll-Ups with marinara sauce for dipping! For the complete recipe, refer to the [Full Recipe]. To make the best cheesy zucchini roll-ups, start with the zucchinis. Excess moisture can make them soggy. To prevent this, slice the zucchinis thinly, about ¼ inch thick. After slicing, sprinkle salt on them and let them rest for about 10 minutes. The salt pulls out water. After 10 minutes, pat them dry with a towel. This step helps keep your roll-ups firm. Next, focus on the cheese filling. Mix your ricotta, mozzarella, and Parmesan in a bowl. Add a beaten egg, minced garlic, and oregano. Season with salt and pepper. Blend until smooth. A well-mixed filling holds together better while baking. You want creamy goodness in every bite. These roll-ups shine when paired with marinara sauce. The sauce adds a rich, tangy flavor that complements the cheese. You can also try other dips. A creamy ranch or spicy aioli can add a fun twist. Serve the roll-ups warm for a delightful treat. Presentation matters! Garnish your roll-ups with fresh basil leaves. This not only adds color but also fresh flavor. Arrange the roll-ups on a nice platter. Drizzle some marinara sauce around them. It creates an inviting look. For a fun touch, use small bowls for the dips. This makes your dish pop and looks great on any table. For the full recipe, check out the steps above! {{image_4}} You can mix up the cheese in these roll-ups. If you love goat cheese, try it instead of ricotta. It adds a tangy flavor. Cheddar also works well for a sharp bite. You can blend different cheeses, too. This creates a unique taste in every bite. Feel free to experiment with cheese types. Each choice brings a new twist to the dish. Want to boost the nutrition? Think about adding more veggies. Spinach is a great option. It wilts nicely when baked and adds a pop of green. Bell peppers can add sweetness and crunch. Just chop them fine and mix them into the cheese filling. You can also try mushrooms or carrots. The more veggies, the better. They make the roll-ups colorful and tasty. To make your roll-ups even tastier, add some spices. Red pepper flakes give a nice kick if you enjoy heat. Thyme brings an earthy taste that pairs well with zucchini. You can also use fresh herbs like parsley or basil. These add freshness and bright flavor. A sprinkle of lemon zest can brighten up the dish, too. Enjoy the process of making these roll-ups your own. For the full recipe, check out the link. To keep your cheesy zucchini roll-ups fresh, place them in an airtight container. This helps to seal in moisture and flavor. You can store them in the fridge for up to three days. If you want to keep them longer, freezing is a great option. Just make sure they cool down before you pack them away. When it comes to reheating, the oven is the best choice. Preheat it to 350°F (175°C). Place the roll-ups on a baking sheet and cover them with foil. This keeps them moist. Bake for about 15 minutes. If you are short on time, the microwave works too. Just heat them on a plate for 1-2 minutes. However, this may make them a bit soggy. To freeze the roll-ups, assemble them as you normally would. After rolling, place them in a single layer on a baking sheet. Freeze them for about an hour until solid. Then, transfer them to a freezer-safe bag or container. Label it with the date. They can stay frozen for up to three months. When you’re ready to enjoy, bake them straight from the freezer without thawing. Just add a few extra minutes to the baking time. For the full recipe, check the earlier section. If you don't have ricotta cheese, you can use cottage cheese. It offers a similar texture but is slightly more watery. You can also try cream cheese for a richer flavor, but it will change the taste a bit. Another option is goat cheese, which adds a tangy twist. Just remember, each cheese will slightly alter the texture and taste of your roll-ups. Yes, you can prepare these roll-ups ahead of time. Just follow the recipe until you assemble the roll-ups. Then, store them in an airtight container in the fridge for up to 24 hours. When you're ready to bake, you can pop them in the oven. This saves time and makes dinner easy on busy days. You’ll know the roll-ups are done when the cheese is bubbly and golden. Look for a slight browning on the edges of the zucchini, which means they are tender. If you see cheese oozing out, that's a good sign too! Trust your eyes; a perfect roll-up should look inviting and delicious. Yes, Cheesy Zucchini Roll-Ups are gluten-free. The main ingredients are zucchini and cheese, which do not contain gluten. Just make sure your marinara sauce is also gluten-free if you are sensitive. This dish is a great option for anyone avoiding gluten while still enjoying a tasty meal. In this post, we explored the delicious world of Cheesy Zucchini Roll-Ups. We covered key ingredients like zucchini and cheese, as well as helpful tips for preparation and baking. You can mix and match cheeses or add veggies for fun twists. Storing and reheating leftovers is simple too. Remember, these roll-ups are not just tasty; they’re also easy to customize. Enjoy making them your own, and impress your family and friends with a delightful dish that is sure to please!](https://blissfulmeal.com/wp-content/uploads/2025/07/aaa397a0-723d-455b-94ae-2e4eca5c2787.webp)
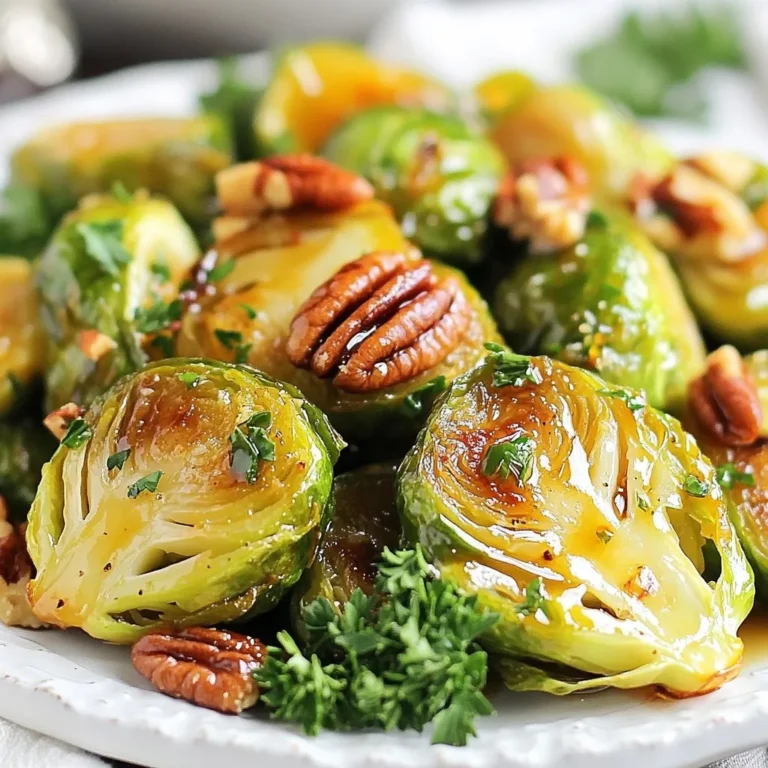
Looking for a tasty and easy snack? Cheesy Zucchini Roll-Ups are your answer! With creamy cheese and fresh zucchini, these roll-ups are a delight. You won’t believe how simple they are to make. Whether you’re preparing for a party or just want a quick bite, these cheesy treats are sure to impress. Let’s roll up our sleeves and dive into this irresistible recipe!
Ingredients
Main Ingredients
For Cheesy Zucchini Roll-Ups, you need a few simple items. Here’s what you’ll need:
– 2 medium zucchinis, sliced lengthwise into thin strips (about ¼ inch thick)
– 1 cup ricotta cheese
– 1 cup shredded mozzarella cheese
– ½ cup grated Parmesan cheese
– 1 large egg, beaten
– 2 cloves garlic, minced finely
– 1 teaspoon dried oregano
– Salt and freshly ground black pepper, to taste
These ingredients work well together. Zucchini gives a nice base. The cheeses offer creaminess and flavor. Garlic and oregano add a tasty touch.
Dipping Sauce
You’ll want a good sauce to dip your roll-ups. Marinara sauce is perfect for this. It adds a rich, tangy flavor that pairs well with the cheesy goodness.
For a fresh touch, you can also add some garnishes. Fresh basil leaves look great and add a nice flavor boost. Just sprinkle them on top before serving.
This combination makes your Cheesy Zucchini Roll-Ups even more enjoyable.
Step-by-Step Instructions
Preparation Steps
1. Preheating the oven: Start by preheating your oven to 400°F (200°C). This ensures the oven is hot enough to cook the roll-ups evenly.
2. Preparing zucchini: Take your zucchini and slice it lengthwise into thin strips, about ¼ inch thick. Place the slices on a clean kitchen towel or paper towels. Lightly sprinkle them with salt and let them sit for about 10 minutes. This step draws out excess moisture. After 10 minutes, pat the slices dry with another towel to remove the salt and moisture.
Making the Filling
1. Combining cheese ingredients: In a mixing bowl, add 1 cup of ricotta cheese, 1 cup of shredded mozzarella cheese, ½ cup of grated Parmesan cheese, and 1 large beaten egg. Then, add 2 cloves of finely minced garlic, 1 teaspoon of dried oregano, and a pinch of salt and pepper to taste. Mix everything together until you have a smooth and well-blended filling.
Assembling the Roll-Ups
1. Rolling technique: Take one zucchini slice and place a generous spoonful of the cheese mixture at one end. Carefully roll the zucchini slice from the filled end, making sure to keep the filling inside. Roll it tightly but gently to secure the filling.
Baking Instructions
1. Greasing the baking dish: Lightly grease a baking dish with olive oil or cooking spray. Arrange the zucchini roll-ups seam side down in the dish. They can be close together, but don’t overcrowd them.
2. Baking time and temperature: Place the dish in the preheated oven and bake for 15-20 minutes. Look for the cheese to be bubbly and the zucchini to become tender. The edges should have a slight golden hue. Enjoy your Cheesy Zucchini Roll-Ups with marinara sauce for dipping!
Tips & Tricks
Perfecting the Roll-Ups
To make the best cheesy zucchini roll-ups, start with the zucchinis. Excess moisture can make them soggy. To prevent this, slice the zucchinis thinly, about ¼ inch thick. After slicing, sprinkle salt on them and let them rest for about 10 minutes. The salt pulls out water. After 10 minutes, pat them dry with a towel. This step helps keep your roll-ups firm.
Next, focus on the cheese filling. Mix your ricotta, mozzarella, and Parmesan in a bowl. Add a beaten egg, minced garlic, and oregano. Season with salt and pepper. Blend until smooth. A well-mixed filling holds together better while baking. You want creamy goodness in every bite.
Serving Suggestions
These roll-ups shine when paired with marinara sauce. The sauce adds a rich, tangy flavor that complements the cheese. You can also try other dips. A creamy ranch or spicy aioli can add a fun twist. Serve the roll-ups warm for a delightful treat.
Presentation Ideas
Presentation matters! Garnish your roll-ups with fresh basil leaves. This not only adds color but also fresh flavor. Arrange the roll-ups on a nice platter. Drizzle some marinara sauce around them. It creates an inviting look. For a fun touch, use small bowls for the dips. This makes your dish pop and looks great on any table.

Variations
Cheese Variations
You can mix up the cheese in these roll-ups. If you love goat cheese, try it instead of ricotta. It adds a tangy flavor. Cheddar also works well for a sharp bite. You can blend different cheeses, too. This creates a unique taste in every bite. Feel free to experiment with cheese types. Each choice brings a new twist to the dish.
Vegetable Add-ins
Want to boost the nutrition? Think about adding more veggies. Spinach is a great option. It wilts nicely when baked and adds a pop of green. Bell peppers can add sweetness and crunch. Just chop them fine and mix them into the cheese filling. You can also try mushrooms or carrots. The more veggies, the better. They make the roll-ups colorful and tasty.
Flavor Enhancements
To make your roll-ups even tastier, add some spices. Red pepper flakes give a nice kick if you enjoy heat. Thyme brings an earthy taste that pairs well with zucchini. You can also use fresh herbs like parsley or basil. These add freshness and bright flavor. A sprinkle of lemon zest can brighten up the dish, too. Enjoy the process of making these roll-ups your own.
Storage Info
Storing Leftovers
To keep your cheesy zucchini roll-ups fresh, place them in an airtight container. This helps to seal in moisture and flavor. You can store them in the fridge for up to three days. If you want to keep them longer, freezing is a great option. Just make sure they cool down before you pack them away.
Reheating Techniques
When it comes to reheating, the oven is the best choice. Preheat it to 350°F (175°C). Place the roll-ups on a baking sheet and cover them with foil. This keeps them moist. Bake for about 15 minutes. If you are short on time, the microwave works too. Just heat them on a plate for 1-2 minutes. However, this may make them a bit soggy.
Freezing Instructions
To freeze the roll-ups, assemble them as you normally would. After rolling, place them in a single layer on a baking sheet. Freeze them for about an hour until solid. Then, transfer them to a freezer-safe bag or container. Label it with the date. They can stay frozen for up to three months. When you’re ready to enjoy, bake them straight from the freezer without thawing. Just add a few extra minutes to the baking time.
FAQs
What can I substitute for ricotta cheese?
If you don’t have ricotta cheese, you can use cottage cheese. It offers a similar texture but is slightly more watery. You can also try cream cheese for a richer flavor, but it will change the taste a bit. Another option is goat cheese, which adds a tangy twist. Just remember, each cheese will slightly alter the texture and taste of your roll-ups.
Can I make Cheesy Zucchini Roll-Ups ahead of time?
Yes, you can prepare these roll-ups ahead of time. Just follow the recipe until you assemble the roll-ups. Then, store them in an airtight container in the fridge for up to 24 hours. When you’re ready to bake, you can pop them in the oven. This saves time and makes dinner easy on busy days.
How do I know when the roll-ups are done?
You’ll know the roll-ups are done when the cheese is bubbly and golden. Look for a slight browning on the edges of the zucchini, which means they are tender. If you see cheese oozing out, that’s a good sign too! Trust your eyes; a perfect roll-up should look inviting and delicious.
Are Cheesy Zucchini Roll-Ups gluten-free?
Yes, Cheesy Zucchini Roll-Ups are gluten-free. The main ingredients are zucchini and cheese, which do not contain gluten. Just make sure your marinara sauce is also gluten-free if you are sensitive. This dish is a great option for anyone avoiding gluten while still enjoying a tasty meal.
In this post, we explored the delicious world of Cheesy Zucchini Roll-Ups. We covered key ingredients like zucchini and cheese, as well as helpful tips for preparation and baking. You can mix and match cheeses or add veggies for fun twists. Storing and reheating leftovers is simple too.
Remember, these roll-ups are not just tasty; they’re also easy to customize. Enjoy making them your own, and impress your family and friends with a delightful dish that is sure to please!
![For Cheesy Zucchini Roll-Ups, you need a few simple items. Here’s what you’ll need: - 2 medium zucchinis, sliced lengthwise into thin strips (about ¼ inch thick) - 1 cup ricotta cheese - 1 cup shredded mozzarella cheese - ½ cup grated Parmesan cheese - 1 large egg, beaten - 2 cloves garlic, minced finely - 1 teaspoon dried oregano - Salt and freshly ground black pepper, to taste These ingredients work well together. Zucchini gives a nice base. The cheeses offer creaminess and flavor. Garlic and oregano add a tasty touch. You’ll want a good sauce to dip your roll-ups. Marinara sauce is perfect for this. It adds a rich, tangy flavor that pairs well with the cheesy goodness. For a fresh touch, you can also add some garnishes. Fresh basil leaves look great and add a nice flavor boost. Just sprinkle them on top before serving. This combination makes your Cheesy Zucchini Roll-Ups even more enjoyable. For the complete instructions on how to make this dish, check the Full Recipe. 1. Preheating the oven: Start by preheating your oven to 400°F (200°C). This ensures the oven is hot enough to cook the roll-ups evenly. 2. Preparing zucchini: Take your zucchini and slice it lengthwise into thin strips, about ¼ inch thick. Place the slices on a clean kitchen towel or paper towels. Lightly sprinkle them with salt and let them sit for about 10 minutes. This step draws out excess moisture. After 10 minutes, pat the slices dry with another towel to remove the salt and moisture. 1. Combining cheese ingredients: In a mixing bowl, add 1 cup of ricotta cheese, 1 cup of shredded mozzarella cheese, ½ cup of grated Parmesan cheese, and 1 large beaten egg. Then, add 2 cloves of finely minced garlic, 1 teaspoon of dried oregano, and a pinch of salt and pepper to taste. Mix everything together until you have a smooth and well-blended filling. 1. Rolling technique: Take one zucchini slice and place a generous spoonful of the cheese mixture at one end. Carefully roll the zucchini slice from the filled end, making sure to keep the filling inside. Roll it tightly but gently to secure the filling. 1. Greasing the baking dish: Lightly grease a baking dish with olive oil or cooking spray. Arrange the zucchini roll-ups seam side down in the dish. They can be close together, but don’t overcrowd them. 2. Baking time and temperature: Place the dish in the preheated oven and bake for 15-20 minutes. Look for the cheese to be bubbly and the zucchini to become tender. The edges should have a slight golden hue. Enjoy your Cheesy Zucchini Roll-Ups with marinara sauce for dipping! For the complete recipe, refer to the [Full Recipe]. To make the best cheesy zucchini roll-ups, start with the zucchinis. Excess moisture can make them soggy. To prevent this, slice the zucchinis thinly, about ¼ inch thick. After slicing, sprinkle salt on them and let them rest for about 10 minutes. The salt pulls out water. After 10 minutes, pat them dry with a towel. This step helps keep your roll-ups firm. Next, focus on the cheese filling. Mix your ricotta, mozzarella, and Parmesan in a bowl. Add a beaten egg, minced garlic, and oregano. Season with salt and pepper. Blend until smooth. A well-mixed filling holds together better while baking. You want creamy goodness in every bite. These roll-ups shine when paired with marinara sauce. The sauce adds a rich, tangy flavor that complements the cheese. You can also try other dips. A creamy ranch or spicy aioli can add a fun twist. Serve the roll-ups warm for a delightful treat. Presentation matters! Garnish your roll-ups with fresh basil leaves. This not only adds color but also fresh flavor. Arrange the roll-ups on a nice platter. Drizzle some marinara sauce around them. It creates an inviting look. For a fun touch, use small bowls for the dips. This makes your dish pop and looks great on any table. For the full recipe, check out the steps above! {{image_4}} You can mix up the cheese in these roll-ups. If you love goat cheese, try it instead of ricotta. It adds a tangy flavor. Cheddar also works well for a sharp bite. You can blend different cheeses, too. This creates a unique taste in every bite. Feel free to experiment with cheese types. Each choice brings a new twist to the dish. Want to boost the nutrition? Think about adding more veggies. Spinach is a great option. It wilts nicely when baked and adds a pop of green. Bell peppers can add sweetness and crunch. Just chop them fine and mix them into the cheese filling. You can also try mushrooms or carrots. The more veggies, the better. They make the roll-ups colorful and tasty. To make your roll-ups even tastier, add some spices. Red pepper flakes give a nice kick if you enjoy heat. Thyme brings an earthy taste that pairs well with zucchini. You can also use fresh herbs like parsley or basil. These add freshness and bright flavor. A sprinkle of lemon zest can brighten up the dish, too. Enjoy the process of making these roll-ups your own. For the full recipe, check out the link. To keep your cheesy zucchini roll-ups fresh, place them in an airtight container. This helps to seal in moisture and flavor. You can store them in the fridge for up to three days. If you want to keep them longer, freezing is a great option. Just make sure they cool down before you pack them away. When it comes to reheating, the oven is the best choice. Preheat it to 350°F (175°C). Place the roll-ups on a baking sheet and cover them with foil. This keeps them moist. Bake for about 15 minutes. If you are short on time, the microwave works too. Just heat them on a plate for 1-2 minutes. However, this may make them a bit soggy. To freeze the roll-ups, assemble them as you normally would. After rolling, place them in a single layer on a baking sheet. Freeze them for about an hour until solid. Then, transfer them to a freezer-safe bag or container. Label it with the date. They can stay frozen for up to three months. When you’re ready to enjoy, bake them straight from the freezer without thawing. Just add a few extra minutes to the baking time. For the full recipe, check the earlier section. If you don't have ricotta cheese, you can use cottage cheese. It offers a similar texture but is slightly more watery. You can also try cream cheese for a richer flavor, but it will change the taste a bit. Another option is goat cheese, which adds a tangy twist. Just remember, each cheese will slightly alter the texture and taste of your roll-ups. Yes, you can prepare these roll-ups ahead of time. Just follow the recipe until you assemble the roll-ups. Then, store them in an airtight container in the fridge for up to 24 hours. When you're ready to bake, you can pop them in the oven. This saves time and makes dinner easy on busy days. You’ll know the roll-ups are done when the cheese is bubbly and golden. Look for a slight browning on the edges of the zucchini, which means they are tender. If you see cheese oozing out, that's a good sign too! Trust your eyes; a perfect roll-up should look inviting and delicious. Yes, Cheesy Zucchini Roll-Ups are gluten-free. The main ingredients are zucchini and cheese, which do not contain gluten. Just make sure your marinara sauce is also gluten-free if you are sensitive. This dish is a great option for anyone avoiding gluten while still enjoying a tasty meal. In this post, we explored the delicious world of Cheesy Zucchini Roll-Ups. We covered key ingredients like zucchini and cheese, as well as helpful tips for preparation and baking. You can mix and match cheeses or add veggies for fun twists. Storing and reheating leftovers is simple too. Remember, these roll-ups are not just tasty; they’re also easy to customize. Enjoy making them your own, and impress your family and friends with a delightful dish that is sure to please!](https://blissfulmeal.com/wp-content/uploads/2025/07/aaa397a0-723d-455b-94ae-2e4eca5c2787-300x300.webp)

![To start, you need fresh okra. Look for firm, green pods that are not too big. Choose about one pound of okra. You will trim the ends and cut them in half. Fresh okra gives the best taste and texture. The right seasonings make this dish sing. Here’s what you need: - 2 tablespoons extra virgin olive oil - 1 teaspoon smoked paprika - 1 teaspoon garlic powder - 1 teaspoon onion powder - 1/2 teaspoon cayenne pepper (optional, for an extra kick) - Salt and freshly cracked black pepper, to taste These seasonings bring out the smoky flavor. Olive oil helps the okra brown nicely. Want to jazz it up? You can add other flavors. Consider these options: - A squeeze of lemon juice for brightness - A dash of cumin for warmth - Parmesan cheese for a savory twist These add-ins can take your roasted okra to the next level. Try them for a fun change! For the full recipe, check the earlier section. Start by preheating your oven to 425°F (220°C). A hot oven is key for crispy okra. It helps the outside get nice and crunchy while keeping the inside tender. This high heat brings out the best flavors. Grab a big mixing bowl. Add 1 pound of trimmed okra halves into it. Pour in 2 tablespoons of extra virgin olive oil. Then, sprinkle in 1 teaspoon of smoked paprika, 1 teaspoon of garlic powder, and 1 teaspoon of onion powder. If you like heat, add 1/2 teaspoon of cayenne pepper too. Finally, season with salt and fresh black pepper to taste. Mix everything well with your hands or a spatula. This step is crucial for that smoky flavor. Each okra piece should be well-coated. Line a baking sheet with parchment paper or grease it lightly. Spread the seasoned okra on the sheet in a single layer. Make sure not to overcrowd them. This helps them roast evenly. Now, place the baking sheet in your preheated oven. Roast for 20-25 minutes. Halfway through, stir the okra to make sure all sides crisp up nicely. You want them tender with a slight crunch on the edges. After roasting, take the baking sheet out and let the okra cool for a bit. Sprinkle with fresh chopped parsley for a bright touch. Enjoy your smoky roasted okra warm for a tasty treat! For the full recipe, check the earlier section. To get that deep smoky taste, use smoked paprika. It adds a warm, rich flavor. Mixing it with garlic powder and onion powder enhances the taste. You can also add cayenne pepper if you love spice. Make sure to coat the okra evenly with the oil and spices. This step is key for that smoky flavor. Even roasting is all about spacing. Spread the okra in a single layer on the baking sheet. If the pieces touch, they will steam instead of roast. Stir the okra halfway through cooking to help it brown evenly. This method gives you crispy edges and tender centers. Presentation matters! Serve the smoky roasted okra on a rustic wooden board. A bright white platter also looks great. Add a wedge of lemon on the side for a pop of color. It adds a fresh touch and a nice zing. Garnish with chopped parsley for a splash of green. This makes the dish look even more appetizing. For the full recipe, check [Full Recipe]. {{image_4}} If you love heat, try adding more cayenne pepper. Use one full teaspoon instead of half. You can also add crushed red pepper for a new twist. This spicy version will tickle your taste buds and warm you up! Mix in fresh herbs for a bright flavor. Try thyme, rosemary, or oregano. Add two teaspoons of your favorite chopped herbs to the oil and spice mix. This will give your okra a fresh and fragrant boost, perfect for summer! This recipe fits many diets. It’s vegan and gluten-free as is. Use a plant-based oil if you want. Olive oil works well, but avocado oil is also great. Feel free to adjust the spices to suit your taste. You can make it as mild or zesty as you like! For the full recipe, check the previous section. To keep your smoky roasted okra tasty, store it in an airtight container. Let it cool first, then place it in the fridge. This method helps maintain flavor and texture. Try to eat the leftovers within three days for the best taste. If you notice any moisture, pat the okra dry before storing. Reheating smoky roasted okra can be tricky. I recommend using an oven or an air fryer. Preheat your oven to 375°F (190°C). Spread the okra on a baking sheet and heat for about 10 minutes. This keeps it crispy. An air fryer works well too, at the same temperature, for about 5-7 minutes. Avoid the microwave, as it makes the okra soggy. If you want to save some for later, freezing is a great option. First, let the roasted okra cool completely. Spread it in a single layer on a baking sheet and freeze for about an hour. Once frozen, transfer the okra to a freezer-safe bag. Remove as much air as possible before sealing. It can last up to three months. When you're ready to use it, just reheat straight from the freezer! When you pick okra, look for bright green pods. They should feel firm and smooth. Avoid okra that has brown spots or looks wilted. Fresh okra bends easily but does not break. This means it is still tender and at its best. Yes, you can use frozen okra. However, fresh okra gives a better texture. Frozen okra can be more watery, which might affect crispness. If you use frozen, thaw it and pat it dry before cooking. This helps reduce moisture for better roasting. To make smoky roasted okra crispy, follow these tips: - Preheat your oven to 425°F (220°C). - Use enough olive oil to coat each piece. - Spread the okra in a single layer on the baking sheet. - Stir them halfway through roasting to allow even cooking. These steps help achieve that crunchy texture. Smoky roasted okra pairs well with many dishes. Try serving it with: - Grilled meats for a hearty meal. - Rice or quinoa for a filling side. - A fresh salad for a lighter option. You can also enjoy it as a snack or appetizer with dips. For the full recipe, check out the Smoky Roasted Okra section. Smoky roasted okra is easy to make and full of flavor. We covered fresh ingredients, essential seasonings, and fun add-ins. You learned step-by-step instructions for oven roasting and tips to get the perfect flavor. We also explored tasty variations for different diets and how to store leftovers properly. In the end, this dish is both versatile and simple. I encourage you to try making it your own!](https://blissfulmeal.com/wp-content/uploads/2025/07/7aacdd89-c614-44a6-bce0-70bf8b4e212e-768x768.webp)

![- 12 string cheese sticks - 1 cup all-purpose flour - 2 large eggs, beaten - 1 cup breadcrumbs (preferably panko for extra crunch) - 1 teaspoon garlic powder - 1 teaspoon Italian seasoning - ½ teaspoon salt - ½ teaspoon black pepper - Cooking spray - Marinara sauce for dipping (optional) Gather these ingredients to make your air fryer mozzarella sticks. The string cheese is the star here. It melts perfectly and tastes great. The flour helps the cheese stick to the coating. The eggs help bind everything together. Using panko breadcrumbs gives your sticks that extra crunch. The seasoning adds flavor and makes each bite tasty. Don't forget the marinara sauce! It makes a great dip. You can find the full recipe for air fryer mozzarella sticks in the article. Prepping the Cheese First, freeze the cheese sticks for at least 1 hour. This helps the cheese stay firm. If you skip this step, the cheese may melt too fast. Setting Up the Breading Station Next, set up your breading station. Use three shallow dishes. In the first dish, add flour. In the second, place beaten eggs. In the third, mix breadcrumbs with garlic powder, Italian seasoning, salt, and black pepper. This mix gives great flavor. Coating the Mozzarella Sticks Take the frozen cheese sticks. Roll each stick in flour first. Make sure it is fully coated. Next, dip it in the beaten eggs. Let the extra egg drip off. Finally, roll it in the breadcrumb mix. Press gently to cover every inch. Air Fryer Preparation Now, preheat your air fryer to 390°F (200°C). This takes about 5 minutes. While it heats, spray the air fryer basket with cooking spray. This keeps the sticks from sticking. Cooking Mozzarella Sticks Place the breaded sticks in a single layer in the basket. Do not overcrowd them. If needed, cook in two batches. Air fry for 6 to 8 minutes, flipping halfway through. They should be golden brown when done. Final Steps Once cooked, take the sticks out and let them cool for a couple of minutes. This makes them easier to eat. Serve them hot with marinara sauce for dipping if you like. For the full recipe, you can check out the earlier sections. To get that perfect crunch, I always use panko breadcrumbs. They add the best texture. A light spray of cooking spray on the mozzarella sticks gives them a nice, crispy finish. This step is key when air frying. Before you coat the sticks, make sure to let any excess egg drip off. This helps the breadcrumbs stick better. A good coating means more crunch and flavor in each bite. Do not overcrowd the air fryer. If you pile the sticks on top of each other, they won't cook evenly. I always cook in batches. This way, each mozzarella stick gets the heat it needs to crisp up perfectly. For the full recipe, you can check out the details above. {{image_4}} To make your air fryer mozzarella sticks even better, try adding some spice. You can add cayenne pepper to the breadcrumb mixture for a nice kick. Just a pinch goes a long way. You can also mix in dried herbs like oregano or basil. This adds great flavor and aroma. Feel free to get creative with spices you enjoy. While string cheese is the classic choice, you can experiment with different types of cheese sticks. Try using cheddar, pepper jack, or even a blend of cheeses. Each type brings a unique taste and melts differently. Just ensure they are similar in size to string cheese for even cooking. Pair your mozzarella sticks with more than just marinara sauce. You can try ranch dressing, spicy aioli, or even a sweet chili sauce. Each dip adds a new layer of flavor. For extra fun, set up a dip station with a few options, so everyone can choose their favorite. To store leftover mozzarella sticks, let them cool first. Place them in an airtight container. Keep the container in the refrigerator. They will stay fresh for up to three days. Make sure to keep them in a single layer to avoid sticking. To reheat mozzarella sticks, use your air fryer again. Preheat it to 350°F (175°C). Place the sticks in the basket, leaving space between them. Heat for about 3 to 5 minutes. This method keeps them crispy. You can also use an oven if you prefer. To freeze uncooked mozzarella sticks, prepare them as usual. After coating them, place the sticks on a baking sheet. Make sure they are not touching each other. Freeze them for about an hour. Then, transfer them to a freezer bag. Label the bag with the date. They can stay frozen for up to three months. When ready to cook, you can air fry them straight from the freezer. Check the [Full Recipe] for detailed cooking times. To stop the cheese from leaking, freeze the sticks first. Place the string cheese in the freezer for at least one hour. This keeps the cheese solid. Next, use a good coating. Make sure to coat the sticks in flour, egg, and breadcrumbs. Each layer should cover the cheese well. This helps seal in the cheese while it cooks. Yes, you can use different types of breading. For a gluten-free option, try almond flour or crushed gluten-free crackers. You can also use cornmeal for a different crunch. Experimenting with different flavors can be fun. Just make sure the coating is thick enough to hold the cheese. Mozzarella sticks pair well with many sides and dips. Marinara sauce is a classic choice. You can also serve them with ranch dressing or a spicy aioli. For sides, think about fresh veggies or a simple salad. These options balance the rich flavors of the cheese. Cooked mozzarella sticks last about 3 to 4 days in the fridge. Store them in an airtight container. Uncooked sticks can last up to 1 month in the freezer. Just make sure they are well wrapped to prevent freezer burn. In this post, I shared how to make delicious mozzarella sticks in an air fryer. We covered the main ingredients, simple steps, and useful tips for a perfect batch. Remember, using panko breadcrumbs gives extra crunch. You can also try different cheeses and sauces for fun variations. Store any extras properly to keep them fresh. With these tips, you can enjoy homemade mozzarella sticks that are crispy and flavorful. Dive in and impress everyone with your tasty snacks!](https://blissfulmeal.com/wp-content/uploads/2025/07/a186f190-e6f2-4244-9d03-78a1c9bed7c1-768x768.webp)