
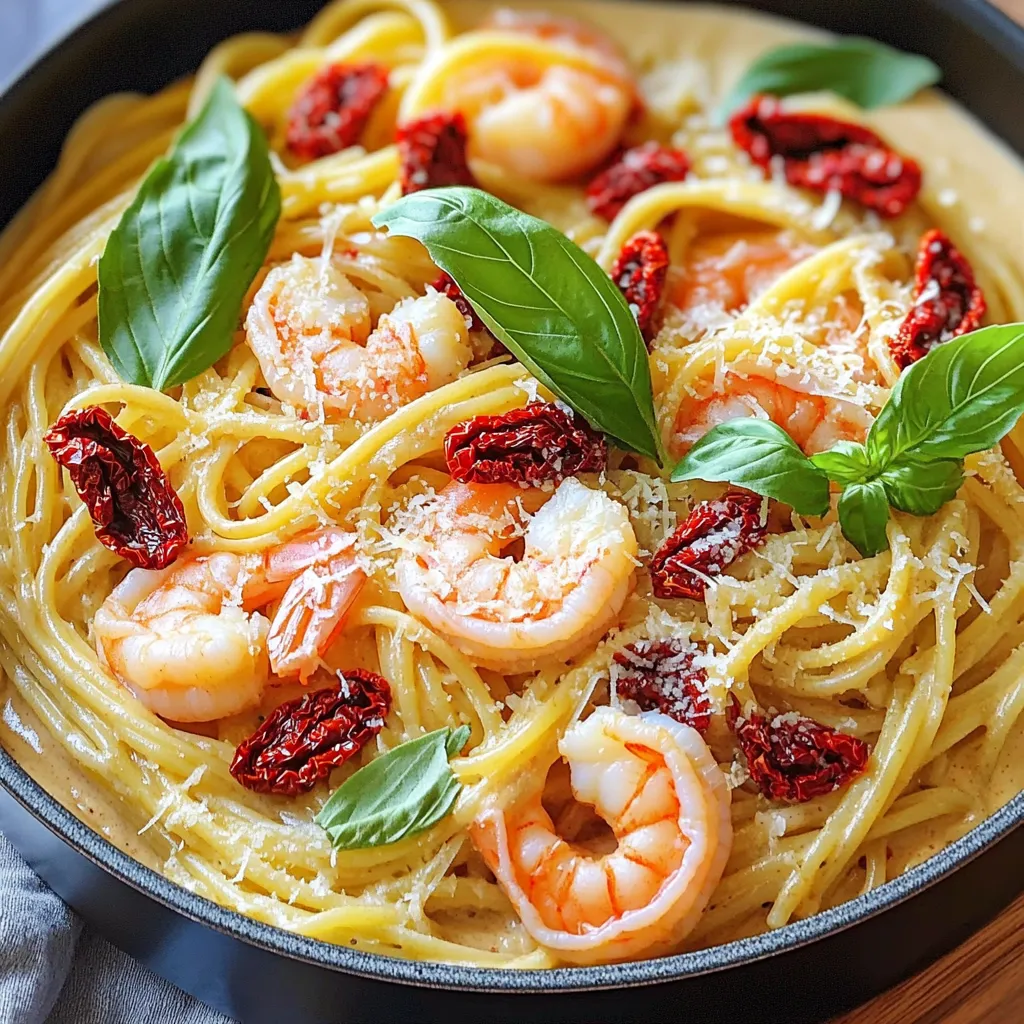
One-Pot Creamy Sun-Dried Tomato Shrimp Pasta Delight

Craving a quick and tasty dinner? You’ll love my One-Pot Creamy Sun-Dried Tomato Shrimp Pasta Delight! This dish combines succulent shrimp, rich cream, and sun-dried tomatoes, all in one pot for easy clean-up. In just a few steps, you’ll create a warm, comforting meal that bursts with flavor. Let’s dive into the ingredients and get cooking—your next favorite dinner is just a few minutes away!
Ingredients
Main Ingredients
– Linguine or spaghetti (12 oz)
– Shrimp (1 lb, peeled and deveined)
– Sun-dried tomatoes (1 cup, chopped)
Additional Ingredients
– Chicken or vegetable broth (3 cups)
– Heavy cream (1 cup)
– Garlic (4 cloves, minced)
Seasonings and Garnish
– Italian seasoning (1 teaspoon)
– Red pepper flakes (1 teaspoon)
– Grated Parmesan cheese (1/2 cup)
– Olive oil (2 tablespoons)
– Salt and pepper, to taste
– Fresh basil leaves, for garnish
To make this dish, you need a mix of fresh and pantry staples. The pasta is the base, and shrimp brings protein. Sun-dried tomatoes add a burst of flavor. You will also need broth and cream to create a rich sauce. Garlic gives the dish a nice kick.
For seasoning, Italian herbs and red pepper flakes balance the creaminess with some heat. Finally, Parmesan cheese adds a savory touch, and fresh basil brightens the dish.
Gather these ingredients to start your cooking adventure!
Step-by-Step Instructions
Preparing the Base
– Heat 2 tablespoons of olive oil in a large skillet or pot.
– Sauté 4 cloves of minced garlic for 1 minute until fragrant.
– Add 1 cup of chopped sun-dried tomatoes and cook for 2-3 minutes.
In this step, the olive oil forms the base of your dish. The garlic adds a warm aroma, while the sun-dried tomatoes enhance the flavor with their rich, tangy sweetness. Stirring occasionally helps to combine these flavors well.
Cooking the Shrimp
– Incorporate 1 pound of peeled and deveined shrimp into the pot.
– Cook the shrimp for 2-3 minutes until they turn pink and opaque.
– Remove the shrimp from the pot and set them aside.
Cooking the shrimp quickly is key. Overcooking can make them tough. This quick cook allows the shrimp to absorb some flavors while keeping them tender.
Cooking the Pasta
– Bring 3 cups of chicken or vegetable broth to a rolling boil in the same pot.
– Add 12 ounces of linguine or spaghetti and 1 teaspoon of Italian seasoning.
– Cook according to package instructions for 8-10 minutes, stirring occasionally to prevent sticking.
Using broth instead of water adds flavor to the pasta. Stirring helps keep the pasta from clumping together, ensuring even cooking.
Creating the Creamy Sauce
– Add 1 cup of heavy cream, 1 teaspoon of red pepper flakes, and 1/2 cup of grated Parmesan cheese to the nearly al dente pasta.
– Stir until the sauce becomes creamy and evenly coats the pasta.
This step transforms your dish into a rich, creamy delight. The red pepper flakes add a hint of heat, balancing the richness of the cream and cheese.
Final Assembly
– Fold the cooked shrimp back into the pot with the pasta.
– Season with salt and pepper to taste.
– Heat everything together for another 2-3 minutes.
Bringing the shrimp back into the mix allows the flavors to meld. Adjusting the seasoning at this stage ensures every bite is flavorful.
Preparing to Serve
– Off the heat, add torn fresh basil leaves for a burst of flavor.
The fresh basil adds a bright, herbal note that contrasts beautifully with the creamy sauce. For a lovely presentation, serve the pasta in shallow bowls, garnished with extra basil and Parmesan.
Tips & Tricks
Ingredient Substitutions
You can swap shrimp for chicken or tofu if needed. Chicken gives a hearty flavor, while tofu is a great vegan choice. For the cream, try coconut cream for a dairy-free option. Greek yogurt can also work if you want a tangy taste.
Cooking Techniques
Always avoid overcooking shrimp. Cook them just until they turn pink and opaque. This keeps them tender. While cooking pasta, stir it frequently. This helps prevent it from sticking together. It also ensures even cooking.
Presentation Suggestions
For a nice touch, serve your pasta with extra Parmesan and fresh basil on top. This adds flavor and color. You can also add halved cherry tomatoes or microgreens. They make the dish look bright and fresh, enhancing the meal’s appeal.
Variations
Add-ins and Mix-ins
You can make this dish even better with some fun add-ins. Try adding fresh spinach for a pop of green. You can also use bell peppers for sweetness and crunch. Both add color and nutrition. If you want a different protein, consider scallops or lobster. Chicken also works well. Just cook them until they’re done and add them in.
Spice Adjustments
Spice is key in this dish. You can adjust the heat by changing the red pepper flakes. If you want more heat, add a bit more. If you want it milder, use less. Another great idea is to add lemon zest. It gives a bright, fresh taste that balances the creaminess.
Flavor Enhancements
Herbs can take your pasta to the next level. Fresh parsley or dill adds great flavor. You can also use flavored broths instead of plain chicken or vegetable broth. This little change can make a big difference in taste. It adds depth and richness to your meal.
Storage Info
Refrigeration Guidelines
To store leftovers, place the pasta in an airtight container. Make sure it cools down first. This helps keep it fresh. Store it in the fridge for up to three days. When you want to reheat it, use a skillet. Add a splash of broth or cream to bring back the creaminess. Heat on low, stirring gently until warmed through.
Freezing Instructions
If you want to freeze the dish, let it cool completely. Then, transfer it to a freezer-safe container. It will last for about two months in the freezer. When you’re ready to eat it, thaw it in the fridge overnight. For reheating, place it in a pot with a little broth and heat on low. This keeps the pasta moist and tasty.
Shelf Life
In the fridge, this pasta dish stays best for three days. After that, it may lose flavor. Signs that it has gone bad include an off smell or mold. If you see either, it’s best to throw it away. Always trust your senses when it comes to food safety.
FAQs
Can I make this dish gluten-free?
Yes, you can make this dish gluten-free. Choose gluten-free pasta made from rice or chickpeas. These options work well with the creamy sauce and shrimp. You can find these at most grocery stores. They cook similar to regular pasta, so just follow the package instructions. This way, you can enjoy a tasty meal without gluten.
How can I make this dish dairy-free?
To make this dish dairy-free, swap the heavy cream for coconut cream or a non-dairy milk. You can also use nutritional yeast instead of Parmesan cheese for flavor. These substitutes still give you a creamy texture. Just keep an eye on the cooking times, as non-dairy options may vary.
What sides pair well with One-Pot Creamy Sun-Dried Tomato Shrimp Pasta?
Many sides go well with this dish. Here are some tasty options:
– Garlic bread for a crunchy side.
– A fresh green salad for a light touch.
– Roasted vegetables like broccoli or asparagus for added color.
– A simple Caprese salad with tomatoes and mozzarella for a refreshing bite.
These sides balance the richness of the pasta and enhance your meal.
Can I prepare this recipe in advance?
Yes, you can prepare this recipe in advance. Here are some tips:
– Cook the pasta and shrimp, then cool them.
– Store them separately in the fridge.
– When ready to serve, reheat them in a pan with the sauce.
– You can also freeze the pasta and sauce but not the shrimp.
– For best results, eat the dish within three days of cooking.
This way, you can enjoy a quick, flavorful meal any day of the week.
This blog post covered a delicious recipe for One-Pot Creamy Sun-Dried Tomato Shrimp Pasta. We explored essential ingredients like shrimp, sun-dried tomatoes, and cream. I shared easy steps from cooking the shrimp to making a creamy sauce. You can customize this dish with various proteins or spices. Remember to store leftovers properly and enjoy them later. With this guide, you can make a satisfying meal quickly. Now, it’s time to gather your ingredients and get cooking. Enjoy your tasty creation!
![- 1 lb baby carrots (or 4 regular carrots, peeled and cut into 1-inch thick slices) - 3 tablespoons balsamic vinegar - 2 tablespoons honey or maple syrup - 2 tablespoons unsalted butter (or olive oil for a vegan alternative) - 1 teaspoon garlic powder - ½ teaspoon salt - ¼ teaspoon freshly cracked black pepper - Fresh parsley, finely chopped, for garnish These ingredients create a sweet and tangy flavor. The balsamic vinegar gives a nice depth to the dish. Honey or maple syrup adds a hint of sweetness. You can customize your carrots with a few extra ingredients. Consider adding: - A sprinkle of red pepper flakes for heat - Chopped nuts like walnuts or pecans for crunch - A splash of orange juice for a citrus twist These variations bring new flavors and textures to the dish. Feel free to explore what you like best! This recipe serves about four people. Here’s a quick look at the nutrition: - Calories: 150 - Protein: 1g - Carbohydrates: 23g - Fiber: 3g - Fat: 7g These numbers may vary based on what you choose. Overall, this dish is a healthy addition to any meal. It provides fiber and vitamins while keeping it delicious. For the full recipe, check the link. Start by prepping your carrots. If you use regular carrots, peel them first. Next, slice them into thick, 1-inch rounds. This step helps them cook evenly. If you choose baby carrots, you can keep them whole. This gives a nice rustic look to your dish. Now, it's time to cook the carrots. Grab a large skillet and add about an inch of water. Bring it to a rolling boil. Once boiling, carefully add your prepared carrots. Cook them for about 5-7 minutes. You want them tender but still a bit crisp. After cooking, drain the carrots and set them aside. In the same skillet, lower the heat to medium. Add the butter or olive oil and let it melt. Then, pour in the balsamic vinegar and honey or maple syrup. Mix in the garlic powder, salt, and black pepper. Stir everything well until it bubbles. This is where the magic happens. Return the drained carrots to the skillet. Toss them in the bubbling glaze, making sure each piece gets coated. Cook for another 4-5 minutes, stirring often. This lets the glaze thicken and stick to the carrots. When they are glazed and tender, they are ready to serve. To get a great glaze, start with the right balance. Use balsamic vinegar and honey. The sweet and tangy mix gives the carrots a rich flavor. Make sure to let the glaze bubble. This helps it thicken and coat the carrots well. Toss the carrots gently in the glaze. You want each piece to be covered. Steaming carrots before glazing helps keep them crisp. Boil them for just 5-7 minutes. This method brings out their natural sweetness. After boiling, quickly drain them. Use the same skillet for the glaze. The leftover bits from cooking the carrots add flavor to the glaze. You can boost the flavor in many ways. Add fresh herbs like thyme or rosemary. A pinch of red pepper flakes gives a spicy kick. For a richer taste, try adding orange juice or zest to the glaze. This adds a nice twist. For the full recipe, check the details provided earlier. {{image_4}} You can switch honey with maple syrup. This option suits vegan diets. You can also try agave nectar. Each sweetener adds its unique taste. Maple syrup offers a rich flavor. Agave nectar gives a light sweetness. Mix in other veggies for more color and flavor. Try adding sliced bell peppers or zucchini. You can also toss in green beans for crunch. These additions make the dish more vibrant. They also enhance the nutrient value. Aim for a mix that complements the carrots. To make this dish vegan, use olive oil instead of butter. This simple swap keeps the taste intact. For gluten-free options, check your balsamic vinegar. Most brands are gluten-free, but always read labels. Enjoy this dish without worry while keeping the flavors bold. For a complete recipe, check the [Full Recipe]. To keep your balsamic glazed carrots fresh, store them in an airtight container. Let them cool down first. Place a paper towel in the container to absorb excess moisture. This helps keep the carrots crisp. You can keep them in the fridge for up to four days. Make sure to label the container with the date. When you are ready to enjoy the leftovers, reheat them gently. You can use a microwave or a skillet. If using the microwave, place the carrots in a bowl. Add a splash of water to keep them moist. Heat in 30-second intervals until warm. If you prefer the skillet, heat over medium-low heat. Stir occasionally until heated through. Freezing balsamic glazed carrots is possible, but they may lose some texture. To freeze, cool the carrots completely. Place them in a freezer-safe bag or container. Remove as much air as possible to prevent freezer burn. You can freeze them for up to three months. To enjoy them later, thaw in the fridge overnight before reheating. For best results, it’s better to eat them fresh. Check the [Full Recipe] for more details on preparation. To make balsamic glazed carrots, you need a few simple steps. First, prepare your carrots by peeling and slicing them, or use baby carrots whole. Cook them in boiling water for about 5-7 minutes until tender but still crisp. Then, drain the carrots. In the same pan, melt butter or olive oil and add balsamic vinegar, honey, garlic powder, salt, and pepper. Stir this mixture and let it bubble. Toss the carrots in the glaze and cook for an additional 4-5 minutes, coating them well. Finally, serve with fresh parsley for a pop of color. For a detailed guide, check the Full Recipe. Yes, you can use regular carrots instead of baby carrots. If you choose regular ones, peel and cut them into 1-inch thick slices. This size helps them cook evenly. They will taste just as good and add a nice texture to the dish. Balsamic glazed carrots work well with many dishes. They make a great side for roasted meats, like chicken or pork. You can also serve them with grilled fish or as part of a vegetarian meal. Pair them with grains, like quinoa or rice, for a balanced plate. Their sweet and tangy flavor complements many flavors, making them a versatile side. This blog post covered how to make delicious balsamic glazed carrots. We talked about the main and optional ingredients, plus their nutritional values. You learned step-by-step instructions for preparing, cooking, and making the glaze. We shared tips for the best results and fun variations. You also found out how to store, reheat, and freeze them. Balsamic glazed carrots are tasty and easy to make, adding flavor to any meal. Try them out, and enjoy the great taste!](https://blissfulmeal.com/wp-content/uploads/2025/06/61ba6323-fcf2-48e8-a260-60b8871825b8-768x768.webp)

![- 8 ounces fettuccine pasta - 1 pound large shrimp, peeled and deveined - 2 tablespoons Cajun seasoning - 2 tablespoons olive oil - 1 medium red bell pepper, sliced - 1 medium yellow onion, sliced - 3 cloves garlic, minced - 1 cup cherry tomatoes, halved - 1 cup heavy cream (or coconut cream for lighter option) - Salt and pepper to taste - 2 tablespoons fresh parsley, finely chopped - Juice of 1 lemon When I make Spicy Cajun Shrimp Pasta, I love how these ingredients come together. The fettuccine is perfect for holding the creamy sauce. The shrimp adds a nice protein boost and absorbs the Cajun flavor well. The red bell pepper and onion give a sweet crunch, while garlic adds a wonderful aroma. Cherry tomatoes pop with juice, bringing brightness to the dish. Cajun seasoning is key here. It gives the shrimp a bold kick. I often choose heavy cream, but coconut cream works too if you want a lighter touch. Fresh parsley and lemon juice at the end brighten the whole dish and make it look pretty. For the full recipe, check out the link. You'll find all the steps to make this delicious meal! To cook the fettuccine, start with a large pot of salted water. Bring it to a rolling boil. Add the fettuccine and cook it according to the package instructions. You want it to be al dente, which means it should be firm yet tender. This usually takes about 8-10 minutes. Once it's done, drain the pasta but save a cup of pasta water. You may need it later to adjust the sauce. Now, let’s season the shrimp. Take your peeled and deveined shrimp and place them in a mixing bowl. Sprinkle the Cajun seasoning over the shrimp. Toss the shrimp until they are fully coated in the spices. This step is key to packing in the flavor. Next, we move to the vegetables. Grab a large skillet and heat the olive oil over medium-high heat. When the oil is hot, add your sliced red bell pepper and yellow onion. Sauté these for about 4-5 minutes. Stir them occasionally until they turn tender and smell great. This process brings out their natural sweetness. After the vegetables are ready, shift them to one side of the skillet. Now, add the seasoned shrimp to the empty side. Cook the shrimp for about 2-3 minutes per side. They are done when they turn pink and opaque. This timing is crucial for perfectly cooked shrimp. Once the shrimp are cooked, add the minced garlic. Then, throw in the halved cherry tomatoes. Stir everything together and sauté for another 1-2 minutes. This allows the garlic to release its strong aroma and the tomatoes to soften. Next, pour in the heavy cream (or coconut cream) and bring it to a gentle simmer. Mix well to combine all the flavors into a creamy sauce. Finally, add the drained fettuccine to the skillet. Toss it gently to coat the pasta with the sauce. If the sauce seems thick, add a splash of the reserved pasta water. Finish with salt and pepper to taste. To make your Spicy Cajun Shrimp Pasta even tastier, try adding some extra spices. Here are a few ideas: - Smoked Paprika: This adds a nice depth to the dish. - Cayenne Pepper: If you want more heat, this is your go-to. - Oregano: A sprinkle can bring out more flavor in the sauce. - Thyme: Fresh or dried, it adds a nice herbal note. You can also use fresh herbs like basil or cilantro for a fresh twist. Cooking shrimp and veggies well can make or break your dish. Here are some tips: - High Heat: Always use medium-high heat for sautéing. This helps the shrimp cook quickly and stay juicy. - Don’t Crowd the Pan: If your skillet is too full, the shrimp will steam instead of sauté. Cook in batches if needed. - Veggie Order: Start with onions and peppers. They take longer to soften. Add garlic and tomatoes later for a fresher taste. Garnishing makes your dish look more inviting. Here are some ideas: - Chopped Parsley: This brightens the dish and adds color. - Lemon Wedge: A slice on the side gives a zesty kick when squeezed. - Grated Parmesan: A sprinkle on top can add a rich flavor. For sides, consider a simple green salad or garlic bread. Pair these with your pasta for a complete meal. For the full recipe, check out the Spicy Cajun Shrimp Pasta. {{image_4}} If you want a change from shrimp, chicken or tofu works well. Chicken can be diced and cooked like the shrimp. Season it the same way with Cajun spice. Tofu is a great plant-based option. Use firm tofu for the best results. Press it to remove excess water, then cut it into cubes. Toss it in the Cajun seasoning and sauté until golden. To make this dish gluten-free, swap the fettuccine for gluten-free pasta. Many brands offer great options that taste similar. For a dairy-free version, replace heavy cream with coconut cream. This will give your pasta a rich flavor without dairy. Always check labels for hidden gluten or dairy. Get creative with your sauces and spices! You can add a dash of hot sauce for an extra kick. Swap the Cajun seasoning for a different blend, like Italian herbs or lemon pepper. Experiment with smoked paprika for a smoky flavor. You can also try adding different vegetables, like spinach or zucchini, to change the taste and texture. To keep your Spicy Cajun Shrimp Pasta fresh, store it in an airtight container. Make sure it cools down first. Place the container in the fridge. It will stay good for up to three days. When you’re ready to eat, check for any signs of spoilage. To reheat your pasta, use a skillet over low heat. Add a splash of water or cream to keep it moist. Stir gently while heating. This will help maintain the sauce's rich flavor and creamy texture. Avoid using the microwave, as it can make the shrimp tough. Yes, you can freeze this dish! Just place the cooled pasta in a freezer-safe container. It will last for up to two months. When you’re ready to enjoy it, thaw it in the fridge overnight. Then, reheat it gently in a skillet for the best taste. Cajun seasoning is a mix of bold spices. Common spices include: - Paprika - Cayenne pepper - Garlic powder - Onion powder - Black pepper - Oregano - Thyme These spices create a warm and spicy flavor. You can adjust the heat by using more or less cayenne pepper. Yes, you can use different pasta types. Some great options are: - Penne - Linguine - Spaghetti - Whole wheat pasta Each type will change the texture a bit. Choose what you like best or what you have on hand. You can tell shrimp are done when they turn pink and opaque. Cook them for 2-3 minutes on each side. They should curl slightly but not be rubbery. The perfect shrimp are tender and juicy. Pair this dish with some tasty sides. Here are some ideas: - Garlic bread - Caesar salad - Roasted vegetables - Coleslaw These sides add freshness and balance to the meal. They’ll make your dinner even more delicious. For the detailed Spicy Cajun Shrimp Pasta recipe, check out the [Full Recipe]. Now you have all you need to make Spicy Cajun Shrimp Pasta. We discussed key ingredients, step-by-step cooking, and tips for success. You can even try alternatives or adjust for your diet. Remember, the joy of cooking comes from experimenting and discovering your flavors. Don't forget to save leftovers the right way and enjoy them later. Cooking doesn’t have to be hard; it can be fun and rewarding. Get in the kitchen and make this dish your own!](https://blissfulmeal.com/wp-content/uploads/2025/06/627ec57a-58e9-4e6d-b220-225632ad6133-768x768.webp)
![- 1 cup long-grain rice - 2 cups vegetable broth (or water) - 1 tablespoon olive oil - 1 lime (for zest and juice) - 1/2 cup fresh cilantro, finely chopped - 1 teaspoon garlic powder - 1/2 teaspoon onion powder - 1/2 teaspoon salt - 1/4 teaspoon black pepper To make cilantro lime rice, gather your ingredients first. I love using long-grain rice because it cooks up fluffy and separates well. Vegetable broth adds great flavor. You can also use water if you prefer. Olive oil is perfect for sautéing the rice. The lime gives a fresh, zesty taste. Make sure to zest the lime before cutting it. Fresh cilantro brings a bright color and taste to the dish. Garlic and onion powders help boost the flavors. Finally, salt and black pepper add just the right seasoning. This combination creates a simple, yet tasty side dish that complements various meals. For the complete recipe, check out the Full Recipe section. - Rinse the long-grain rice Start by rinsing the rice under cold water. This step is key. It removes extra starch. Rinse until the water runs clear. Drain the rice well and set it aside. - Sauté the rinsed rice in olive oil In a medium saucepan, heat some olive oil over medium heat. Once warm, add in the rinsed rice. Sauté for 2-3 minutes. Stir frequently until the rice looks slightly clear. - Add vegetable broth and bring to a boil Carefully pour in the vegetable broth or water. Turn up the heat to bring it to a boil. Watch closely as it will bubble quickly. - Reduce heat and cover to simmer After boiling, lower the heat. Cover the saucepan tightly. Let it simmer for 15-18 minutes. The rice should be tender and absorb all the liquid. - Let rice sit after cooking When the rice is done, remove it from heat. Keep the lid on and let it sit for 5 minutes. This helps the rice become fluffy. - Fluff the rice and mix in seasoning After sitting, use a fork to fluff the rice gently. This separates the grains nicely. Now stir in lime juice, lime zest, chopped cilantro, garlic powder, onion powder, salt, and black pepper. - Adjust seasoning to taste Taste your rice to check the flavors. If you want more zing, add extra lime juice or salt. Adjust until it tastes just right. For the full recipe, check out the [Full Recipe]. Rinsing rice is a must. It helps remove excess starch. This step prevents the rice from becoming sticky. Rinsing also leads to a cleaner taste. The key to fluffy rice is using the right water ratio. For this recipe, I use two cups of vegetable broth for one cup of rice. This balance gives you soft and tender grains. Letting the rice sit after cooking is crucial. After you remove it from heat, keep it covered for five minutes. This resting time helps the rice finish cooking and absorb any remaining moisture. For garnishing, I love to sprinkle extra cilantro on top. It adds a fresh touch and bright color. You can also add a lime wedge for an extra zest. When serving, choose a decorative bowl. This makes the dish look more inviting. Place the rice in the center and surround it with lime wedges and cilantro leaves. This not only looks great but also lets guests add more lime if they like. {{image_4}} To make your cilantro lime rice even better, consider these simple tweaks: - Add jalapeños for a spicy kick: If you love heat, chop some fresh jalapeños. Mix them in while cooking for a nice zing. - Incorporate other herbs like parsley: For a fresh twist, try adding chopped parsley. This will give the rice a different flavor profile. Cilantro lime rice pairs well with many dishes. Here are some ideas: - Pairing with tacos and burritos: This rice complements the bold flavors of tacos and burritos perfectly. - Using as a base for protein bowls: Spoon the rice into a bowl, then top with grilled chicken, shrimp, or veggies. It's a satisfying meal. - Adding to salads for extra flavor: You can mix the rice into salads. It adds texture and a burst of flavor. These variations make the dish more exciting and allow you to tailor it to your taste. Enjoy experimenting! To store your leftover cilantro lime rice, choose an airtight container. Glass or plastic containers work great. Make sure to let the rice cool down before sealing it. This keeps it fresh longer. Place it in the fridge right away. It will stay good for about 3 to 5 days. If you want to store it for longer, freeze it. Just scoop it into freezer bags and remove as much air as possible. This method keeps the rice tasty for up to 2 months. When you’re ready to enjoy your leftover rice, you need to reheat it well. The best way is to use the stovetop. Add a splash of water in a pot and heat it on low. Stir the rice often to avoid sticking. This keeps the rice moist and fluffy. You can also use a microwave if you’re short on time. Add a little water to the rice in a bowl. Cover it with a damp paper towel and heat it in short bursts. Stir and check for warmth. For serving after reheating, you can add a squeeze of fresh lime juice. This really brings the flavors back to life. Serve it alongside your favorite dishes, like tacos or grilled chicken. Enjoy your meal! Can I use brown rice instead? Yes, you can use brown rice in this recipe. Brown rice takes longer to cook, about 40-45 minutes. Adjust the water to 2.5 cups for better results. How can I make it vegan? To make cilantro lime rice vegan, simply use water instead of broth. The flavor will still be great with lime and cilantro. What other dishes pair well with cilantro lime rice? Cilantro lime rice goes well with tacos, burritos, and grilled chicken. It also complements fish and beans nicely. Can I substitute lime with lemon? Yes, lemon works as a good substitute for lime. It adds a different but fresh flavor to the rice. What is the best way to increase the recipe yield? To increase the yield, simply double the ingredients. Use 2 cups of rice and 4 cups of broth for a larger batch. Is cilantro lime rice healthy? Yes, cilantro lime rice can be healthy. It is low in fat and provides good carbs. The fresh herbs add nutrients too. What are the calorie counts per serving? One serving of cilantro lime rice has about 180 calories. This can vary based on the specific ingredients used in the recipe. For the Full Recipe, check the details above. This blog post shared a complete guide for making cilantro lime rice. You learned the ingredients needed, from rice to fresh cilantro. I also offered easy steps for cooking, tips for perfect rice, and ways to store leftovers. You can enhance this dish with flavors, or serve it with tacos and bowls. Always feel free to adapt the recipe to fit your tastes. Enjoy making your cilantro lime rice and impress your family and friends!](https://blissfulmeal.com/wp-content/uploads/2025/07/df1e15ca-c255-476a-b8f5-f79f1d6c80b8-768x768.webp)