Cherry Chocolate Chunk Ice Cream Tasty Summer Delight
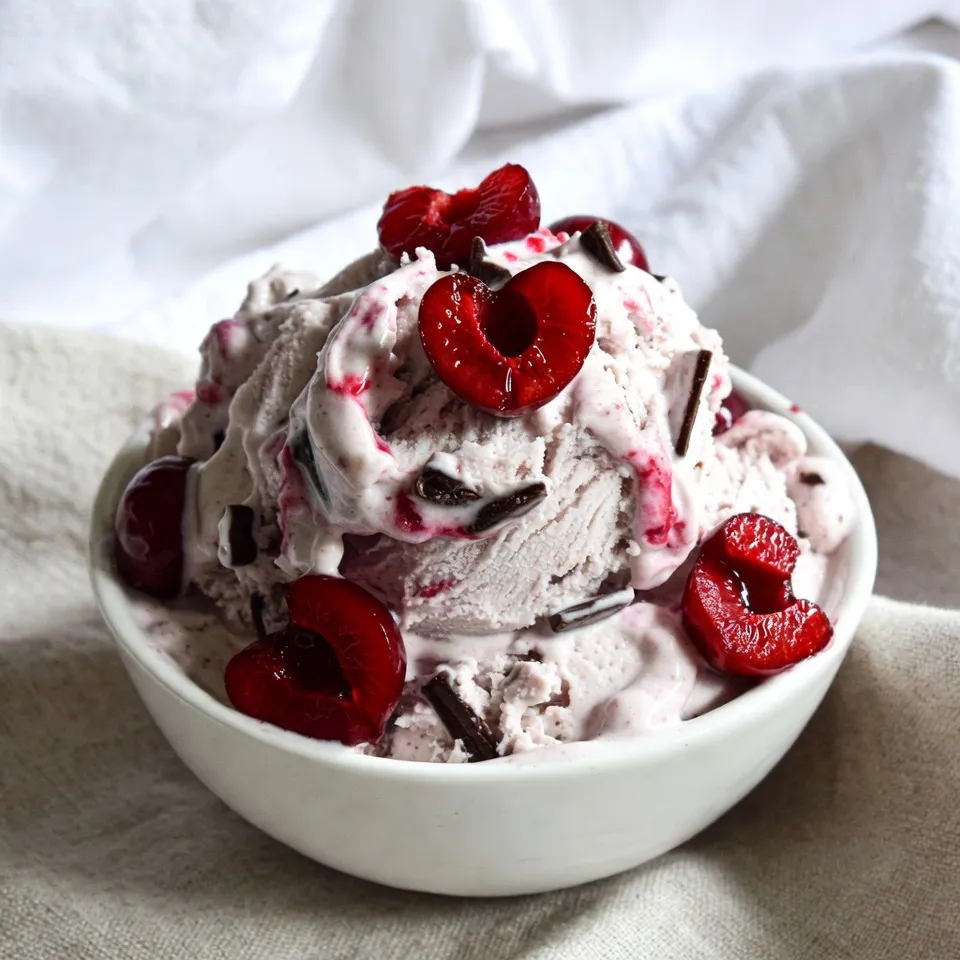

Looking for a sweet treat to cool you down this summer? I have the perfect recipe for you! Cherry Chocolate Chunk Ice Cream is a delightful mix of rich chocolate and tart cherries. With just a few simple ingredients and easy steps, you’ll create a creamy dessert that impresses everyone. Let’s dive into this tasty recipe and enjoy a summer delight you can share with friends and family!
Why I Love This Recipe
- Fresh and Fruity: This ice cream captures the essence of summer with the vibrant flavors of fresh cherries, making it a refreshing treat.
- Decadent Chocolate: The dark chocolate chunks add a rich contrast to the sweet cherries, creating a delightful balance in every bite.
- Easy to Make: With straightforward steps, this recipe allows even novice cooks to whip up a delicious homemade ice cream.
- Customizable: You can easily adjust the sweetness or substitute different fruits or chocolates to make this recipe your own.
Ingredients
List of Ingredients
– 2 cups fresh or frozen cherries, pitted and halved
– 1 cup heavy cream
– 1 cup whole milk
– ¾ cup granulated sugar, divided
– 1 teaspoon vanilla extract
– ½ cup dark chocolate chunks
– ¼ teaspoon salt
– 1 tablespoon lemon juice
Measurement Details
When measuring the cherries, make sure they are pitted. This helps avoid any surprises while eating. Use a liquid measuring cup for the cream and milk to get an accurate amount. For sugar, use dry measuring cups to ensure the right sweet balance.
Tips for Ingredient Quality
Use ripe, sweet cherries for the best flavor. Check for firmness and vibrant color. If you choose frozen cherries, pick a brand with no added sugar. For cream and milk, choose full-fat options. This gives your ice cream a rich, creamy texture. Dark chocolate chunks should be high quality, with at least 60% cocoa content. This adds depth to your ice cream.

Step-by-Step Instructions
Cooking the Cherry Mixture
First, take your fresh or frozen cherries. Pitting and halving them makes them easier to cook. In a medium saucepan, add the cherries, 2 tablespoons of granulated sugar, and lemon juice. Heat this over medium heat. Stir the mixture gently for about 5 to 7 minutes. You want the cherries to soften and release their juices. Once they look shiny and juicy, remove the pan from heat and set it aside to cool.
Whisking the Cream Mixture
While your cherry mixture cools, grab a large mixing bowl. In this bowl, add the heavy cream, whole milk, the remaining ½ cup of sugar, vanilla extract, and salt. Use a whisk to mix everything together. Keep whisking until the sugar dissolves completely. The mixture should become smooth and creamy. This base is what will make your ice cream rich and tasty.
Churning and Freezing
Now it’s time to combine the mixtures. Carefully fold the cooled cherry mixture into the cream mixture. Make sure to save a few cherry halves for later. Stir gently, but don’t overmix. You want to see swirls of cherry in your cream.
Next, pour this combined mixture into your ice cream maker. Churn it according to the manufacturer’s instructions for about 20 to 25 minutes. You want it to reach a soft-serve texture. In the last few minutes, add the dark chocolate chunks. This step spreads the chocolate throughout the ice cream.
Once done, transfer the ice cream into an airtight container. To keep it fresh, press plastic wrap against the top. This will help prevent ice crystals. Seal the container with its lid and freeze for at least 4 hours. This will make it firm enough for scooping. Enjoy your homemade cherry chocolate chunk ice cream!
Tips & Tricks
How to Achieve Creamy Texture
To get that rich and creamy texture, use heavy cream and whole milk. These ingredients keep the ice cream smooth. Make sure to whisk the cream and sugar until fully mixed. This step is key for a velvety base. Churning the mixture in your ice cream maker is also important. It incorporates air, which makes the ice cream light and fluffy.
Preventing Ice Crystals
Ice crystals can ruin your ice cream’s texture. To avoid this, press plastic wrap against the surface of the ice cream before sealing it. This keeps air out and helps maintain a smooth texture. Also, try to store the ice cream in an airtight container. This way, it won’t absorb other flavors from the freezer.
Serving Suggestions
For a fun serving idea, use chilled bowls. This keeps the ice cream from melting too quickly. Top each bowl with reserved cherry halves and extra chocolate chunks. This adds a nice touch and makes it look fancy. You can also pair your ice cream with a warm dessert, like brownies or pie. The contrast of warm and cold is a treat!
Pro Tips
- Choose the Right Cherries: Opt for ripe, sweet cherries for the best flavor. If using frozen cherries, ensure they’re unsweetened to keep control of the sugar levels.
- Chill Your Mixture: For a creamier texture, refrigerate the ice cream base for at least an hour before churning. This helps the mixture churn more efficiently.
- Use Good Quality Chocolate: Invest in high-quality dark chocolate chunks. They will melt beautifully and enhance the overall taste of your ice cream.
- Experiment with Add-ins: Feel free to add other mix-ins such as nuts or different fruits in the last few minutes of churning for added texture and flavor.

Variations
Alternative Fruits to Use
You can swap cherries for other fruits. Try strawberries, blueberries, or raspberries. These fruits add bright flavors. Each fruit brings its own sweet touch. Mix and match for fun combinations. For example, use peaches for a summer vibe. You can even mix fruits together for a unique twist.
Dairy-Free or Vegan Options
Want a dairy-free treat? Use coconut milk instead of cream and milk. Almond milk works well too. Replace sugar with maple syrup or agave. For a creamy texture, add soaked cashews blended smooth. This way, you keep the sweet, rich taste. Your vegan friends will love this choice!
Chocolate Types and Combinations
Dark chocolate is a classic choice for this ice cream. But you can also use milk chocolate for a sweeter flavor. White chocolate adds a creamy touch with a hint of sweetness. For a fun twist, try adding chocolate-covered cherries. This gives a double dose of chocolate delight. Mix different chocolates to suit your taste.
Storage Info
Best Practices for Storing Ice Cream
To keep your cherry chocolate chunk ice cream fresh, use an airtight container. This prevents air from getting in and keeps your ice cream creamy. Press plastic wrap against the surface before sealing it. This step stops ice crystals from forming, which can ruin the texture.
Freezing Time Recommendations
After you churn the ice cream, freeze it for at least 4 hours. This allows it to harden properly. If you want to enjoy it later, leave it in the freezer until you are ready to serve. Just remember, the longer it sits, the firmer it gets.
Shelf Life and Usage Tips
Homemade ice cream lasts about 2 to 3 weeks in the freezer. After that, it may lose flavor and texture. To make the most of your ice cream, enjoy it sooner rather than later. If you notice ice crystals or freezer burn, it’s best to toss it out for a fresh batch!
FAQs
Can I use frozen cherries for this recipe?
Yes, you can use frozen cherries. They work well and save time. Just thaw them before cooking. This helps them release their juices. You’ll enjoy that fruity flavor just like fresh cherries.
How long can I store homemade ice cream?
You can store homemade ice cream for about two weeks. Keep it in an airtight container. This keeps it fresh and tasty. After two weeks, the flavor might fade a bit. If it lasts longer, check for ice crystals.
What if I don’t have an ice cream maker?
No ice cream maker? No problem! You can still make this treat. After mixing all your ingredients, pour them into a shallow dish. Freeze it for about 30 minutes. Stir every 30 minutes until it gets creamy. This method takes more time but gives you a delicious result.
This blog post covered all the key steps to make tasty cherry ice cream. We discussed the right ingredients, how to mix and freeze them, and tips for a creamy treat. I shared variations and storage tips to help you enjoy it longer. Remember, using quality ingredients makes a big difference. With these steps and tips, you can create a delicious dessert that everyone will love. Go ahead and make your cherry ice cream; it’s easier than you think! Enjoy your sweet creatio

Cherry Chocolate Chunk Ice Cream
Ingredients
- 2 cups fresh or frozen cherries, pitted and halved
- 1 cup heavy cream
- 1 cup whole milk
- ¾ cup granulated sugar, divided
- 1 teaspoon vanilla extract
- ½ cup dark chocolate chunks
- ¼ teaspoon salt
- 1 tablespoon lemon juice
Instructions
- In a medium saucepan set over medium heat, combine the halved cherries, 2 tablespoons of granulated sugar, and lemon juice. Cook for approximately 5 to 7 minutes, stirring occasionally, until the cherries soften and begin to release their vibrant juices. Once cooked, remove from heat and allow the mixture to cool slightly.
- While the cherry mixture cools, take a large mixing bowl and whisk together the heavy cream, whole milk, the remaining ½ cup of sugar, vanilla extract, and salt. Continue whisking until the sugar is completely dissolved and the mixture is smooth.
- Carefully fold the cooled cherry mixture into the cream mixture, making sure to reserve a few cherry halves for garnish later. Stir gently until the two mixtures are well incorporated.
- Pour the combined mixture into your ice cream maker and churn according to the manufacturer's instructions, typically for about 20 to 25 minutes, or until it achieves a soft-serve consistency.
- During the last few minutes of churning, gently fold in the dark chocolate chunks, allowing them to distribute evenly throughout the ice cream.
- Transfer the finished ice cream into an airtight container. To prevent ice crystals from forming, press a piece of plastic wrap directly against the surface of the ice cream before sealing the container with its lid.
- Freeze the ice cream for a minimum of 4 hours or until it is firm enough for scooping and serving.


![When making Butterscotch Pretzel Cookies, you need just the right ingredients. Each one adds to the sweet and salty delight. Here’s what you’ll need: - 1 cup unsalted butter, softened to room temperature - 3/4 cup packed brown sugar - 1/2 cup granulated sugar - 2 large eggs - 1 teaspoon pure vanilla extract - 2 1/4 cups all-purpose flour - 1 teaspoon baking soda - 1/2 teaspoon fine sea salt - 1 cup butterscotch chips - 1 cup crushed pretzels (plus extra for topping) - Coarse sea salt for sprinkling These ingredients work together to create a cookie that is both chewy and crunchy. The butter and sugars blend for a rich taste. The butterscotch chips melt slightly, adding sweetness, while the pretzels give that perfect crunch. Don't forget to check the [Full Recipe] for more details on how to put it all together. Start by preheating your oven to 350°F (175°C). This step is vital for even baking. While the oven heats, grab two baking sheets. Line them with parchment paper. This will help the cookies from sticking to the sheets. In a large mixing bowl, add 1 cup of softened unsalted butter. Then, pour in 3/4 cup of packed brown sugar and 1/2 cup of granulated sugar. Use an electric mixer to beat these together. Mix until the mixture is light and fluffy. This usually takes about 2 to 3 minutes. Now, add 2 large eggs one by one. Make sure to mix each egg in completely before adding the next. After the last egg, stir in 1 teaspoon of pure vanilla extract. This gives a nice flavor boost to the cookies. In a separate bowl, whisk together 2 1/4 cups of all-purpose flour, 1 teaspoon of baking soda, and 1/2 teaspoon of fine sea salt. This step ensures that the dry ingredients mix well. Gradually add this mix to the wet ingredients. Mix on low speed until just combined. Avoid overmixing; the dough should still be soft and slightly sticky. Next, gently fold in 1 cup of butterscotch chips and 1 cup of crushed pretzels. This will add both sweetness and crunch to each cookie. Make sure the chips and pretzels are evenly mixed into the dough. Using a cookie scoop or a tablespoon, drop rounded portions of the dough onto the prepared baking sheets. Space them about 2 inches apart. For added texture, press a few extra crushed pretzels onto the top of each cookie. Finish by sprinkling a pinch of coarse sea salt on top of each. Place the baking sheets in the oven and bake for 10 to 12 minutes. Look for the edges to turn golden brown. Once baked, let them cool on the baking sheets for about 5 minutes. Then, move the cookies to a wire rack to cool completely. For the full recipe, check out the detailed instructions. Enjoy these sweet and salty treats! To get a great texture, focus on your butter. Use softened unsalted butter. This helps create a creamy base. Mix your butter and sugars well. Aim for light and fluffy. Overmixing can lead to tough cookies. When adding flour, mix just until combined. This keeps the dough soft and slightly sticky. You can swap some ingredients if needed. For a dairy-free version, use vegan butter. You can also replace butterscotch chips with chocolate chips. If you want a crunch, try nuts instead of pretzels. Omit the sea salt if you prefer less saltiness. Make sure to adjust the amount based on your taste. To bake evenly, space your dough balls correctly. Keep about two inches between them on the baking sheet. This allows heat to circulate. Use parchment paper to prevent sticking. Keep an eye on the baking time. Everyone’s oven is different. You want golden edges but soft centers. Rotate your baking sheets halfway through for even results. Check out the Full Recipe for step-by-step details! {{image_4}} You can switch up your cookies by adding chocolate chips. Mixing butterscotch and chocolate gives a rich flavor. Just replace half the butterscotch chips with chocolate chips. This adds a deep, sweet taste that many love. You can use dark or milk chocolate, depending on your preference. This twist makes them even more decadent! Nuts can add crunch and flavor to your cookies. Try adding chopped pecans or walnuts. They mix well with butterscotch and pretzels. If you like dried fruit, add some raisins or cranberries. This gives a burst of sweetness. You can even use coconut flakes for a tropical vibe. Just be careful not to add too much, or the dough may become too dry. You can make these cookies gluten-free with simple swaps. Use gluten-free flour instead of all-purpose flour. For vegan cookies, replace the butter with coconut oil or vegan butter. You can use flax eggs instead of regular eggs. Just mix one tablespoon of ground flaxseed with two and a half tablespoons of water, then let it sit. This will create a great egg substitute! These options let everyone enjoy the sweet and salty delight of butterscotch pretzel cookies. For the full recipe, check out the complete guide. To keep your butterscotch pretzel cookies fresh, store them in an airtight container. Place parchment paper between layers to prevent sticking. Keep them at room temperature for up to one week. If you want to enjoy them later, consider freezing some. This way, you can savor that sweet and salty delight anytime. Freezing cookies is easy. First, let them cool completely. Then, place them in a single layer on a baking sheet. Freeze until solid, then transfer them to a freezer-safe bag. Remove excess air to avoid freezer burn. You can freeze these cookies for up to three months. When you’re ready, just thaw them overnight in the fridge or at room temperature. To bring back the warm, gooey texture, reheat your cookies. Preheat the oven to 350°F (175°C). Place the cookies on a baking sheet and warm them for about 5-7 minutes. This will make them soft and delicious again. Enjoy them fresh, just like they came out of the oven! For the full recipe, check out the detailed instructions above. To make Butterscotch Pretzel Cookies, start with soft butter and sugars. Cream them together in a bowl. Then, add eggs and vanilla. Mix flour, baking soda, and salt in another bowl. Combine the dry mix with the wet mix. Finally, fold in butterscotch chips and crushed pretzels. Scoop dough onto baking sheets, press in extra pretzels, and sprinkle sea salt on top. Bake at 350°F for 10-12 minutes. For the full recipe, check above. Yes, you can make these cookies ahead of time! You can prepare the dough and chill it in the fridge for up to 3 days. This helps the flavors develop even more. When you're ready, scoop and bake as usual. You can also bake them and store them in an airtight container for up to a week. To prevent cookies from spreading, make sure your butter is not too warm. Use cold eggs and chill the dough for about 30 minutes before baking. Also, keep enough space between each cookie on the tray. A good rule is to leave 2 inches apart. Finally, use parchment paper to help maintain their shape while baking. In this post, we explored making Butterscotch Pretzel Cookies. We covered the right ingredients, step-by-step instructions, and tips for perfect cookies. Variations like adding nuts or making gluten-free options were also discussed. For best results, store your cookies properly to keep them fresh. Remember to have fun and experiment with flavors as you bake. Happy cooking!](https://blissfulmeal.com/wp-content/uploads/2025/07/eddfa83e-bdca-458a-b4cd-a6341ad0b6ee-768x768.webp)