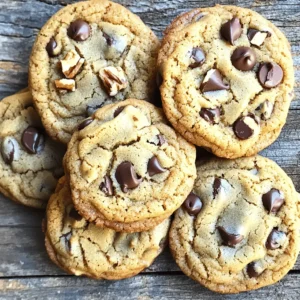
Brown Butter Chocolate Chip Cookies Irresistible Treat

If you love cookies, then you need to try brown butter chocolate chip cookies. They combine rich, nutty flavors with classic sweetness for a truly irresistible treat. Once you master the simple steps of browning butter, you’ll create a cookie you’ll crave again and again. Let me guide you through the best ingredients, tools, and tips to get perfect results every time. Are you ready to bake some magic?
Ingredients
List of Ingredients
– 1 cup unsalted butter (2 sticks)
– 1 cup brown sugar, packed
– 1/2 cup granulated sugar
– 1 large egg
– 1 teaspoon pure vanilla extract
– 2 1/4 cups all-purpose flour
– 1 teaspoon baking soda
– 1/2 teaspoon sea salt
– 1 cup semi-sweet chocolate chips
– 1/2 cup chopped pecans or walnuts (optional)
Tips for Selecting Ingredients
– Quality of chocolate chips: Choose high-quality semi-sweet chips. They add rich flavor. Brands like Ghirardelli or Guittard work great.
– Importance of using unsalted butter: Unsalted butter gives you control over the salt. This allows you to balance flavors better.
– Choosing fresh ingredients: Always use fresh flour, sugar, and eggs. They make a big difference in taste and texture. Fresh ingredients ensure your cookies rise well and taste amazing.
Step-by-Step Instructions
Step 1: Brown the Butter
To begin, melt 1 cup of unsalted butter in a medium saucepan over medium heat. Stir the butter gently as it melts. This helps it cook evenly. Keep an eye on it. After about 5-7 minutes, the butter will change. It will turn a rich amber color and smell nutty. This is the perfect time to take it off the heat. Let it cool for a few minutes before using.
Step 2: Mix Sugars and Brown Butter
In a large mixing bowl, combine 1 cup of packed brown sugar and 1/2 cup of granulated sugar with the cooled brown butter. You can use a whisk or a mixer for this step. Mix until everything is smooth and well combined. This is key for a rich flavor.
Step 3: Combine Dry Ingredients
In a separate bowl, whisk together 2 1/4 cups of all-purpose flour, 1 teaspoon of baking soda, and 1/2 teaspoon of sea salt. Sifting these dry ingredients helps avoid lumps. Then, gradually add this dry mix to the wet mixture. Stir gently. Be careful not to overmix, as this keeps the cookies tender.
Step 4: Baking the Cookies
Preheat your oven to 350°F (175°C). Prepare your baking sheet by lining it with parchment paper. This prevents sticking and makes cleanup easy. Use a tablespoon or a cookie scoop to drop rounded dough onto the sheet. Space them about 2 inches apart. This allows room for the cookies to spread while baking. Bake for 10-12 minutes. Watch closely; the edges should be golden brown, while the centers should stay soft. After baking, let the cookies cool on the sheet for 5 minutes before moving them to a wire rack.
Tips & Tricks
Achieving the Perfect Texture
To get the right texture, you can choose between soft and chewy or crispy cookies. For soft cookies, take them out when the edges are golden, but the center is still soft. Let them cool on the baking sheet for about 5 minutes, then move them to a wire rack. If you prefer crispy cookies, bake them a bit longer until they turn a deep golden brown.
Enhancing Flavor Profiles
You can easily enhance the flavor of your cookies. Consider adding chopped nuts like pecans or walnuts. They add a nice crunch. You can also try different extracts, such as almond or hazelnut. For chocolate lovers, swap semi-sweet chocolate chips for dark chocolate or milk chocolate for a sweeter taste.
Presentation Tips
For a fun serving idea, stack the cookies on a decorative platter. Dust them lightly with powdered sugar to impress your guests. You can also pair these cookies with a glass of cold milk or a warm cup of coffee. This makes for a cozy treat experience that everyone will enjoy.

Variations
Healthier Alternatives
You can make these cookies a bit healthier with some easy swaps. Instead of all-purpose flour, try whole wheat flour for more fiber. You can also reduce the sugar by using less brown or granulated sugar. If you want a vegan option, use coconut oil in place of butter and a flax egg instead of a chicken egg. Just mix one tablespoon of ground flaxseed with three tablespoons of water and let it sit for a few minutes.
Flavor Variants
To add more flavor to your cookies, try mixing in spices like cinnamon or nutmeg. These spices can give a warm, cozy taste. You can also customize your mix-ins. Add dried fruits like cranberries or cherries for a fruity twist, or even throw in some shredded coconut for a tropical vibe. The options are endless, so feel free to get creative!
Seasonal Twists
You can adapt these cookies for holidays or special occasions. For a festive touch, add peppermint extract during Christmas or sprinkle in some pumpkin spice for fall. You can also cut the dough into fun shapes for birthdays or celebrations. Serve them with themed decorations to make your treats stand out. These small twists can turn an everyday cookie into a special treat!
Storage Info
Best Practices for Storing Cookies
For the best taste, store cookies at room temperature. Use an airtight container to keep them fresh. They will stay soft and tasty for up to a week. If you want to keep them longer, the fridge works too. Just remember to let them warm up a bit before eating. This makes them soft again.
Freezing Instructions
Freezing cookie dough is easy. Scoop the dough into balls and place them on a tray. Freeze them for about an hour. Then, move the dough balls into a freezer bag. This way, you can bake fresh cookies anytime.
To store baked cookies in the freezer, let them cool first. Place them in a freezer-safe container. Layer them with parchment paper to avoid sticking. They can last for up to three months in the freezer.
Shelf Life Information
For the best taste, eat the cookies within a week if kept at room temperature. In the fridge, they last about two weeks. If frozen, they stay fresh for up to three months. Always check for any changes in smell or texture before eating.
FAQs
What makes brown butter cookies different?
Brown butter cookies taste richer and nuttier. The browning process adds depth to the flavor. You heat the butter until it turns golden brown. This step makes all the difference. It creates a warm, comforting taste that regular butter does not. Your cookies will have a unique flavor that stands out.
Can I use salted butter?
Yes, you can use salted butter. However, it may change the cookie’s taste. Salted butter adds extra saltiness. This can enhance flavor but may overpower sweetness. If you use salted butter, reduce the sea salt in the recipe to balance the flavors.
How do I know when the cookies are done?
Look for golden edges and soft centers. The cookies should appear slightly underbaked in the middle. They will continue to cook on the baking sheet after you remove them. This gives them a soft, chewy texture. Trust your instincts; the aroma will also guide you.
What should I do if my cookies spread too much?
If cookies spread too much, check your dough. Ensure you chill it for at least 30 minutes. This helps firm up the butter. Also, avoid overmixing the dough. If the dough is too warm, the cookies will spread. Lastly, ensure your baking sheet is not too warm.
Brown butter cookies rely on simple, high-quality ingredients to taste great. You learned about the steps to brown butter and mix your dough for perfect cookies. I shared tips to create the best texture, add flavors, and store your treats well.
Whether you want a chewy cookie or a crispy one, you have the tools to succeed. Baking should be fun, so experiment with different flavors and variations along the way. Enjoy your baking and savor every bite!