Skip to content
About
Contact
Cookie Policy
Copyright Policy
Disclaimer
Search
Home
Dinner
Appetizer
Desserts
Drinks
About
Contact
Privacy Policy
Toggle Menu
Home
/
Appetizer
- Page 10
Appetizer
Spicy Honey Garlic Wings Irresistible Flavor Boost
Easy Greek Tzatziki Dip Flavorful and Refreshing Treat
Loaded Veggie Quesadillas Tasty and Simple Recipe
Crispy Coconut Shrimp Delightful and Easy Recipe
Lemon Dill Potato Salad Fresh and Flavorful Side
Roasted Red Pepper Hummus Wraps Quick and Tasty Meal
Caramelized Onion and Goat Cheese Flatbread Delight
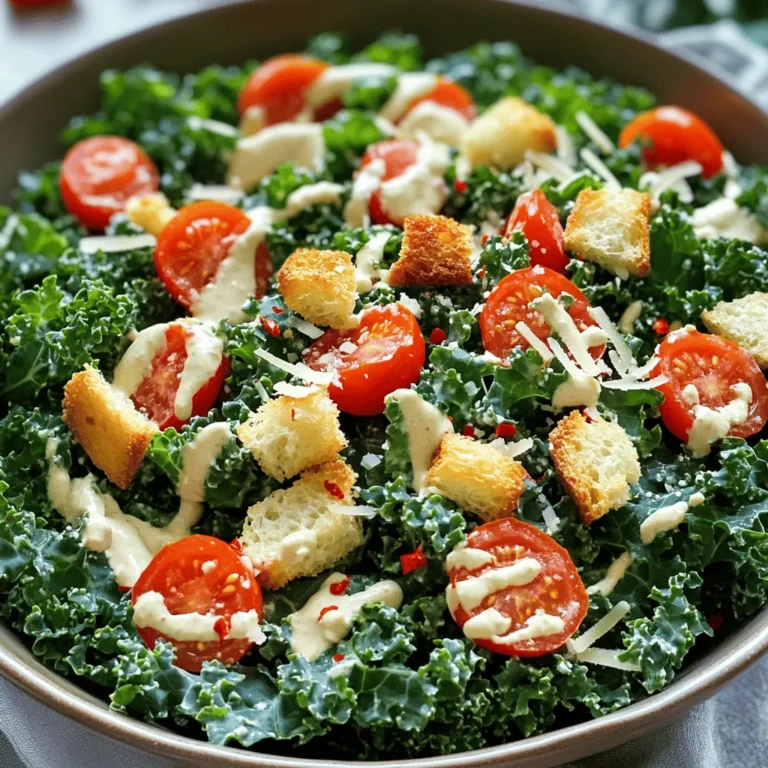
Chopped Kale Caesar Salad Fresh and Flavorful Dish
Jalapeño Cheddar Pretzel Knots Flavorful Snack Recipe
Cheesy Jalapeno Cornbread Irresistible Flavor Boost
Page navigation
Previous Page
Previous
1
…
8
9
10
11
12
…
23
Next Page
Next
Home
Dinner
Appetizer
Desserts
Drinks
About
Contact
Privacy Policy
Toggle Menu Close
Search for:
Search


. To make the filling, start by sautéing the vegetables. Heat olive oil in a large skillet over medium heat. Once the oil shimmers, add diced red bell pepper, zucchini, and sliced mushrooms. Cook these for about 5-7 minutes. Stir often. You want them soft and fragrant. Next, add the black beans and corn. Sprinkle in the ground cumin and smoked paprika. Season with salt and black pepper. Mix well, then cook for another 2-3 minutes. This helps all the flavors blend. After everything heats up, remove the skillet from the heat. Transfer the veggie mixture to a bowl and let it cool. Now, let’s layer the quesadillas. Wipe out the skillet with a paper towel. Place one tortilla back in the skillet. Sprinkle half of it with shredded cheese. Next, add a good heap of the veggie mixture on top of the cheese. Then, layer another sprinkle of cheese over the veggies. Carefully fold the tortilla in half. Cook it for about 3-4 minutes on each side. You want the tortilla golden brown and crispy. The cheese should melt nicely. Repeat this with the remaining tortillas and filling. Once all your quesadillas are cooked, slice them into wedges. Arrange these tasty pieces on a serving platter. For a nice touch, sprinkle chopped cilantro on top. You can serve with small bowls of sour cream or Greek yogurt, and zesty salsa. This makes it fun for dipping. Enjoy your delicious creation! For the full recipe, check out the details above. To boost flavor in your loaded veggie quesadillas, use spices like: - Ground cumin: It adds warmth. - Smoked paprika: This gives a nice smoky taste. For cheese, I love using a mix. Try: - Cheddar: Sharp and tangy. - Monterey Jack: Creamy and mild. - A blend: This gives you the best of both worlds. To get the perfect crispiness, ensure your skillet is hot. Cook each quesadilla for about 3-4 minutes on each side. You want a golden brown color and melted cheese. You can choose different cooking methods: - Grill: Adds a smoky flavor. - Skillet: Perfect for easy flipping. Plating is key for a great look. Serve your quesadillas on a bright platter. Top them with fresh cilantro for a pop of color. Add small bowls of sour cream and salsa on the side. This not only looks nice but also lets everyone dip as they like. For the full recipe, check the details above. {{image_4}} You can add protein to your quesadillas easily. Chicken is a great choice. Simply cook it and shred it before mixing it with your veggies. If you want a vegan option, try tofu. Press and cube the tofu, then sauté until golden. This adds texture and boosts protein. If you're looking for dairy-free options, you have choices. Many brands offer vegan cheese that melts well. Nutritional yeast is another great substitute. It adds a cheesy flavor without dairy. You can also mix different cheese types for a unique taste. Try a blend of cheddar and mozzarella for creaminess. You can customize your quesadillas with seasonal veggies. Fresh spinach adds color and nutrients. Roasted sweet potatoes give a sweet touch. Bell peppers and onions are also tasty choices. Play around with your favorites to make a dish that you love. Add what you enjoy most for a personal touch. To keep your loaded veggie quesadillas fresh, store them the right way. - Refrigerating leftovers: Place any leftover quesadillas in an airtight container. They will stay fresh in the fridge for up to three days. Make sure they cool down first to avoid steam buildup, which can make them soggy. - Freezing cooked quesadillas: If you want to save some for later, freeze them. Wrap each quesadilla in plastic wrap or foil. Then, put them in a freezer bag. They can last for about two months in the freezer. When it’s time to eat your stored quesadillas, reheating them properly is key. - Best methods to maintain texture: For the best results, heat them in a skillet over medium heat. This method keeps them crispy. You can also use an oven at 350°F for about 10-15 minutes. - Tips for reheating without drying out: If using a microwave, cover the quesadilla with a damp paper towel. This helps keep it from drying out. Heat in short bursts, checking often to avoid overcooking. Knowing how long to keep your quesadillas is important. - How long to keep in the fridge: Store them in the fridge for up to three days. After that, they may lose flavor and texture. - Signs of spoilage: Look out for any off smells or visible mold. If you see any changes, it's best to toss them. Fresh quesadillas should smell good and look appetizing. For more details on making these delicious quesadillas, check out the Full Recipe. Yes, you can make Loaded Veggie Quesadillas ahead of time. To do this, prepare the filling and let it cool. You can then store it in the fridge for up to three days. When ready to cook, fill your tortillas with the veggie mix and cheese as usual. Cook them in a skillet until they are crispy and hot. This way, you save time and still enjoy a tasty meal. If you need a substitute for tortillas, you have options. You can use corn tortillas if you want a gluten-free choice. Lettuce wraps are also great for a low-carb option. You can even try using large cabbage leaves. These will hold your filling well and add a nice crunch. To keep your quesadillas crispy, avoid overloading them with filling. Use just enough to enjoy the flavors without making a mess. Cook them on medium heat, and flip them only once. Let them rest for a minute before slicing. This helps keep them crispy until serving. Loaded veggie quesadillas are delicious and easy to make with fresh ingredients. You start by sautéing veggies and mixing in beans and corn. Then, assemble and cook for that perfect crunch. Don’t forget to add your favorite spices and herbs for flavor. You can even switch up ingredients to suit your tastes. Store leftovers properly for later enjoyment. With these tips, you’ll impress anyone with great quesadillas. Enjoy creating your own tasty versions!](https://blissfulmeal.com/wp-content/uploads/2025/07/fd9f3c66-6857-4d5a-a2bd-dfe16e095c1a-768x768.webp)

![- 2 pounds baby potatoes - 1/4 cup fresh dill, finely chopped - 1/3 cup creamy Greek yogurt - 2 tablespoons mayonnaise (optional for a richer taste) - 1 lemon, zested and juiced - 2 green onions, thinly sliced - 1 clove garlic, finely minced - Sea salt and freshly ground black pepper, to taste - 1/4 cup celery, finely diced - 1/4 cup red bell pepper, finely diced You need fresh baby potatoes for a nice texture. They hold their shape well. The dill adds a bright and fresh taste. You can find it in your local grocery store. Greek yogurt gives creaminess without too much fat. Mayonnaise is optional, but it can make the salad richer. Use a fresh lemon for zest and juice. The zest adds a bright flavor, while the juice adds tang. Green onions bring a mild onion taste. Garlic adds depth and flavor. Sea salt and pepper help enhance all the flavors. The celery and red bell pepper give a nice crunch. They also add color to your dish. If you want to make a big batch, adjust the amounts. You can find the Full Recipe for detailed steps and serving ideas. - Greek yogurt alternatives: You can use sour cream or a plant-based yogurt. - Mayonnaise options: Try avocado or hummus for a healthy twist. - Dairy-free alternatives: Use coconut yogurt or leave out dairy entirely. Experiment with these swaps to fit your taste and dietary needs! Boiling the potatoes Start by placing two pounds of halved baby potatoes into a large pot. Add enough cold water to cover the potatoes by about an inch. Sprinkle in a pinch of sea salt for flavor. Heat the pot over high heat until the water boils. Once boiling, lower the heat to medium-low. Let the potatoes simmer for 15 to 20 minutes. Check for doneness by piercing them with a fork. If it goes in easily, they are ready. Preparing the dressing While the potatoes boil, it's time to make the dressing. In a small bowl, whisk together 1/3 cup of creamy Greek yogurt and 2 tablespoons of mayonnaise, if you want extra richness. Add the zest and juice of one lemon, minced garlic, and a pinch of salt and pepper. Whisk everything until it’s creamy and smooth. Mixing warm potatoes with the dressing Once the potatoes are cooked and drained, transfer them to a mixing bowl while they are still warm. Pour the tangy dressing over the potatoes. This helps the potatoes soak up the flavors better. Gently fold the dressing in with a spatula, ensuring all potatoes are coated well. Adding fresh herbs and vegetables Next, add in 1/4 cup of finely chopped fresh dill, 2 sliced green onions, and 1/4 cup each of diced celery and red bell pepper. These ingredients bring freshness and color to the salad. Mix everything gently until well combined. Refrigeration time For the best taste, chill the potato salad in the refrigerator for at least 30 minutes. This allows the flavors to meld together. It also makes the salad refreshing and cool, perfect for hot days. Presentation tips When ready to serve, place the salad in an elegant bowl. You can garnish it with extra sprigs of dill or lemon wedges. This adds an appealing touch and makes the dish more inviting. Enjoy your Lemon Dill Potato Salad as a bright side at any meal! To make the best lemon dill potato salad, focus on the potatoes. Choose baby potatoes for their creamy texture. Boil them until they are fork-tender, about 15-20 minutes. This ensures a soft, yet firm bite. Next, balance the flavors well. Use fresh dill for a bright taste. The lemon juice adds zing, while the creamy Greek yogurt gives richness. Taste your salad as you mix. Adjust salt, pepper, or lemon juice as needed. This simple step makes a big difference. Storing leftovers properly keeps your salad fresh. Place any extra potato salad in an airtight container. This helps keep flavors intact. It can last in the fridge for up to four days. Just remember to give it a stir before serving again. This potato salad pairs well with grilled meats. Serve it alongside chicken or fish for a complete meal. It also shines at picnics and gatherings. Its bright flavors and creamy texture make it a hit. You can serve it cold or at room temperature for easy enjoyment. For the full recipe, check [Full Recipe]. Enjoy making this delicious dish! {{image_4}} You can change the flavor of your Lemon Dill Potato Salad by adding other herbs. Try mixing in fresh parsley or chives for a new twist. These herbs brighten up the dish even more. You can also add ingredients like crispy bacon or tangy feta cheese. Both options bring extra texture and flavor. Bacon adds a savory crunch, while feta gives a creamy, salty bite. For those who follow a vegan diet, you can easily make a vegan version of Lemon Dill Potato Salad. Swap out the Greek yogurt for a thick dairy-free yogurt. You can also skip the mayonnaise to keep it light. This version is just as tasty and satisfying. If you want low-carb options, consider using cauliflower instead of potatoes. It still holds flavor well and gives that comforting feel. You can also explore regional twists on this salad. For a Mediterranean flavor, add olives and sun-dried tomatoes. These ingredients bring a rich taste that pairs well with the lemon. If you prefer a Southern-style twist, try adding hard-boiled eggs and a dash of mustard. This version gives a creamy bite that many people love. Each variation offers a unique take on a classic dish, making it fun to explore! Can you make Lemon Dill Potato Salad ahead of time? Yes, you can make this salad a day before you need it. It tastes even better when chilled overnight. Just keep it covered in the fridge. What type of potatoes are best for potato salad? Baby potatoes work great for potato salad. They hold their shape well and have a nice, creamy texture. You can also use Yukon Golds for a similar effect. Caloric content per serving Each serving has about 180 calories. This makes it a light side dish that pairs well with many meals. Health benefits of key ingredients - Potatoes: Good source of vitamins and fiber. - Dill: Rich in antioxidants and may aid digestion. - Greek yogurt: Packed with protein and lower in fat than sour cream. How to fix a bland potato salad If your salad tastes bland, add a bit more salt and lemon juice. They can bring the flavors to life. You can also mix in more fresh herbs. Dealing with overly watery dressing If your dressing is too watery, add more Greek yogurt. This will thicken the dressing and enhance the creamy texture. You can also try adding a bit of Dijon mustard for flavor and thickness. This Lemon Dill Potato Salad is fresh and zesty. It features baby potatoes, dill, Greek yogurt, and lemon. Ingredients: - 2 pounds baby potatoes, halved - 1/4 cup fresh dill, finely chopped - 1/3 cup creamy Greek yogurt - 2 tablespoons mayonnaise (optional for a richer taste) - 1 lemon, zested and juiced - 2 green onions, thinly sliced - 1 clove garlic, finely minced - Sea salt and freshly ground black pepper, to taste - 1/4 cup celery, finely diced - 1/4 cup red bell pepper, finely diced Instructions: 1. First, place the halved baby potatoes in a large pot. Fill with cold water to cover the potatoes by an inch. Add salt to the water. 2. Heat the pot over high heat until boiling. Then, lower the heat to medium-low. Simmer for 15-20 minutes, until a fork easily pierces the potatoes. 3. Drain the potatoes in a colander and let them cool for a few minutes. Then, transfer the warm potatoes to a mixing bowl. 4. In another bowl, whisk the Greek yogurt, mayonnaise (if using), lemon zest, lemon juice, minced garlic, and a pinch of salt and pepper until creamy. 5. Pour the dressing over the warm potatoes. Gently fold in the dill, green onions, celery, and red bell pepper. Mix until coated. 6. Taste the salad and adjust the seasonings if needed. Add more salt, pepper, or lemon juice for flavor. 7. Chill the potato salad in the refrigerator for at least 30 minutes before serving. This helps the flavors blend. Prep Time: 15 minutes Total Time: 1 hour Servings: 6 Serve this dish in a nice bowl. Garnish with extra dill or lemon wedges for a beautiful touch. Enjoy this refreshing salad on warm days! In this article, we explored how to make a delicious Lemon Dill Potato Salad. We detailed the key ingredients and offered handy substitutions, so you can adapt the recipe to fit your needs. The step-by-step guide helps you create the perfect dish, while tips ensure great flavor and texture. Don't forget the variations for a unique twist. This salad is perfect for gatherings or as a tasty side for grilled meats. Enjoy creating a dish that is simple, fresh, and packed with flavor. You now have all the tools to impress anyone with your cooking!](https://blissfulmeal.com/wp-content/uploads/2025/07/371f48bb-7fe2-4e20-a5c5-40c4ce4522c6-768x768.webp)