Skip to content
About
Contact
Cookie Policy
Copyright Policy
Disclaimer
Search
Home
Dinner
Appetizer
Desserts
Drinks
About
Contact
Privacy Policy
Toggle Menu
Home
/
Appetizer
- Page 14
Appetizer
Dill Pickle Cheddar Biscuits Irresistible Savory Treat
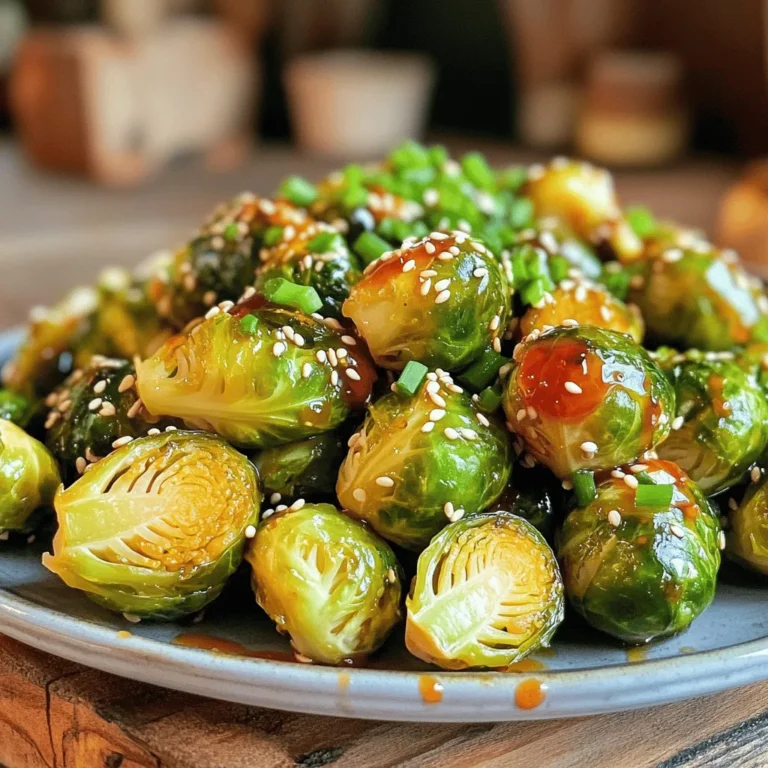
Savory Honey Sriracha Brussels Sprouts Recipe
Cheesy Garlic Breadsticks Simple and Flavorful Snack
Roasted Chickpea Snack Crispy and Healthy Treat
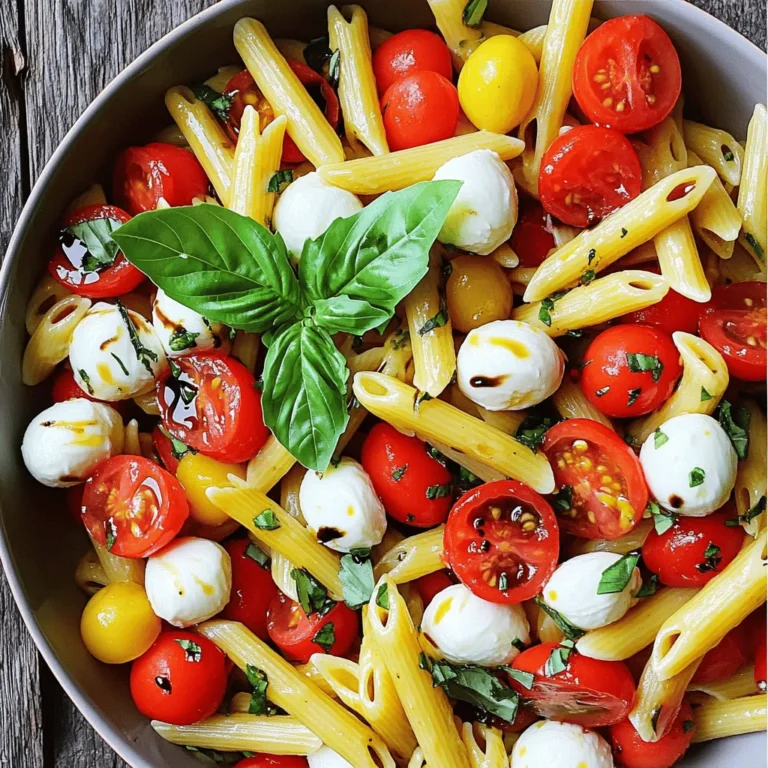
Caprese Pasta Salad Fresh and Flavorful Dish
Roasted Red Pepper Hummus Creamy and Flavorful Dip
Classic Egg Salad Simple and Flavorful Recipe
Homemade Guacamole Fresh and Flavorful Recipe
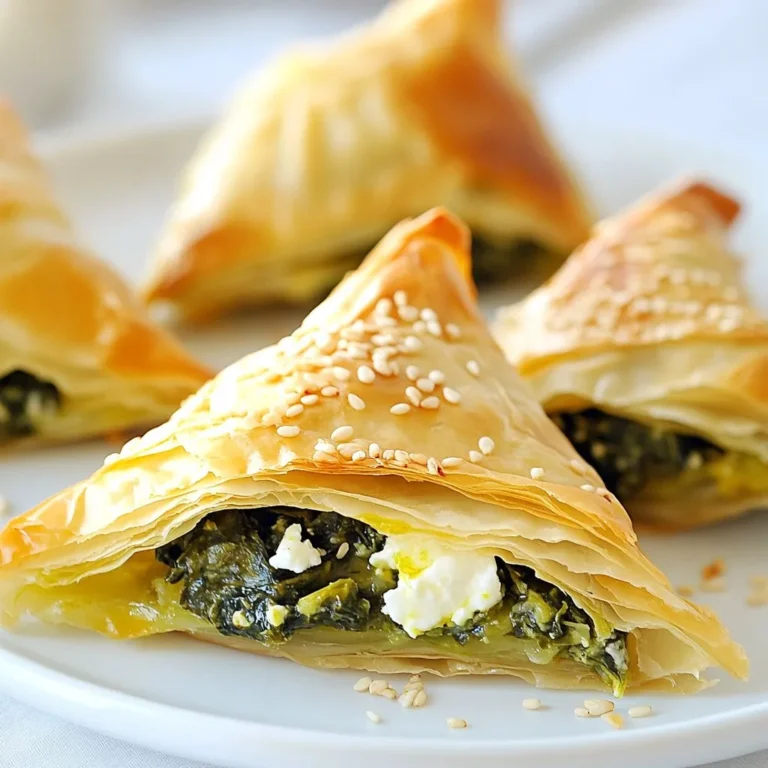
Greek Spanakopita Triangles Savory and Crispy Snack
Mango Black Bean Salsa Fresh and Flavorful Dip
Page navigation
Previous Page
Previous
1
…
12
13
14
15
16
…
23
Next Page
Next
Home
Dinner
Appetizer
Desserts
Drinks
About
Contact
Privacy Policy
Toggle Menu Close
Search for:
Search


![- 2 cups all-purpose flour - 1 packet active dry yeast - 1 cup warm water - 1 tablespoon granulated sugar - 1 tablespoon extra virgin olive oil - 1 teaspoon fine sea salt - 1 teaspoon garlic powder - 1 cup shredded mozzarella cheese - 1/2 cup freshly grated Parmesan cheese - Fresh parsley for garnish - 2 tablespoons unsalted butter, melted I love using fresh and simple ingredients for my cheesy garlic breadsticks. The main ingredients create the perfect base for the dough. You start with all-purpose flour for structure. The active dry yeast makes the bread rise. Warm water helps activate the yeast. The sugar feeds the yeast, creating a lovely flavor. Extra virgin olive oil adds richness, while fine sea salt brings it all together. For flavor, garlic powder is a must. It gives that classic garlic taste. The mozzarella cheese melts beautifully and creates that gooey texture we crave. Freshly grated Parmesan cheese tops it off with a savory bite. Fresh parsley makes a lovely garnish and adds a splash of color. Don't forget the melted butter! It enhances the flavor and gives the breadsticks a nice, golden finish. All these ingredients work together to create a snack that is simple yet full of flavor. For the full recipe, check out the detailed instructions! To start, combine warm water, sugar, and yeast in a bowl. Use water that feels warm to the touch, about 110°F (45°C). Stir gently with a spoon. Now, let it sit for 5 to 10 minutes. You should see bubbles forming on top. This frothy layer shows that the yeast is active. In a large mixing bowl, add the dry ingredients. Combine 2 cups of all-purpose flour, 1 teaspoon of fine sea salt, and 1 teaspoon of garlic powder. Whisk these together until mixed well. Next, add the yeast mixture and 1 tablespoon of extra virgin olive oil. Mix with a spoon until a dough starts to form. Transfer the dough onto a floured surface. Knead the dough for about 5 minutes. Work it until it feels smooth and elastic. This step helps develop the gluten in the dough. Now, shape the dough into a ball. Place it in a greased bowl and cover it with a clean towel. Let it rise in a warm spot for about 1 hour. The dough should double in size. While the dough rises, preheat your oven to 425°F (220°C). Once the dough has risen, punch it down gently. Roll it out on a floured surface into a rectangle, about 1/2 inch thick. Using a pizza cutter, cut the dough into strips about 1 inch wide. Line a baking sheet with parchment paper and arrange the strips with space between each. Brush melted butter on top of each strip. Then, sprinkle shredded mozzarella and grated Parmesan evenly over the dough. Now, bake the breadsticks in the preheated oven for 12 to 15 minutes. Watch closely until they turn golden brown and the cheese bubbles. Once done, remove them from the oven and let them cool for a few minutes. Enjoy your cheesy garlic breadsticks! For the full recipe, check out the [Full Recipe]. Kneading the dough is key. Use your palms to push and fold the dough. Keep it on a floured surface for less stickiness. Aim for five minutes of kneading. This helps create a smooth texture. You can tell it's ready when it bounces back after you poke it. The first rise is very important. Place the dough in a greased bowl. Cover it with a kitchen towel. Let it sit in a warm spot for an hour. This helps the dough grow and become fluffy. A good rise gives you soft and airy breadsticks. To get a golden crust, preheat your oven to 425°F (220°C). Bake the breadsticks for 12 to 15 minutes. Keep an eye on them. They should turn golden and the cheese should bubble. If your oven runs cooler, you may need to add a few minutes. Check the color to know when they're done. If you notice uneven baking, rotate the baking sheet halfway through. This ensures all sides bake evenly. For different ovens, you might need to adjust the temperature. Always trust your nose; if they smell great, they’re likely close to being done. For a nice presentation, serve the warm breadsticks on a wooden board. You can also use a cute breadbasket. This makes them look inviting. Pair them with marinara sauce or garlic butter for dipping. The saucy flavors complement the cheesy goodness very well. Feel free to sprinkle fresh parsley on top for color. It adds a nice touch and some freshness. A great snack can be even more fun with a little creativity in serving! For more ideas, check out the Full Recipe. {{image_4}} You can change the cheese for more flavor. Mix mozzarella and cheddar for a sharp taste. For a richer option, use gouda or fontina. If you're vegan, try cashew cheese or almond-based cheese. These options melt well and taste great. Herbs and spices can elevate your breadsticks. Add dried oregano or basil to the dough for a fresh twist. You could also sprinkle red pepper flakes for a kick. Top your breadsticks with sun-dried tomatoes or olives for extra flavor. If you need gluten-free breadsticks, use gluten-free flour blends. They work well and taste delicious. Whole wheat flour is another option for a healthier twist. It gives a nutty flavor and more nutrients. Just remember, the texture may be a bit different with these changes. For the full recipe, check the Garlicky Cheese-Stuffed Breadsticks section. To store leftover cheesy garlic breadsticks, place them in an airtight container. You can also wrap them in plastic wrap or aluminum foil. This keeps them fresh for a few days. Store them in the fridge. When you are ready to enjoy them again, just take them out. If you want to save breadsticks for a longer time, freezing is the best option. First, let the breadsticks cool completely. Then, wrap each one tightly in plastic wrap. You can also put them in a freezer bag. Make sure to remove as much air as possible. When you want to eat them, thaw them in the fridge overnight. For the best texture, reheat them in the oven at 350°F (175°C) for about 10 minutes. This helps them become warm and crispy again. When stored properly, cheesy garlic breadsticks can last in the fridge for about 3-4 days. In the freezer, they can stay fresh for up to 3 months. Always check for any signs of spoilage before eating. Enjoy your tasty treats! For the full recipe, check above. You can make cheesy garlic breadsticks without yeast by using a baking powder dough. Baking powder acts as a leavening agent, making the dough rise without waiting. Alternative recipes without yeast: - Use 2 cups of all-purpose flour. - Mix in 1 tablespoon of baking powder, 1 teaspoon of salt, and 1 teaspoon of garlic powder. - Blend in 1 cup of milk and 1/4 cup of melted butter. - Knead the dough briefly and roll it out. - Cut into strips and top with cheese. - Bake at 425°F for about 15 minutes. This method is quick and easy, perfect for a last-minute snack. Yes, you can use store-bought dough for cheesy garlic breadsticks. This saves time and effort. Pros and cons of using pre-made dough: - Pros: - Quick and easy to use. - No need to wait for dough to rise. - Consistent results. - Cons: - Less control over texture and flavor. - May contain preservatives. - Not as fresh as homemade dough. Using store-bought dough can be a great shortcut when you want cheesy garlic breadsticks fast. Dipping sauces can enhance the flavor of cheesy garlic breadsticks. Here are some popular choices: - Marinara Sauce: Classic tomato sauce adds a zesty touch. - Garlic Butter: Melted butter with garlic brings rich flavor. - Ranch Dressing: Creamy ranch offers a cool contrast. - Pesto: Fresh basil pesto adds a vibrant taste. Try these dips to elevate your cheesy garlic breadsticks experience. Making cheesy garlic breadsticks is simple and fun. We've covered the key ingredients, from all-purpose flour to mozzarella, that make these sticks flavorful. You learned step-by-step instructions for dough preparation and baking. The tips helped you perfect your technique for a golden crust. Now, enjoy exploring variations and storage tips to keep them fresh longer. Cheesy garlic breadsticks are versatile; customize them to suit your taste. Try different cheese blends or serve with tasty dips to elevate your meal. Get creative and enjoy this delicious treat!](https://blissfulmeal.com/wp-content/uploads/2025/06/13ada63a-89f1-4fbe-8965-71133ae09ab3-768x768.webp)


![To make a classic egg salad, you need a few simple items. Here’s what you’ll need: - 6 large eggs - 1/4 cup mayonnaise - 1 tablespoon Dijon mustard - 1 tablespoon freshly squeezed lemon juice - 1/4 cup celery, finely chopped - 1/4 cup red onion, finely chopped - 1 tablespoon fresh dill, chopped (or 1 teaspoon dried dill) - Salt and freshly cracked black pepper to taste - Crisp lettuce leaves (for serving) - Whole grain bread or wraps (optional) These ingredients come together to create a creamy and flavorful dish. Eggs are the star here, giving the salad its rich base. Mayonnaise adds creaminess, while mustard gives it a nice kick. The lemon juice brightens the flavors. Celery and red onion bring in crunch and a bit of bite. Dill adds a fresh, herbal note. You can adjust salt and pepper to your taste. For serving, crisp lettuce makes a great base, while whole grain bread or wraps can turn this salad into a hearty meal. If you want to try the full recipe, check it out [here]. To start, place the eggs in a saucepan. Cover them with cold water. Make sure the water is about an inch above the eggs. Turn the heat to medium-high. Bring the water to a rolling boil. Once boiling, cover the saucepan with a lid. Turn off the heat and let the eggs sit for 12-15 minutes. After the time is up, use a slotted spoon to take the eggs out. Put them in a bowl filled with ice water. Let them cool for about 5 minutes. This cools the eggs fast and helps with peeling. Once cool, tap the eggs gently on a hard surface. Peel the shell off under running water if you want. Chop the eggs into small pieces. In a large mixing bowl, mix the mayonnaise, Dijon mustard, and lemon juice. Whisk these ingredients until the mix is creamy and smooth. This dressing is the heart of your egg salad. Now, add the chopped eggs, celery, red onion, and dill into the bowl with the dressing. Use a spatula or spoon to gently fold everything together. Make sure each part gets coated in the dressing. This way, every bite is flavorful. Next, sprinkle in salt and cracked black pepper to taste. Mix it again to spread the seasoning evenly. You can taste it and adjust the seasoning if needed. For serving, you have two great choices. You can spoon the egg salad onto crisp lettuce leaves for a light dish. Or you can layer it on whole grain bread or wraps for a hearty meal. For the full recipe, follow these steps closely, and enjoy your egg-cellent classic egg salad! To cook eggs perfectly, start with cold water. Place your eggs in a saucepan. Cover them with water, an inch above the eggs. Heat on medium-high until it boils. Once boiling, cover the pot and turn off the heat. Let them sit for 12-15 minutes. This method makes sure the yolks are nice and firm. For the best flavor, use fresh ingredients. The mayonnaise, mustard, and lemon juice are key. I like to use whole egg mayonnaise for creaminess. Add a touch of Dijon mustard to give it a nice kick. Fresh lemon juice brightens the dish. Don’t forget to season with salt and pepper. Adjust to make it taste just right for you. When serving, think about color and texture. Use crisp lettuce leaves as a base. This makes the dish look fresh and bright. You can also serve the egg salad on whole grain bread or wraps. For a nice touch, sprinkle fresh dill on top. A slice of tomato on the side adds a pop of color. This makes your dish not just tasty but also beautiful! For the complete recipe, check out the Full Recipe. {{image_4}} You can add creamy avocado to your egg salad for a rich twist. Use one ripe avocado. Mash it with the dressing before mixing in the eggs. This adds a buttery texture and a healthy dose of good fats. It also brings a lovely green color to your dish. You can even sprinkle a bit of lime juice on top for extra flavor. Bacon makes everything better, including egg salad! Cook up about four slices of bacon until crispy. Crumble the bacon and mix it in with the egg salad. The salty, smoky flavor pairs well with the creamy dressing. This variation is perfect for a brunch or a hearty lunch. You can serve it on a sandwich or enjoy it on its own. If you love heat, try adding Sriracha to your egg salad. Start with about one to two tablespoons of Sriracha mixed into the dressing. Adjust the amount based on how spicy you like it. This gives the salad a zesty kick. You can garnish with sliced jalapeños for an extra punch. This version is great for those who want something different and bold. Feel free to explore these variations and find your favorite! For the full recipe, check out the detailed steps above. To store leftover egg salad, place it in an airtight container. Make sure the lid seals well. This keeps the salad fresh and prevents odors from other foods. Always refrigerate the container right away. It is important to keep the egg salad cool. Egg salad lasts about 3 to 5 days in the fridge. Check for any off smells or changes in texture before eating. I do not recommend freezing egg salad. Freezing changes the texture of eggs and mayo. It may become watery when thawed. You should not reheat egg salad. It is meant to be served cold. For a tasty twist, try serving it on crackers or cucumber slices. You can also add it to a salad for extra protein. Enjoy your egg salad chilled, fresh, and flavorful! The best types of bread for egg salad sandwiches include whole grain, sourdough, and rye. Whole grain bread adds fiber and a hearty flavor. Sourdough gives a nice tang, while rye adds a unique taste. You can also use wraps for a lighter option. Yes, you can make egg salad ahead of time. It is best to store it in the fridge for up to two days. Just keep it in an airtight container. This way, the flavors develop and taste even better. To make your egg salad healthier, consider adding diced veggies like bell peppers or cucumbers. You can also use Greek yogurt instead of mayonnaise for a creamy, low-fat option. Fresh herbs like parsley or spinach add flavor and nutrients too. Egg salad lasts about three to five days in the refrigerator. Make sure to keep it in a sealed container. If you notice any off smell or change in color, it’s best to discard it. Yes, you can use egg substitutes for this recipe. You might try silken tofu or a store-bought egg replacement product. However, the taste and texture may vary. Experiment to find what works best for your egg salad. For the full recipe, check the section above. This blog post covered how to make a tasty egg salad. We looked at key ingredients, steps, and helpful tips. You can easily customize your dish with variations like avocado or bacon. Proper storage ensures freshness and great taste later on. Remember, serving it on crisp lettuce or whole grain bread makes it even better. Enjoy experimenting with flavors and make your egg salad a hit!](https://blissfulmeal.com/wp-content/uploads/2025/06/e169cd43-55ff-40e8-8109-9959c6479bd2-768x768.webp)