Skip to content
About
Contact
Cookie Policy
Copyright Policy
Disclaimer
Search
Home
Dinner
Appetizer
Desserts
Drinks
About
Contact
Privacy Policy
Toggle Menu
Home
/
Appetizer
- Page 15
Appetizer
Loaded Nacho Supreme Irresistible Flavor Delight
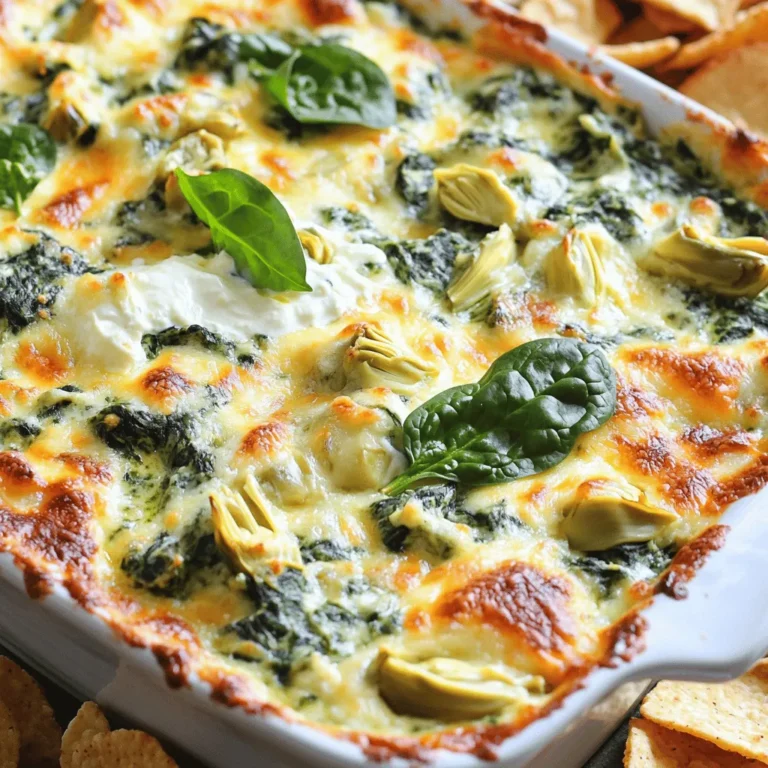
Savory Spinach Artichoke Dip Easy and Delicious Recipe
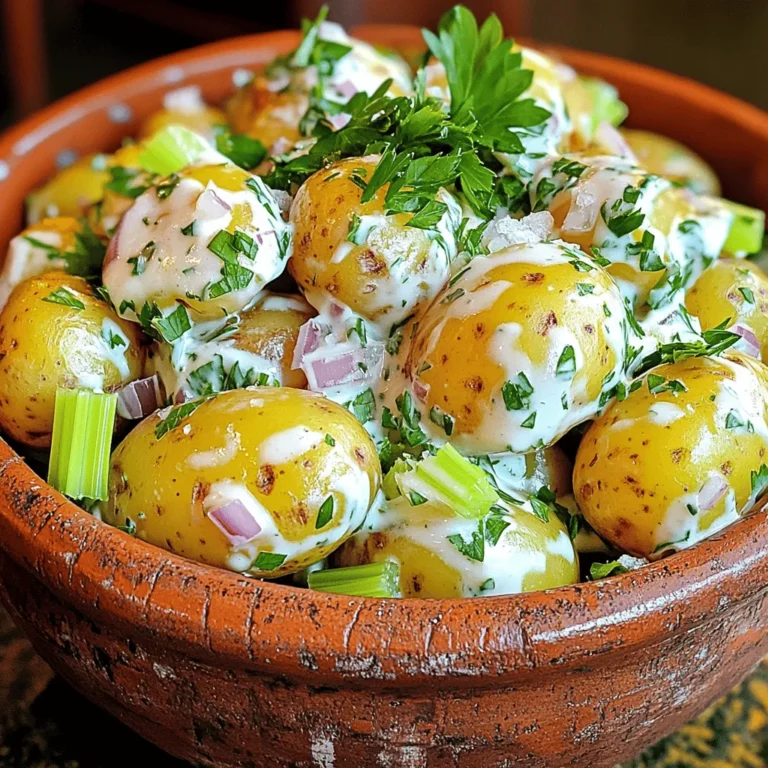
Classic Potato Salad Simple and Flavorful Recipe
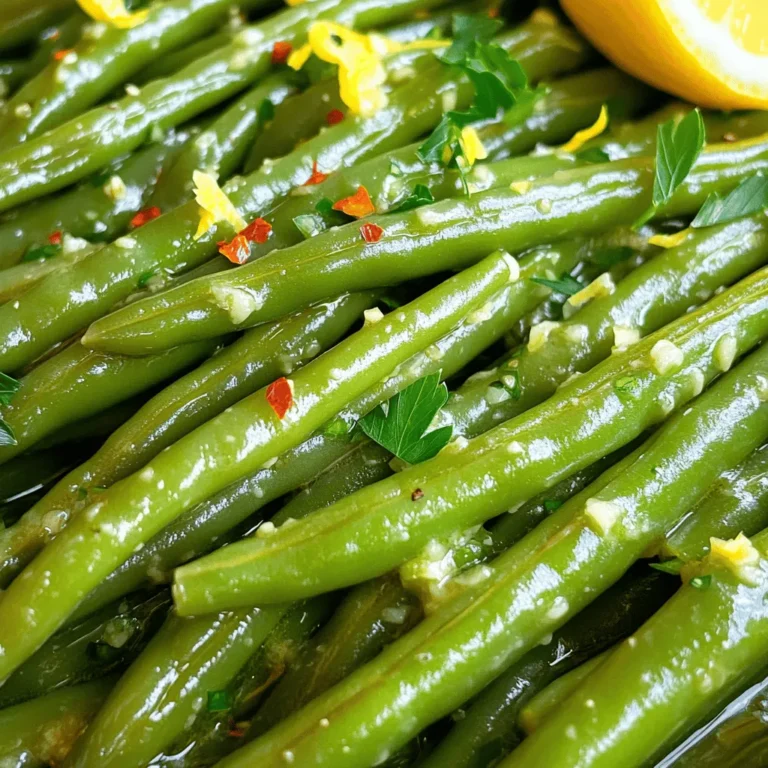
Garlic Butter Green Beans Flavorful and Simple Recipe
Cucumber Watermelon Salad Refreshing Summer Delight
Zucchini Corn Muffins Tasty and Simple Recipe
Zucchini Cheddar Biscuits Tasty and Easy Recipe
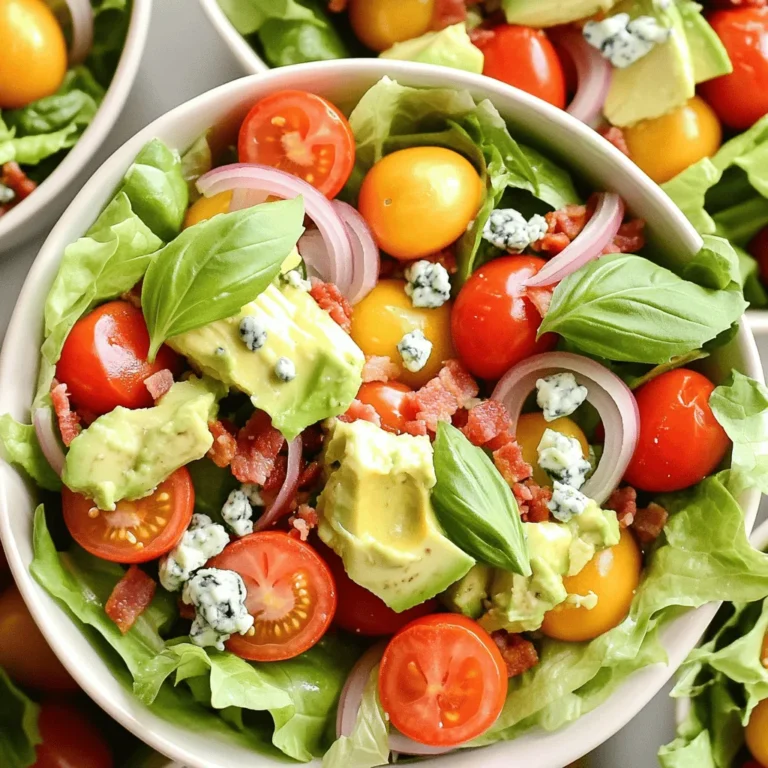
Classic BLT Salad Tasty and Simple Summer Dish
Caprese Stuffed Avocados Flavorful and Fresh Delight
Buffalo Chicken Stuffed Peppers Easy and Tasty Dish
Page navigation
Previous Page
Previous
1
…
13
14
15
16
17
…
23
Next Page
Next
Home
Dinner
Appetizer
Desserts
Drinks
About
Contact
Privacy Policy
Toggle Menu Close
Search for:
Search


![- Watermelon (2 cups, cut into bite-sized cubes) - Cucumber (1 large, diced) - Red onion (1/2, finely thin-sliced) - Fresh mint leaves (1/4 cup, finely chopped) - Creamy feta cheese (1/4 cup, crumbled) - Honey (2 tablespoons, preferably raw) - Freshly squeezed lime juice (2 tablespoons) - Salt and freshly cracked black pepper (to taste) The best part of this salad is its bright colors and fresh flavors. I love how the sweet watermelon pairs with the crisp cucumber. You will find that red onion adds a nice bite. Fresh mint brings a refreshing note. Feta cheese adds a creamy texture and a bit of saltiness, balancing the sweetness. Honey and lime juice create a lovely dressing. This mix makes each bite a real treat. When you make this salad, use the freshest produce you can find. This will make a huge difference in taste. The recipe is easy to follow. You can find the full recipe above. Enjoy this refreshing dish on a hot summer day! - First, mix 2 cups of juicy watermelon and 1 large diced cucumber in a large bowl. - Next, fold in 1/2 finely thin-sliced red onion and 1/4 cup of finely chopped fresh mint leaves. This adds color and flavor. - In a separate bowl, whisk together 2 tablespoons of honey and 2 tablespoons of freshly squeezed lime juice. This makes a sweet and tangy dressing. - Now, drizzle the honey-lime dressing over the salad and gently toss everything together. Be careful not to break the watermelon cubes. - Just before serving, sprinkle 1/4 cup of crumbled feta cheese on top. Season with salt and freshly cracked black pepper to taste. To check out the full recipe, you can refer to the [Full Recipe]. To make a great Cucumber Watermelon Salad, start with fresh ingredients. Choose a watermelon that feels heavy for its size. Look for a uniform shape and a creamy spot on one side. That spot means it ripened on the ground, which is key. For cucumbers, pick ones that are firm and bright green. Avoid ones with soft spots or wrinkles, as they’re not fresh. Check for mint by looking for bright green leaves. They should smell strong and sweet. Fresh mint adds a nice touch. For feta cheese, pick a block instead of crumbled. It should be creamy and white with a slight tang. If it smells sour or has a strange color, skip it. Presenting your salad well can impress your guests. Use a large, clear bowl to show off the colors. You can chill the bowl beforehand for a nice touch. Top the salad with whole mint leaves for a pop of green. This not only looks good but also adds freshness. Pair this salad with grilled chicken or fish for a tasty meal. It also goes well with pita bread or hummus. The salad is light and refreshing, perfect for warm days. To boost the flavor, consider adding herbs like basil or cilantro. They can give your salad a new twist. A sprinkle of chili flakes can add heat if you like spice. Adjust sweetness by adding more honey or lime juice. Taste as you go to find your perfect balance. If it’s too sweet, add a bit more lime juice for brightness. This makes your salad more exciting and delicious. {{image_4}} You can mix up your salad with other fruits and veggies. Try adding diced strawberries or blueberries for a sweet twist. You can also include diced bell peppers for a colorful crunch. If you want a vegan option, you can replace feta cheese with avocado. The creaminess of avocado brings a nice texture, plus it’s full of healthy fats. For a Mediterranean flair, toss in some olives or roasted red peppers. Both add a briny taste that pairs well with watermelon. You can also try an Asian twist by adding sesame oil or soy sauce. This gives your salad a unique depth of flavor that’s sure to impress your guests. This salad can change with the seasons. In the summer, use fresh peaches or nectarines to keep it light. In fall, add diced apples or pears for a sweet crunch. For holidays, think about adding pomegranate seeds for a festive touch. This not only adds color but also a burst of sweetness that compliments the other flavors nicely. For the complete recipe, check out the Full Recipe section above. To keep your Cucumber Watermelon Salad fresh, store leftovers in the fridge. Place the salad in an airtight container. This prevents moisture loss and keeps flavors intact. Glass containers work well, as they are easy to clean and do not retain smells. If you use plastic, ensure it is BPA-free. Cucumber Watermelon Salad stays fresh for up to three days in the fridge. After that, the cucumber may become mushy and the watermelon can lose its crunch. Discard any leftovers if they smell bad or look slimy. Always trust your senses! You can prep parts of the salad in advance. Cut the watermelon and cucumber a day ahead. Store them separately in airtight containers. This keeps them crisp until you’re ready to serve. Mix the dressing with honey and lime juice a few hours before serving. Just remember to add the mint and feta before you serve to keep them fresh! Yes, you can add other fruits. Try strawberries, mangoes, or pineapples. These fruits add flavor and color. Mix and match to create your favorite blend. Fresh fruits keep the salad exciting and tasty. Yes, this salad works well for meal prep. You can chop the ingredients ahead of time. Just keep the dressing separate until you serve. This way, your salad stays fresh and crisp. Cucumber is hydrating and low in calories. Watermelon is also hydrating and rich in vitamins. Mint aids digestion and adds flavor without extra calories. Feta cheese provides calcium and protein. Together, these ingredients make a healthy choice. To add spice, include diced jalapeños or chili flakes. You can also mix in fresh cilantro for more flavor. A pinch of cayenne pepper in the dressing works well too. Adjust to your taste for a fun kick! Yes, you can make the dressing ahead of time. Store it in the fridge in an airtight container. Just give it a good shake before using it. This saves time when you’re ready to serve your salad. For the full recipe, check out the detailed instructions above. Cucumber Watermelon Salad is fresh, easy, and fun to make. Using ripe fruits, creamy feta, and a light dressing brings great flavor. Pair it with your favorite dishes or enjoy it on its own. You can also add unique swaps for different tastes. Remember to store leftovers properly for lasting freshness. Try these tips, and you'll impress anyone with your delicious, colorful salad. Enjoy making it your own!](https://blissfulmeal.com/wp-content/uploads/2025/06/7fec256e-4b0b-4194-bbff-272faf969516-768x768.webp)


![- 4 large bell peppers (any color) - 2 cups cooked shredded chicken - 1/2 cup buffalo sauce - 1 cup cream cheese, softened - 1/2 cup shredded cheddar cheese - 1/4 cup green onions, finely chopped - 1/2 teaspoon garlic powder - 1/2 teaspoon onion powder - Salt and freshly ground black pepper to taste - Optional: blue cheese crumbles When I make buffalo chicken stuffed peppers, I start with the main ingredients. You need four large bell peppers. Pick any color you like; they all taste great. I usually use red, yellow, or green for a colorful dish. Next, I grab two cups of cooked shredded chicken. This can be rotisserie chicken or leftovers from another meal. It saves time and adds flavor. Buffalo sauce gives these peppers their kick. Half a cup is usually enough, but adjust it based on your spice level. If you love heat, feel free to add more. Cream cheese is essential for a rich and creamy filling. One cup, softened, blends well with the other ingredients. For some cheesy goodness, add half a cup of shredded cheddar. It melts beautifully and adds a nice flavor. Finally, chop up a quarter cup of green onions. They add freshness and a nice crunch. Now, let's talk about seasonings. You’ll want half a teaspoon each of garlic powder and onion powder for added depth. Don’t forget salt and black pepper to taste. If you enjoy blue cheese, sprinkle some crumbles on top before serving. They add a tangy flavor that pairs well with the buffalo sauce. You can find the full recipe for buffalo chicken stuffed peppers to make this dish at home. - Preheat the oven to 375°F (190°C). This helps the peppers cook evenly. - Prepare the bell peppers by slicing off the tops and removing the seeds. Make sure they can stand upright. - In a large mixing bowl, combine the cooked shredded chicken, buffalo sauce, cream cheese, cheddar cheese, and green onions. - Add garlic powder, onion powder, salt, and pepper. Mix everything well until creamy and smooth. - Use a spoon to fill each pepper with the buffalo chicken mixture. Pack it gently but firmly. - Place the stuffed peppers upright in a baking dish. If they wobble, trim the bottom for stability. - Cover the dish with aluminum foil and bake for 25 minutes. This helps the flavors meld. - After 25 minutes, uncover and bake for another 10 minutes. Watch until the peppers are tender and cheese is bubbly. - For added richness, sprinkle blue cheese crumbles on top during the last few minutes of baking. - Once done, let the dish cool for a few minutes before serving to avoid burns. This simple recipe offers a fun twist on traditional stuffed peppers and is sure to impress! How to choose the right peppers Pick large bell peppers for stuffing. They should be firm and bright. Look for smooth skin without blemishes. Green, red, yellow, or orange peppers all work well. Each has its unique flavor, so choose the one you like best. Tips for mixing the filling Always shred your cooked chicken before mixing. This helps it blend well with the other ingredients. When adding buffalo sauce, start with half a cup. You can always add more if you want extra heat. Mix thoroughly until you have a creamy filling. Use a spoon or spatula to combine the cream cheese and chicken. This makes sure every bite is rich and tasty. Presentation tips for serving Place the stuffed peppers on a large platter. This makes them easy to grab. Add some chopped green onions on top for color. You can also drizzle ranch or blue cheese dressing around the platter. This adds flavor and looks great. Recommendations for dips Serve with ranch or blue cheese dressing for dipping. These creamy dips balance the heat of the buffalo sauce. You can even set out small bowls for guests. This way, they can choose their favorite dip. {{image_4}} You can switch up the protein in this dish. Instead of chicken, try using turkey. Ground turkey works great and keeps the taste similar. You can also use tofu for a meat-free option. Firm tofu, when pressed and crumbled, takes on the flavors well. This makes it a perfect choice for vegetarians. Want to change the heat level? Start by adding less buffalo sauce. You can always add more if you like it spicier. Mix in honey or brown sugar for a sweet twist. This balances out the heat nicely. If buffalo sauce isn’t your thing, try these alternatives: - Barbecue sauce for a smoky flavor - Sriracha for a sharper kick - Teriyaki sauce for a sweet and savory mix These options add a fun twist to the stuffed peppers. Each variation brings a new taste experience to your table. For the complete recipe, check out the Full Recipe. To keep your buffalo chicken stuffed peppers fresh, follow these easy tips: - Refrigerate: Place leftover peppers in an airtight container. They will stay good for about 3-4 days. - Cool First: Let the peppers cool to room temperature before sealing them. This helps avoid moisture buildup. - Label: Use a label with the date for easy tracking. If you want to save them for longer: - Freezing: Wrap each pepper in plastic wrap, then put them in a freezer-safe bag. They can last up to 3 months. - Thawing: When ready to eat, thaw in the fridge overnight before reheating. To reheat without drying out, use these methods: - Microwave: Place a pepper on a microwave-safe plate. Cover it with a damp paper towel. Heat for 1-2 minutes, checking often. - Oven: Preheat to 350°F (175°C). Place peppers in a baking dish, cover with foil, and heat for about 15-20 minutes. - Skillet: Heat a little oil or butter in a skillet. Cook on low heat, turning the peppers until warmed through. These methods keep the peppers moist and tasty! How do I prevent soggy peppers? To avoid soggy peppers, choose firm, fresh ones. Pre-bake them for about 10 minutes before stuffing. This will help them stay crisp. Drain any excess liquid from the filling, too. Can I make these ahead of time? Yes, you can prepare buffalo chicken stuffed peppers ahead. Stuff the peppers and store them in the fridge for up to a day. Just bake them when you're ready to serve. What to serve with buffalo chicken stuffed peppers? These stuffed peppers pair well with simple sides. Try a fresh salad, some crunchy veggies, or rice. You can also offer dips like ranch or blue cheese. Calories and macronutrients per serving Each serving has about 350 calories. You get 22 grams of protein, 25 grams of fat, and 10 grams of carbs. This makes it a filling meal. Health benefits of the ingredients used Bell peppers are high in vitamins A and C. Shredded chicken provides lean protein. Buffalo sauce adds flavor without too many calories. Cream cheese gives a rich, creamy texture. For the complete recipe for buffalo chicken stuffed peppers, including the cooking time and servings, check out the [Full Recipe]. Buffalo chicken stuffed peppers are simple and tasty. You can easily make them with bell peppers, chicken, and buffalo sauce. Remember to follow the prep steps and tips for perfect cooking. Variations let you mix flavors, too. Store extras in the fridge or freezer for later. These stuffed peppers not only look great but also taste amazing. Enjoy them with your favorite dip. You’ll impress your family and friends with this delicious meal.](https://blissfulmeal.com/wp-content/uploads/2025/06/ba505378-4b7f-4bc2-b476-396c5cac2800-768x768.webp)