Skip to content
About
Contact
Cookie Policy
Copyright Policy
Disclaimer
Search
Home
Dinner
Appetizer
Desserts
Drinks
About
Contact
Privacy Policy
Toggle Menu
Home
/
Appetizer
- Page 5
Appetizer
Cranberry Pecan Brie Crescent Ring Flavorful Delight
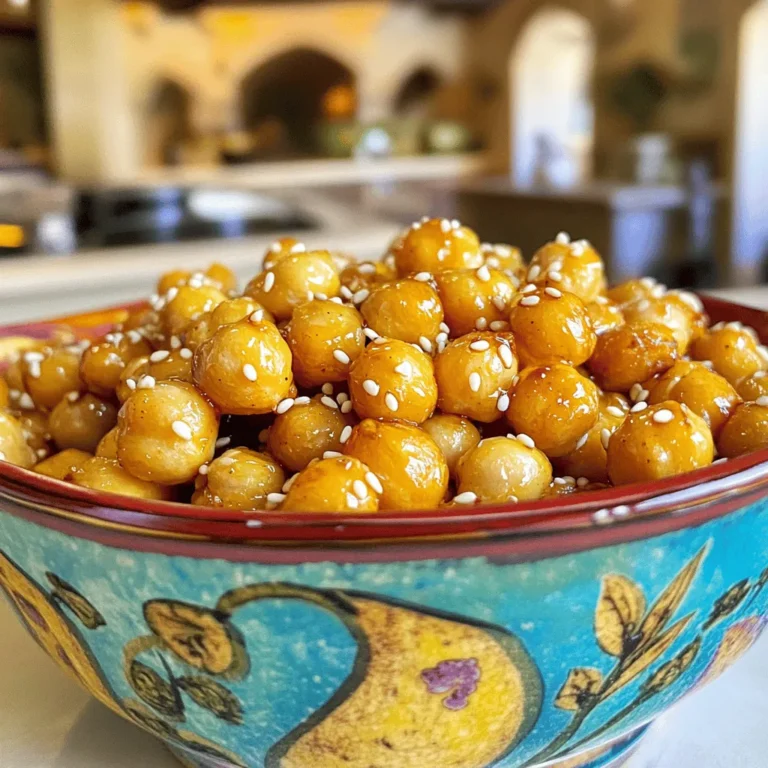
Sriracha Honey Roasted Chickpeas Crunchy Snack Delight
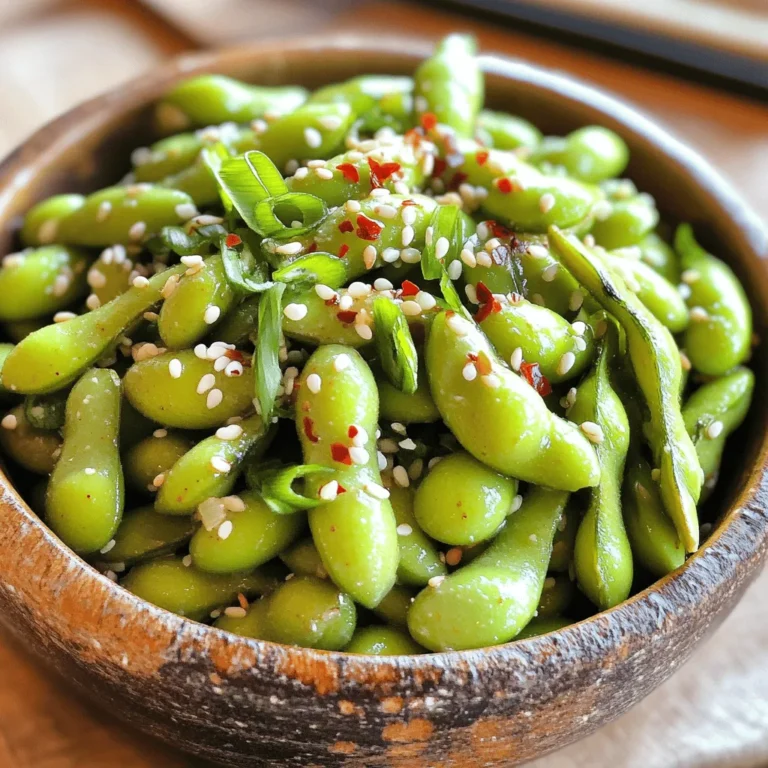
Spicy Garlic Edamame Tempting and Flavorful Snack
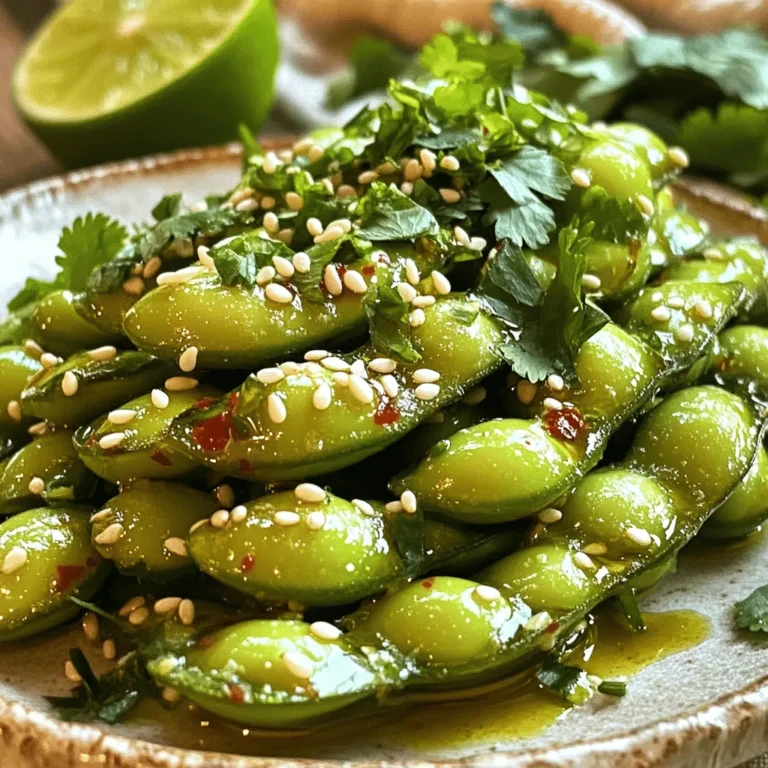
Spicy Garlic Edamame Flavorful and Easy Snack Recipe
Loaded Veggie Nachos Tasty and Easy to Make Dish
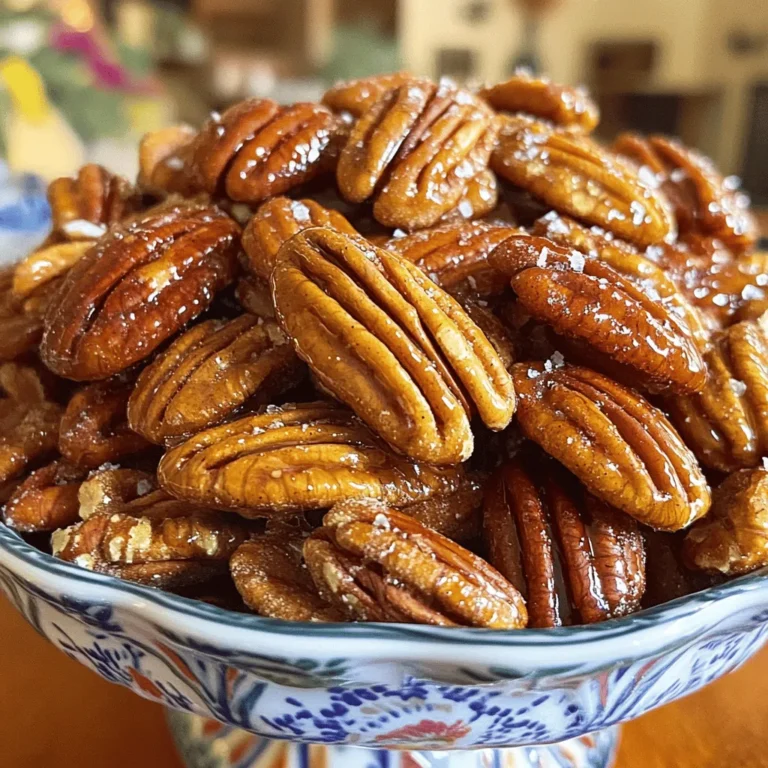
Maple Glazed Pecans Delightful Sweet Snack Recipe
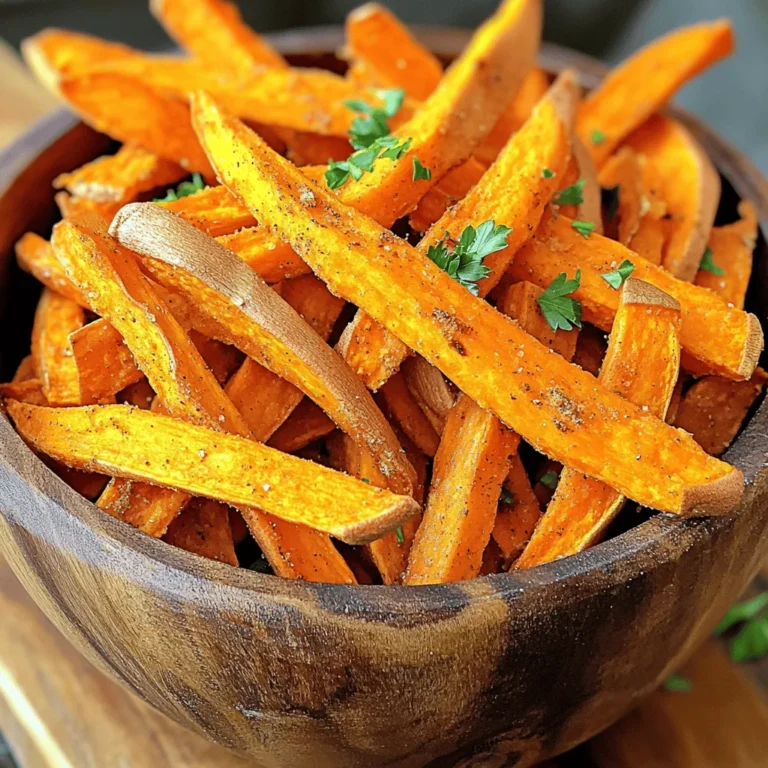
Air Fryer Sweet Potato Fries Crunchy and Flavorful Treat
Air Fryer Everything Bagel Chips Crunchy Snack Delight
Air Fryer Honey Sriracha Cauliflower Crispy Delight
Air Fryer Garlic Parmesan Wings Tasty and Easy Recipe
Page navigation
Previous Page
Previous
1
…
3
4
5
6
7
…
23
Next Page
Next
Home
Dinner
Appetizer
Desserts
Drinks
About
Contact
Privacy Policy
Toggle Menu Close
Search for:
Search


![To make loaded veggie nachos, gather these simple ingredients: - 1 bag of tortilla chips - 1 cup black beans, drained and rinsed - 1 cup corn kernels (fresh or frozen) - 1 medium bell pepper, diced (your choice of color) - 1 small red onion, finely diced - 1 cup cherry tomatoes, halved - 1 ripe avocado, diced - 1 cup shredded cheese (cheddar or a cheese blend) - 2 tablespoons olive oil - 1 teaspoon ground cumin - 1 teaspoon smoked paprika - 1 teaspoon chili powder - Salt and freshly cracked pepper, to taste - Fresh cilantro, chopped (for garnishing) - Jalapeño slices (optional, for those who like it spicy) - Sour cream (for serving alongside) These ingredients create a flavorful mix that is sure to please everyone. Feel free to customize your nachos with these tasty toppings: - Sliced black olives - Diced green onions - Fresh lime juice - Guacamole - Salsa or pico de gallo Adding these toppings can enhance flavor and make the dish even more fun! If you need to swap some ingredients, try these options: - Use refried beans instead of black beans. - Substitute queso for shredded cheese for a creamy touch. - Replace corn with diced zucchini for a different veggie. - If you don’t have olive oil, any cooking oil will work. These substitutes can help accommodate your pantry and personal taste! Start by preheating your oven to 375°F (190°C). This step is key for melting the cheese perfectly. In a large bowl, mix the black beans, corn, bell pepper, red onion, cherry tomatoes, and avocado. Drizzle in olive oil and add cumin, smoked paprika, chili powder, salt, and pepper. Gently toss the mix until everything is nicely coated. Next, spread the tortilla chips on a large baking sheet. Make sure they cover the sheet evenly. Now, layer the veggie mix over the chips. This ensures every bite is bursting with flavor. Finally, sprinkle the shredded cheese on top. Bake the nachos in your preheated oven for 10-15 minutes. Look for the cheese to be melted and bubbly, which signals they are ready. After baking, take the nachos out and let them cool for a few minutes. If you like it spicy, add jalapeño slices on top. Then, sprinkle chopped cilantro for a fresh touch. Serve the nachos hot with a side of sour cream for dipping. This dish is perfect for sharing or enjoying alone! For more details on making these tasty nachos, check out the Full Recipe. To get the best taste, layer your ingredients right. Start with tortilla chips, then add the veggie mix. This way, every chip gets some flavor. After that, sprinkle cheese on top. Make sure to cover it well. You want that cheesy goodness in every bite. If you skip this step, some chips may end up plain. No one wants that! For cheese that melts just right, choose a good blend. Cheddar and Monterey Jack work great together. Grate the cheese finely. This helps it melt faster and more evenly. Bake your nachos until the cheese bubbles. This usually takes about 10-15 minutes at 375°F (190°C). Keep an eye on it. You want it melted, not burnt! You can prep your nachos in advance. Just keep your chips and toppings separate. Mix your veggies and seasonings a few hours ahead. Store them in the fridge. When you’re ready, layer everything and bake. This way, you save time and still enjoy fresh nachos. If you want a quick snack, loaded veggie nachos are perfect. Just follow the Full Recipe for all the details! {{image_4}} You can easily add protein to your Loaded Veggie Nachos. Consider using cooked chicken, beef, or turkey. You can also try plant-based options, like lentils or tofu. This gives your nachos a heartier feel. Simply mix the protein into your veggie blend before layering. It adds flavor and fills you up. Do you like your nachos spicy? You can adjust the heat by adding jalapeños or hot sauce. For a milder taste, skip the jalapeños or use less chili powder. You can also try different peppers, like poblano or serrano, for unique flavors. This way, everyone can enjoy their nachos just how they like them. Cheese is key in nachos. You can mix it up by using different types. Try pepper jack for a spicy kick, or mozzarella for a stretchy, gooey texture. You can even use a vegan cheese if you're looking for dairy-free options. Just remember to sprinkle the cheese evenly to ensure every bite is cheesy and delicious. For the complete recipe, check out the [Full Recipe]. After enjoying your Loaded Veggie Nachos, cool any leftovers. Place them in an airtight container. They keep well in the fridge for up to three days. The chips may get a bit soft, but the flavors stay fresh. To reheat, preheat your oven to 350°F (175°C). Spread the nachos on a baking sheet. Heat for about 10 minutes until warm. If needed, add a bit of cheese before reheating. This will help revive the cheesy goodness. You can freeze your Loaded Veggie Nachos for longer storage. Just make sure to separate the chips and toppings. Place the toppings in a freezer bag and remove air. The chips can go in a separate bag. They stay good in the freezer for up to a month. When ready to eat, thaw everything in the fridge overnight. Reassemble and reheat for a quick snack. Enjoy the taste anytime! For the full recipe, check out the earlier section. Yes, you can use other chips. Tortilla chips are classic, but you can try pita chips. You can also use plantain chips for a unique twist. Just make sure they are sturdy enough to hold the toppings. If you prefer a healthier option, baked chips work well too. To make these nachos gluten-free, choose certified gluten-free tortilla chips. Always check the labels to be safe. Most of the ingredients in this recipe are already gluten-free, like beans and veggies. This makes it simple to adapt without losing flavor. The best toppings for Loaded Veggie Nachos include fresh cilantro, diced jalapeños, and sour cream. You can also add sliced olives or pickled onions for extra taste. For a creamy touch, drizzle with some avocado crema or hot sauce. Feel free to get creative with your favorites! You learned about making great nachos, from the ingredients to storage. We discussed important tips for flavor and texture. Always layer your nachos well and choose fun toppings. Feel free to explore protein options and adjust spice levels. With the right care, you'll enjoy them fresh or saved for later. Nachos are perfect for any gathering or snack. Try your own twists and share your favorites! Enjoy every bite of your nacho adventure.](https://blissfulmeal.com/wp-content/uploads/2025/07/86ea8bbf-4ada-40e4-a176-b2267ee3484c-768x768.webp)

![To make Air Fryer Honey Sriracha Cauliflower, you need some fresh and simple ingredients. Here’s what you'll need: - Cauliflower - Olive Oil - Honey - Sriracha Sauce - Soy Sauce - Garlic Powder - Smoked Paprika - Salt and Pepper - Garnishes (Green Onions and Sesame Seeds) These ingredients work together to create a tasty, crispy delight. The cauliflower gives a nice texture, while honey and Sriracha add sweet and spicy flavors. Olive oil helps the cauliflower crisp up nicely in the air fryer. Make sure to choose fresh cauliflower to get the best taste. For a full recipe with step-by-step instructions, check out the Full Recipe. The combination of these ingredients makes a perfect dish. You can enjoy it as a snack, appetizer, or side. To start, gather your ingredients. You need olive oil, honey, Sriracha, soy sauce, garlic powder, smoked paprika, salt, and pepper. In a large bowl, whisk these ingredients together. Mix until you get a smooth marinade. It should look shiny and well-blended. This step is key to getting great flavor on your cauliflower. Now it’s time to add the cauliflower. Toss the florets into the bowl with the marinade. Make sure each piece gets a good coat. This helps the flavors soak in. Let the marinated florets sit for about 15-20 minutes at room temperature. This short wait makes a big difference in taste. While the cauliflower marinates, preheat your air fryer. Set it to 375°F (190°C) and let it warm up for about 5 minutes. Once hot, arrange the marinated florets in the basket. Lay them out in a single layer. Avoid overcrowding; this ensures they cook evenly. Air fry the cauliflower for 12-15 minutes. Halfway through, shake the basket to help them brown. You're aiming for a nice crispy texture. When done, carefully move the golden-brown cauliflower to a dish. Finish with a sprinkle of chopped green onions and sesame seeds for a pop of color and crunch. Enjoy this crispy delight as an appetizer or side. For the full recipe, check the previous section! To get the best crispy cauliflower, follow these tips: - Use enough oil: A good amount of olive oil helps the cauliflower crisp up nicely. - Preheat the air fryer: Always preheat your air fryer for even cooking. - Don’t overcrowd: Lay the florets in a single layer. If they touch, they won’t crisp up. Cook in batches if needed. You can tweak the flavors to fit your taste: - Adjust Sriracha: Want more heat? Add more Sriracha. For milder taste, use less. - Try new ingredients: Swap honey for maple syrup for a different sweet taste. Add lime juice or ginger for a fresh twist. Pair your Honey Sriracha Cauliflower with tasty dips: - Ranch dressing: This creamy dip contrasts with the heat. - Greek yogurt: It adds a cool, creamy touch. For sides, consider serving with: - Rice or quinoa: These grains balance the spice. - A fresh salad: A crunchy salad adds freshness to the meal. For the complete recipe, check out the [Full Recipe]. {{image_4}} You can easily make this dish vegan and gluten-free. For honey, use maple syrup or agave nectar. Both give a sweet taste and work well with Sriracha. For soy sauce, choose tamari. Tamari is a great gluten-free option that adds rich flavor. These swaps keep your Honey Sriracha Cauliflower tasty and inclusive. Want to mix things up? Add other veggies to the air fryer. Broccoli, bell peppers, and carrots pair well with cauliflower. Cut them into small pieces and toss them in the same marinade. This way, you get more colors and flavors in your dish. Plus, it makes your meal more nutritious and fun. If you love heat, try different hot sauces. A chili garlic sauce or a spicy taco sauce can add a new kick. For a milder taste, use a chipotle sauce. You can also play with spices. Add cumin for a warm flavor or curry powder for a touch of exotic. Experimenting with these options makes each batch unique and exciting. To keep your air fryer honey sriracha cauliflower fresh, use an air-tight container. This helps prevent moisture from making the cauliflower soggy. You can store leftovers in the fridge for up to three days. If you plan to eat them later, let them cool first before sealing. To reheat your cauliflower and keep that crispiness, the best method is the air fryer. Set it to 350°F (175°C) and cook for about 5 minutes. This method brings back the crunch you love. You can also use an oven. Just place the cauliflower on a baking sheet and heat it at 350°F for about 10 minutes. If you want to freeze the honey sriracha cauliflower, first let it cool completely. Then, place it in a freezer-safe bag or container. Be sure to remove as much air as possible to avoid freezer burn. You can freeze it for up to a month. When you want to enjoy it, thaw it in the fridge overnight. Then, reheat it using the air fryer for the best results. Yes, you can use frozen cauliflower. Frozen cauliflower saves time. It cooks faster than fresh cauliflower. Here are some tips: - Thaw first: Let the cauliflower thaw completely for even cooking. - Pat dry: Remove excess moisture with a paper towel. This helps achieve crispiness. - Adjust cooking time: Cook for about 10-12 minutes instead of 12-15 minutes. Check for doneness. Yes, grilling cauliflower is a great option. It adds a smoky flavor. Here are some steps: - Prepare the marinade: Use the same marinade as for the air fryer. - Preheat grill: Set the grill to medium heat. - Skewer the florets: Thread cauliflower onto skewers for easy handling. - Grill time: Cook for about 8-10 minutes, turning occasionally, until tender. You can serve Honey Sriracha Cauliflower with many dishes. Here are some tasty ideas: - Rice or quinoa: These make a great base for the spicy cauliflower. - Salads: Pair it with a fresh green salad for a light meal. - Dips: Serve with ranch dressing or Greek yogurt for added creaminess. For detailed instructions, check out the [Full Recipe](#). This blog post covered how to make Honey Sriracha Cauliflower from scratch. You learned about the key ingredients, plus marinating and cooking tips. I shared how to get that perfect crispy texture, spice adjustments, and tasty serving suggestions. Don't forget to try different vegetables or hot sauces for a unique twist. Follow proper storage tips for leftovers so you can enjoy this dish later. Remember, cooking should be fun and flexible, so feel free to experiment!](https://blissfulmeal.com/wp-content/uploads/2025/07/de29001b-160a-4cd4-ab1b-d1e7a333e0a6-768x768.webp)
![To make Air Fryer Garlic Parmesan Wings, gather these ingredients: - 2 pounds fresh chicken wings - 2 tablespoons extra virgin olive oil - 1 teaspoon garlic powder - 1 teaspoon onion powder - 1 teaspoon smoked paprika - Salt and freshly ground black pepper to taste - ½ cup finely grated Parmesan cheese - 2 tablespoons fresh parsley, finely chopped - 2 tablespoons unsalted butter, melted If you want to mix it up, try these alternatives: - Use chicken drumsticks instead of wings for a different bite. - Swap olive oil for avocado oil for a smoother taste. - Replace fresh parsley with dried herbs like oregano or thyme. - Use a cheese blend instead of Parmesan for a unique flavor. Getting the seasoning right is key. Here are some tips: - Always use fresh spices for better flavor. - Adjust the garlic powder to your taste; add more for a stronger kick. - For a spicy twist, add cayenne pepper or hot sauce. - Toss the wings in the seasoning mix well to ensure even coverage. These steps will help you create a flavor-packed dish that everyone will love. For the full recipe, check out the [Full Recipe]. First, gather your ingredients. You will need fresh chicken wings, olive oil, garlic powder, onion powder, smoked paprika, salt, pepper, Parmesan cheese, parsley, and melted butter. Next, preheat your air fryer to 400°F (200°C) for about 5 minutes. This step helps the wings get crispy. In a large bowl, add the chicken wings. Pour the olive oil over them. Sprinkle the garlic powder, onion powder, smoked paprika, salt, and pepper. Mix everything well. Make sure each wing gets coated for great flavor. Now, place the seasoned wings in the air fryer basket. Keep them in a single layer. This helps them cook evenly. If you have many wings, cook them in batches. Air fry the wings for 25-30 minutes. Halfway through, around 12-15 minutes, flip them over. This will help them brown nicely. When they finish cooking, they should look golden and crispy. For extra crispiness, do not overcrowd the basket. Give them space. You can also pat the wings dry before seasoning. This removes moisture and helps them crisp up. Using fresh ingredients, like high-quality olive oil and Parmesan, makes a big difference. If you want more flavor, let the wings marinate in the seasoning for at least 30 minutes before cooking. After cooking, toss the wings in the garlic Parmesan mixture to coat. This adds a rich flavor. Enjoy these tasty wings hot, right from the fryer. For the full recipe, check out the details above. For the best wings, always preheat your air fryer. Set it to 400°F (200°C) for about 5 minutes. This helps the wings cook evenly and get crispy. When you add the wings, make sure they are in a single layer. This allows hot air to circulate and cook them well. If you have a lot of wings, fry them in batches. This way, each batch comes out perfectly crispy. One common mistake is overcrowding the basket. If the wings are too close together, they will steam instead of fry. Another mistake is not drying the wings before cooking. Pat them dry with paper towels. This removes excess moisture and helps them crisp up better. Also, remember to flip the wings halfway through cooking. This ensures even browning and crispiness on both sides. To boost flavor, try adding different spices. For a kick, add cayenne pepper or chili powder. You can also use fresh herbs like rosemary or thyme. Mixing in lemon zest gives a bright, fresh taste. If you love garlic, use fresh minced garlic instead of garlic powder. Tossing the wings in a mix of melted butter and Parmesan right after cooking adds richness. You can also experiment with different cheeses, like blue cheese or feta, for a unique twist. For the full recipe, check the detailed instructions above. {{image_4}} You can switch up the flavors in these wings. Try adding hot sauce for heat. Mix in lemon zest for a zesty kick. You can also use different cheeses, like cheddar or blue cheese. If you love herbs, add dried oregano or thyme for extra flavor. Experiment with different spices like cayenne pepper or chili powder for a bold taste. Each change can make your wings unique. If you want a healthier version, use skinless chicken wings. For a lower-fat option, try using an air fryer spray instead of oil. You can replace Parmesan with nutritional yeast for a vegan twist. If you are gluten-free, ensure your spices are free from gluten. These swaps help keep the wings tasty and align with your diet. Serve the wings hot and fresh from the air fryer. Pair them with ranch or blue cheese dressing for dipping. You can add celery and carrot sticks on the side for crunch. These wings also go great with a fresh salad. For a fun twist, try serving them in a wrap or a sandwich. These ideas can make your meal even more enjoyable. For the full recipe, check out the detailed instructions above. You can store leftover wings in the fridge. Place them in an airtight container. They stay fresh for up to three days. If you want to keep them crispy, avoid stacking them. Let them cool first before sealing. This keeps that yummy flavor locked in. To freeze your wings, first cool them completely. Use a freezer-safe bag or container. Remove as much air as you can. Label the bag with the date. They last up to three months in the freezer. When you're ready to eat, let them thaw overnight in the fridge. To reheat, use your air fryer again for the best results. Preheat it to 350°F (175°C). Cook the wings for about 10 minutes. This method keeps them crispy. You can also use an oven, but the air fryer is my favorite. If you are in a hurry, a microwave works too, but the wings won’t be as crispy. You can find the full recipe for these wings earlier in the article. Enjoy! To make Air Fryer Garlic Parmesan Wings, start with fresh chicken wings. You need two pounds. Preheat your air fryer to 400°F (200°C) for five minutes. In a big bowl, mix the wings with olive oil, garlic powder, onion powder, smoked paprika, salt, and pepper. Toss them well to coat. Place the wings in a single layer in the air fryer basket. Cook for 25-30 minutes, flipping them halfway through. Once cooked, toss the wings in a mixture of melted butter, grated Parmesan cheese, and chopped parsley. Yes, you can use frozen wings! Just remember to increase the cooking time by about 5-10 minutes. Make sure to check if they are cooked through. You can season them the same way as fresh wings. The air fryer does a great job of cooking frozen wings. They will come out crispy and tasty, just like the fresh ones. Garlic parmesan wings taste great with various dipping sauces. Here are some popular options: - Ranch dressing - Blue cheese dressing - Honey mustard - Spicy buffalo sauce - Marinara sauce These sauces enhance the flavor and add a fun twist to each bite. Enjoy experimenting to find your favorite! For the complete recipe, check the Full Recipe section. In this blog post, we explored the best way to make air fryer garlic parmesan wings. We covered key ingredients, alternative suggestions, and seasoning tips to enhance flavor. The step-by-step instructions guide you through preparation and cooking for crispy results. We shared tips to avoid common mistakes and variations that cater to different tastes. Finally, we explained storage and reheating methods to keep your wings fresh. Enjoy your crispy wings, and remember, practice makes perfect. Happy cooking!](https://blissfulmeal.com/wp-content/uploads/2025/07/3681883e-ad12-447f-b17b-1b761b2571f7-768x768.webp)