Skip to content
About
Contact
Cookie Policy
Copyright Policy
Disclaimer
Search
Home
Dinner
Appetizer
Desserts
Drinks
About
Contact
Privacy Policy
Toggle Menu
Home
/
Appetizer
- Page 7
Appetizer
Crispy Parmesan Zucchini Chips Perfect for Snacking
Easy Air Fryer Veggie Egg Rolls Crunchy and Flavorful
Cheesy Garlic Pull Apart Bread Irresistible Snack Delight
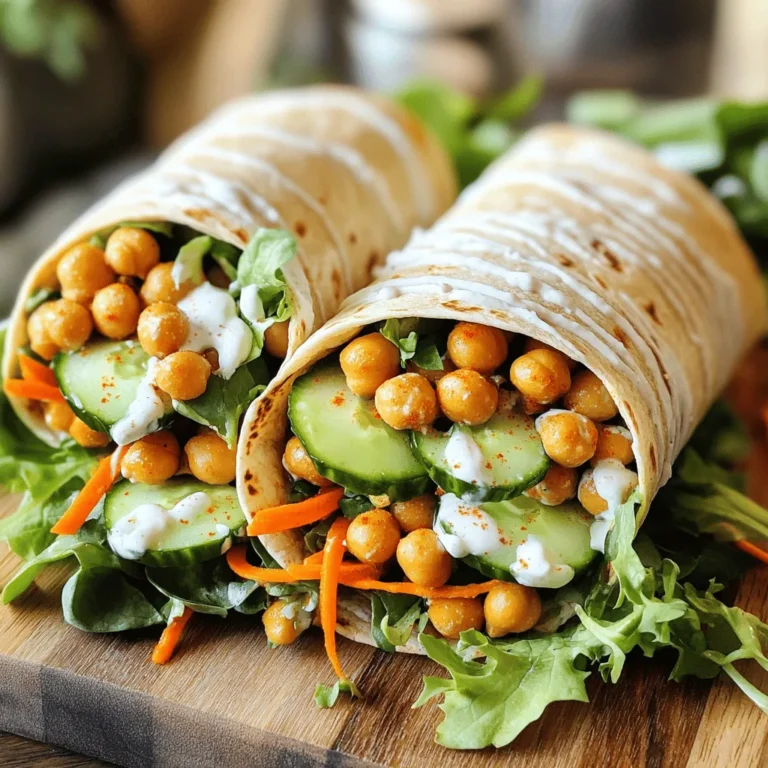
Vegan Buffalo Chickpea Wraps Packed with Flavor
Crispy Parmesan Zucchini Chips Irresistible Snack Treat
Loaded Sheet Pan Quesadilla Quick and Easy Meal
Buffalo Chicken Lettuce Wraps Flavorful and Easy Meal
Garlic Parmesan Roasted Broccoli Flavorful Side Dish
Jalapeño Popper Stuffed Mushrooms Irresistible Appetizer
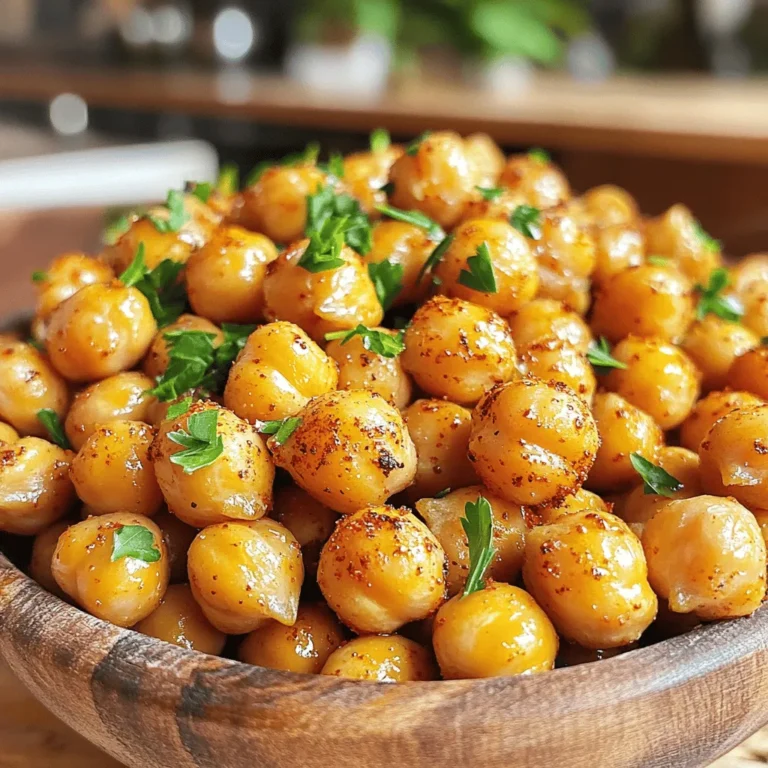
Spicy Roasted Chickpeas Crunchy and Flavorful Snack
Page navigation
Previous Page
Previous
1
…
5
6
7
8
9
…
23
Next Page
Next
Home
Dinner
Appetizer
Desserts
Drinks
About
Contact
Privacy Policy
Toggle Menu Close
Search for:
Search


![- 1 cup shredded cabbage - 1 cup shredded carrots - 1/2 cup bell pepper, finely chopped (any color works great) - 1/4 cup green onions, sliced (save some for garnish) - 1 tablespoon soy sauce (low sodium if preferred) - 1 tablespoon sesame oil - 1 teaspoon rice vinegar - 2 cloves garlic, minced - 1 teaspoon ginger, freshly grated - 1 package of egg roll wrappers (about 10 wrappers) - Cooking spray or oil for brushing For this recipe, I love using fresh veggies. They not only add flavor but also crunch. You can really mix it up with the bell peppers. Choose red, yellow, or green for a colorful dish. The sauce is key to flavor. The soy sauce brings saltiness, while sesame oil adds a nutty note. Rice vinegar gives a nice tang. Don’t skip the garlic and ginger. They add warmth and depth to the filling. Now, let’s talk about the wrappers. Egg roll wrappers are perfect because they crisp up nicely in the air fryer. Make sure to brush them with oil or spray. This helps achieve that golden, crunchy exterior. For the full recipe, follow the steps closely to make these tasty veggie egg rolls! Start by gathering your ingredients. In a large mixing bowl, add: - 1 cup shredded cabbage - 1 cup shredded carrots - 1/2 cup bell pepper, finely chopped - 1/4 cup green onions, sliced - 2 cloves garlic, minced - 1 teaspoon ginger, freshly grated Mix these ingredients well. You want the flavors to blend. Next, drizzle in: - 1 tablespoon soy sauce - 1 tablespoon sesame oil - 1 teaspoon rice vinegar Add salt and pepper to taste. Toss everything together until the veggies are coated. This mixture gives your egg rolls a great flavor. Now it's time to wrap the egg rolls. Lay an egg roll wrapper flat on a clean surface. Point one corner toward you. Spoon about 2 tablespoons of the veggie mix into the center. Fold the bottom corner over the filling. Then, fold in the two side corners. Roll the wrapper tightly away from you. If needed, use a little water on the edges to seal them well. This helps keep the filling inside. Repeat this with the rest of the wrappers and filling until they are all wrapped. Before cooking, preheat your air fryer to 400°F (200°C). Spray the basket with cooking spray to stop sticking. Place 4 to 5 egg rolls in the basket. Make sure they do not touch. This helps them cook evenly. Lightly brush the tops of the egg rolls with oil or cooking spray for added crispiness. Cook them for 12 to 15 minutes. Flip them halfway through to get them golden brown on both sides. Once they are done, take them out and let them cool for a few minutes before serving. You can find the full recipe above to guide you through each step. To make your veggie egg rolls flavorful and crunchy, pick the best vegetables. I love using: - Shredded cabbage - Shredded carrots - Bell peppers These veggies have great texture and taste. You can also try seasonal vegetables. For spring, use fresh peas or asparagus. In fall, add squash or sweet potatoes. Seasonal veggies boost flavor and nutrition. Rolling your egg rolls right is key. To avoid breakage, don’t overfill them. Use just enough filling to keep them tight. I suggest about 2 tablespoons per wrapper. If you find the edges won’t stick, use a little water. Dabbing water helps seal the egg rolls well. This keeps your filling inside while cooking. To get that perfect crispy texture, oil is essential. Lightly brush the egg rolls with oil or use cooking spray. This helps them brown nicely. Set your air fryer to 400°F (200°C). Cooking at this high temperature makes the outside crispy. Remember to flip them halfway through cooking. This way, they cook evenly on all sides. For the full recipe, check [Full Recipe]. {{image_4}} You can make these veggie egg rolls even heartier by adding proteins. Tofu is a great choice. Just press it first to remove excess water. Then, cube and sauté it until golden. You can also use chicken. Cook it in small pieces with seasonings before adding it to the mix. Shrimp is another tasty option. Just chop it finely and mix it in. All these proteins boost flavor and make your egg rolls more filling. Want to add some kick? Incorporate spices and hot sauces into your filling. Try adding red pepper flakes for heat. You could also mix in some chili garlic sauce for a zesty punch. Suggested seasoning blends include five-spice powder or even curry powder. These will transform your egg rolls into a flavor explosion that excites the taste buds. If you're vegan, you can still enjoy these egg rolls. Use rice paper or nori wraps instead of egg roll wrappers. They are easy to find and work well. For gluten-free options, look for gluten-free egg roll wrappers or use rice paper. Pair your egg rolls with gluten-free sauces, like tamari or homemade sweet chili sauce. This way, everyone can savor these crunchy treats! To keep your egg rolls fresh, follow a few simple steps. First, let them cool completely. Place them in an airtight container. Store the container in the fridge. Your egg rolls will stay fresh for about 3 to 4 days. If you want to ensure they remain crispy, avoid stacking them. When you're ready to enjoy your leftovers, air frying is the best method. Preheat your air fryer to 350°F (175°C). Place the egg rolls in the basket in a single layer. Heat them for about 5 to 7 minutes. This method will make them crispy again. You can also use an oven. Preheat it to 375°F (190°C). Place the egg rolls on a baking sheet. Heat them for about 10 to 12 minutes. Make sure to flip them halfway through. This will help them warm evenly. You can freeze egg rolls both before and after cooking. If you freeze them uncooked, wrap each egg roll tightly in plastic wrap. Then place them in a freezer bag. They will last for up to 3 months. To freeze cooked egg rolls, let them cool first. Place them in an airtight container or freezer bag. They will also last for about 3 months. When you’re ready to eat them, thaw overnight in the fridge. Reheat them using the air fryer or oven for best results. This ensures they stay crunchy and full of flavor. To make your veggie egg rolls crispy, apply oil lightly. Use a spray bottle or brush to coat the egg rolls. Place them in a single layer inside the air fryer basket. Give space between them for hot air to circulate. This helps them crisp up well. Yes, you can use other wrappers! Spring roll wrappers work well. You can also try rice paper for a gluten-free option. Just know that different wrappers may change the texture. Experiment to find your favorite! Many sauces go great with veggie egg rolls. Sweet chili sauce is a popular choice. Soy sauce adds a salty kick. You could also try homemade peanut sauce for a nutty flavor. Mix it up and find what you love! Look for a golden brown color on the egg rolls. They should be crispy to the touch. If you hear a crunch when you bite in, they are done. Enjoy the crispy texture and delicious filling! For the full recipe, check out [Full Recipe]. You now know how to make delicious veggie egg rolls. We explored each ingredient, from the crunch of cabbage to the tangy sauce mix. You learned the best ways to wrap and air fry them for crispy perfection. Plus, we included tips on storing and reheating leftovers. Experiment with proteins and spices to make them your own. Enjoy sharing these tasty treats with friends and family!](https://blissfulmeal.com/wp-content/uploads/2025/07/844ee6f4-16e5-4b35-a7d7-1ac3d6757f76-768x768.webp)


![- 4 large flour tortillas - 2 cups shredded cheese (Mexican blend works best) - 1 cup cooked chicken, shredded (use rotisserie chicken) - 1 cup black beans, drained and rinsed - 1 cup corn (frozen or canned) - 1 red bell pepper, finely diced - 1 small red onion, finely diced - 1 tablespoon taco seasoning (adjust for heat) - 1 avocado, sliced (for topping) - 1 cup salsa (for serving) - Fresh cilantro, chopped (for garnish) - Cooking spray or olive oil (for greasing) You can swap ingredients based on what you have. Use whole wheat tortillas for a healthier option. For cheese, try Monterey Jack or cheddar if you prefer. If you don’t have chicken, ground turkey or beef works too. Black beans can be replaced with pinto beans. You can also use fresh corn if you have it. To keep everything fresh, use ripe vegetables. Choose firm bell peppers and bright green cilantro. Store ingredients separately before cooking. If you plan to make this later, keep the tortillas stored in a cool place. Store cooked quesadillas in an airtight container in the fridge. This helps maintain flavor and texture. For the complete recipe, check the [Full Recipe]. Start by preheating your oven to 400°F (200°C). Grab a large baking sheet and line it with parchment paper. You can also use cooking spray or olive oil to coat it lightly. This helps prevent sticking. Gather your ingredients, and make sure everything is ready to go. This helps the cooking process flow smoothly. 1. In a mixing bowl, combine the shredded chicken, black beans, corn, diced red bell pepper, diced red onion, and taco seasoning. Mix well so all the flavors blend. 2. Lay two large tortillas on the prepared baking sheet. Overlap them slightly to cover the base. 3. Spread half of the shredded cheese evenly over the tortillas. Make sure to cover them completely. 4. Spoon the chicken and bean mixture over the cheese. Spread it out evenly for a tasty bite every time. 5. Add the rest of the cheese on top of the filling. Then, place the other two tortillas on top. Press down gently to hold it all together. 6. Bake the quesadilla in the oven for 15-20 minutes. Watch closely until the top turns golden and the cheese is melted. 7. Once done, take the sheet pan out and let it cool for a few minutes. Use a sharp knife to slice it into wedges. 8. Serve the warm wedges with fresh avocado slices and your choice of salsa. Sprinkle chopped cilantro on top for a burst of color and flavor. Arrange the quesadilla wedges on a large platter. Garnish with more cilantro and lime wedges for a bright look. Serve the salsa in a separate bowl for dipping. This makes for easy sharing and adds to the fun of the meal! To get a crispy quesadilla, use a hot oven. Bake at 400°F (200°C). Make sure to spread cheese on both sides of the filling. This helps seal in moisture. Use flour tortillas; they get crispier than corn ones. Press down gently on top while baking. This creates a great crunch. To prevent sticking, always grease your baking sheet. Use cooking spray or olive oil. Lining the sheet with parchment paper also helps. Make sure the tortillas overlap slightly. This keeps the filling in place and prevents spills. If you see any sticking after baking, use a spatula to loosen it before serving. For more flavor, try adding jalapeños or green chiles to the mix. You can also use different spices. Cumin or smoked paprika adds depth. Squeeze fresh lime juice over the quesadilla before serving. This brightens every bite. Top with sour cream or guacamole for creaminess. Don't shy away from fresh herbs like cilantro for a pop of flavor. For the complete recipe, check out the Full Recipe. {{image_4}} You can easily make this dish vegetarian. Replace the chicken with more beans or veggies. Use mushrooms, zucchini, or spinach for extra flavor. You can also add diced tomatoes or jalapeños for a kick. Don't forget to keep the cheese, as it adds great taste and texture. If you want to change the protein, go for ground beef or turkey. Shredded pork is another tasty option. For a lighter choice, use grilled shrimp or fish. You can even throw in some tofu for a plant-based protein. Each protein adds its own unique flavor to the quesadilla. Feel free to get creative with your toppings. Try sour cream, guacamole, or sliced olives. You can also add fresh herbs like cilantro or green onions for a burst of freshness. For sauces, consider chipotle mayo or a spicy ranch dressing. These additions can make your quesadilla even more delicious. Check out the Full Recipe for more ideas! To store leftovers, let the quesadilla cool down. Once cool, cut it into wedges. Place the wedges in an airtight container. You can keep them in the fridge for up to three days. Keeping them sealed helps maintain flavor and texture. To reheat, preheat your oven to 350°F (175°C). Place the quesadilla wedges on a baking sheet. Bake them for about 10-15 minutes until hot. You can also use a microwave, but the oven gives better crispiness. For the microwave, heat for 1-2 minutes on high. If you want to freeze quesadilla wedges, wrap each piece in plastic wrap. Then, place them in a freezer bag. Be sure to remove as much air as you can. You can freeze them for up to three months. When ready to eat, thaw in the fridge overnight and reheat as mentioned. For the full recipe, check out the detailed instructions. Yes, you can prepare this loaded sheet pan quesadilla ahead of time. To do this, follow the recipe steps until you layer the tortillas and filling. Instead of baking, cover it with plastic wrap and refrigerate. When you're ready to eat, just bake it as directed. This method saves time and makes meal prep easy. For quesadillas, a blend of cheeses works best. I like using a Mexican cheese blend. It melts well and gives a rich flavor. You might also try Monterey Jack or cheddar. Both add great taste and texture. Feel free to mix them up for a fun twist. To make the loaded sheet pan quesadilla gluten-free, use gluten-free tortillas. Many brands offer tasty options. Check the labels to ensure they’re safe. Also, you can use gluten-free taco seasoning. This way, you get all the flavor without the gluten. Dipping sauces add fun to your quesadilla meal. Salsa is a classic choice. You can also try guacamole or sour cream. For a kick, serve with spicy salsa or hot sauce. Each sauce brings a different flavor that complements the quesadilla. You learned about the key ingredients for loaded sheet pan quesadillas, plus substitutions for freshness. I shared step-by-step cooking instructions and serving tips. We covered best practices for crispiness and flavor boosts. You also saw variations, from vegetarian options to different proteins. Lastly, I explained storage methods and answered common questions about this dish. Now, you're ready to create your own tasty quesadillas. Use this guide for fun meals and happy moments. Enjoy cooking!](https://blissfulmeal.com/wp-content/uploads/2025/07/8ff81390-80ae-4784-affc-988618c0f15b-768x768.webp)

![- 1 lb broccoli florets, washed and trimmed - 3 tablespoons extra virgin olive oil - 4 cloves garlic, finely minced - ½ cup freshly grated Parmesan cheese - ½ teaspoon red pepper flakes (optional, for heat) - Salt and freshly ground black pepper to taste - Zest of 1 lemon for brightness - Fresh parsley, chopped, for garnish When choosing your ingredients, fresh is best. For broccoli, look for bright green florets. Avoid yellowing or brown spots. The garlic should be firm with no signs of sprouting. Fresh Parmesan cheese gives the best flavor. Grating it yourself makes a big difference. Use extra virgin olive oil for richness. For measuring, use standard measuring spoons and cups. This ensures your ingredients are just right. Keep your seasonings simple. A pinch of salt and pepper can change the dish. Freshness matters. It enhances taste and nutrition. When you use fresh ingredients, your dish will shine. Don't be shy about experimenting with amounts. Cooking is all about discovering what you love! For the full recipe, check the [Full Recipe]. - Preheating the Oven Start by preheating your oven to 425°F (220°C). This high heat helps the broccoli roast well. A hot oven gives the broccoli nice color and flavor. - Tossing the Broccoli with Ingredients In a big bowl, add 1 lb of washed and trimmed broccoli florets. Drizzle 3 tablespoons of extra virgin olive oil over the florets. Add 4 cloves of finely minced garlic, ½ teaspoon of red pepper flakes (if you want some heat), and salt and freshly ground black pepper to taste. Toss everything together until the broccoli is well coated. - Arranging on a Baking Sheet Take a large baking sheet and transfer the seasoned broccoli onto it. Make sure to spread the florets out in a single layer. This step is key for even roasting. Crowding the pan can make the broccoli steam instead of roast. - Cooking Time and Temperature Place the baking sheet in the preheated oven. Roast the broccoli for about 15 minutes. You want it to be tender and start turning golden brown. Keep an eye on it; you want that perfect roast! - Importance of Single Layer Always roast the broccoli in a single layer. This helps each piece cook evenly and get that nice crispiness. If they are piled up, some pieces will cook too fast, while others may stay soggy. - Adding Parmesan Cheese After 15 minutes, carefully take the baking sheet out. Sprinkle ½ cup of freshly grated Parmesan cheese over the hot broccoli. The cheese will melt and stick nicely to the florets. - Zesting Lemon and Garnishing Put the baking sheet back in the oven for another 5 minutes. Wait until the cheese is melted and bubbly. Once done, take it out and zest a lemon over the dish. This adds a bright, fresh flavor. Finally, sprinkle some fresh parsley on top for color and freshness. You can find the full recipe to make this dish shine! Achieving the Right Texture Roasting broccoli is all about texture. You want it crisp but tender. To get this right, use fresh florets and cut them into similar sizes. This helps them cook evenly. Preheat your oven to 425°F (220°C). This hot temperature gives the broccoli a nice char. Cook for about 15 minutes, then check for doneness. If they are too soft, reduce the time next time. Ensuring Even Cooking Spread the broccoli in a single layer on your baking sheet. Crowding the pan can lead to steaming instead of roasting. Use a large sheet if needed. Toss the broccoli well with olive oil and seasonings. This guarantees that every piece gets coated and cooks evenly. Variations with Herbs and Spices You can mix things up with herbs and spices. Try adding thyme or rosemary for an earthy taste. If you want heat, sprinkle some cayenne or smoked paprika. These flavors can transform your dish. Experiment and see what you like best! Incorporating Other Vegetables Roasted broccoli pairs well with other veggies. Consider adding carrots or bell peppers. Cut them to match the broccoli size. This way, they roast evenly together. You can also add cherry tomatoes for a burst of sweetness. Serving Suggestions Serve your garlic Parmesan roasted broccoli in a shallow bowl. This allows the colors to shine. Add a lemon wedge on the side for a pop of brightness. It looks fresh and inviting. Creative Plating Tips For a fun touch, drizzle a bit of extra olive oil over the top. You can also sprinkle some more Parmesan cheese before serving. This gives a nice finishing touch. Use fresh parsley for a vibrant, green contrast. A well-presented dish makes it even more appealing. For the full recipe, follow the steps and enjoy this delightful side! {{image_4}} You can switch up the cheese to suit your taste. Here are some great options: - Pecorino Romano - Grana Padano - Asiago - Feta Each cheese brings its own flavor. Pecorino Romano adds a sharp bite, while Grana Padano is milder. You can also mix cheeses for extra depth. Try feta for a creamy contrast. Add fun flavors to the dish. Try these combinations: - Lemon zest with capers - Balsamic glaze with honey - Smoked paprika for a smoky touch Experiment with spices and herbs. For a kick, add chili powder or cumin. Use fresh herbs like basil or thyme for a fresh twist. Want to make this dish a full meal? Add protein! Some tasty suggestions include: - Grilled chicken - Shrimp - Tofu Grilled chicken pairs well with the garlic and cheese. Shrimp adds a lovely seafood flavor. For a plant-based option, try marinated tofu. Cook the protein separately and serve it alongside or mixed in. If you're vegan, you can still enjoy this dish! Replace the cheese with: - Nutritional yeast - Vegan cheese Nutritional yeast gives a cheesy flavor without dairy. Vegan cheese can melt just like regular cheese. Look for brands that taste good on their own. For a creamy touch without dairy, use: - Cashew cream - Almond cream These creams add richness. You can make them by blending soaked nuts with water. They add a silky texture to your roasted broccoli. For the full recipe, check the Garlic Parmesan Roasted Broccoli section above. Enjoy these tasty variations! How do you store leftovers? First, let the broccoli cool down. Place it in an airtight container. This keeps it fresh. You can safely store it in the fridge for up to three days. If you want to keep it longer, consider freezing it. What are proper containers? Use glass or plastic containers with tight lids. These help prevent moisture loss. Make sure the container is clean before adding the broccoli. What are the best practices for reheating? The best way to reheat broccoli is in the oven. Preheat your oven to 350°F (175°C). This keeps the broccoli crisp. Spread it out on a baking sheet. Heat it for about 10 minutes. How do you maintain crunchiness? Avoid using the microwave if you want crunch. The oven helps keep that great texture. You can also use a skillet on medium heat. Just stir for a few minutes until warm. How can you freeze for long-term storage? Start by blanching the broccoli. Boil it for two minutes, then cool it in ice water. Drain and pat dry. Place it in a freezer bag. Squeeze out the air and seal it well. This way, it can last up to six months. How do you thaw and prepare from frozen? To thaw, place the bag in the fridge overnight. You can also use the microwave on the defrost setting. After thawing, you can roast or sauté it. This will bring back some crunch. For best results, cook it straight from frozen. Roasting broccoli usually takes about 20 minutes. You first cook it for 15 minutes. Then, you add cheese and let it roast for another 5 minutes. This time gives the broccoli a nice texture and flavor. Yes, you can use frozen broccoli. However, fresh broccoli works best for this recipe. Frozen broccoli may not get as crispy. If using frozen, thaw and drain it well before roasting. Garlic Parmesan roasted broccoli pairs well with many dishes. I like serving it with grilled chicken or fish. It also complements pasta dishes and can be a great side for steak. Yes, this recipe is gluten-free. It contains no bread or grains. Just check your Parmesan cheese to ensure it’s gluten-free. Most brands are safe, but it’s good to confirm. To spice things up, add red pepper flakes. You can also use spicy garlic powder. If you want more heat, try adding sliced jalapeños before roasting. Yes, you can prep the broccoli in advance. Toss it with oil and garlic, then store it in the fridge. Just roast it when you’re ready to serve. If you need to replace olive oil, try using avocado oil. It has a similar flavor and is healthy. You can also use melted butter for a richer taste. You learned how to make tasty Garlic Parmesan Roasted Broccoli. We covered key ingredients, cooking steps, and tips for perfect results. You also discovered tasty variations and how to store leftovers. This dish is easy and fun to make. It’s a great side for any meal, whether you want it vegan or with protein. Use the tips to impress your family and friends. Now, enjoy your delicious broccoli and get creative in the kitchen!](https://blissfulmeal.com/wp-content/uploads/2025/07/520c3acc-e255-49b0-8f24-6b1973e4738e-768x768.webp)