Skip to content
About
Contact
Cookie Policy
Copyright Policy
Disclaimer
Search
Home
Dinner
Appetizer
Desserts
Drinks
About
Contact
Privacy Policy
Toggle Menu
Home
/
Appetizer
- Page 8
Appetizer
Sheet Pan Chicken Nachos Tasty and Simple Recipe
Roasted Beet and Goat Cheese Salad Fresh Flavor Burst
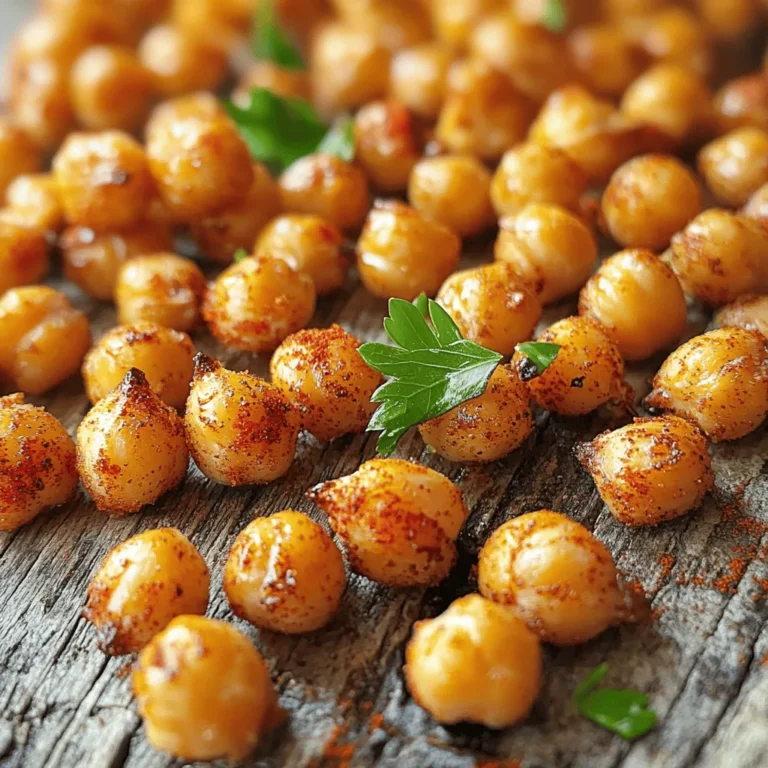
Easy Roasted Chickpeas Crispy and Flavorful Snack
Garlic Butter Mushrooms Savory and Simple Recipe
Homemade Soft Pretzels Easy and Tasty Recipe Guide
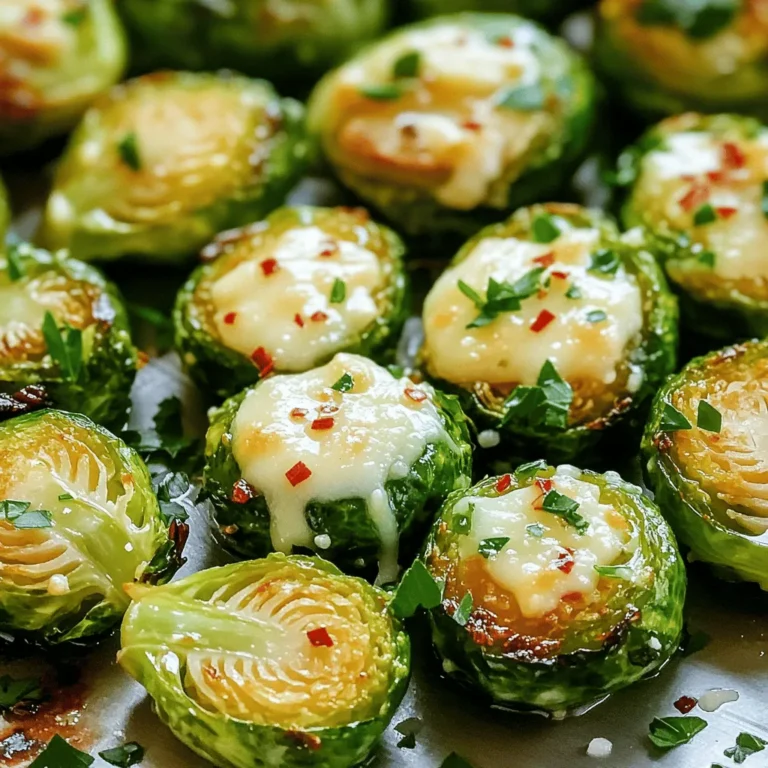
Garlic Parmesan Roasted Brussels Sprouts Flavor Boost
Mango Avocado Salsa Fresh and Flavorful Recipe
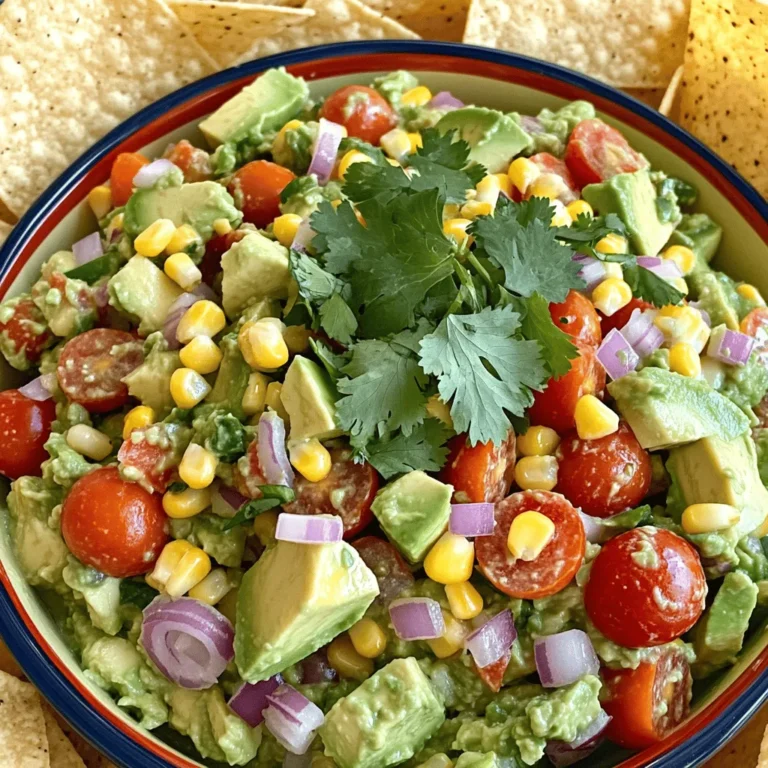
Chunky Guacamole Salad Fresh and Flavorful Delight
Classic Deviled Eggs Simple Recipe for Everyone
Caprese Avocado Toast Flavorful and Easy Recipe
Page navigation
Previous Page
Previous
1
…
6
7
8
9
10
…
23
Next Page
Next
Home
Dinner
Appetizer
Desserts
Drinks
About
Contact
Privacy Policy
Toggle Menu Close
Search for:
Search

![- 2 cups cooked chicken, shredded - 1 bag (12 oz) tortilla chips - 1 cup black beans, rinsed and drained - 1 cup corn (frozen or fresh) - 1 cup sliced jalapeños (fresh or pickled) - 2 cups shredded cheddar cheese - 1 cup diced tomatoes - 1 cup diced avocado - ½ cup sour cream - ¼ cup fresh cilantro, chopped - 1 tablespoon olive oil - 1 teaspoon chili powder - Salt and pepper to taste Choose fresh ingredients for the best taste. When picking chicken, look for organic options. Fresh jalapeños should feel firm and have bright skin. If using canned black beans, check the label for low sodium. For corn, fresh is great, but frozen works well too. Use sharp cheddar cheese for a richer flavor. Avocados should be ripe but not overripe, yielding slightly to pressure. Always select vibrant tomatoes for color and taste. You can swap chicken for turkey or beef if you prefer. For a veggie option, use grilled vegetables instead of meat. If you dislike jalapeños, try sweet bell peppers for crunch. Instead of cheddar, use Monterey Jack or a dairy-free cheese for a different taste. Greek yogurt can replace sour cream for a healthy twist. You can leave out cilantro if it’s not your favorite herb. Making Sheet Pan Chicken Nachos is fun and easy. You only need a few steps. Start with gathering all your ingredients. This keeps things simple and quick. Prep time is just 15 minutes! 1. Preheat your oven to 375°F (190°C). This step is important for baking. 2. In a large bowl, mix the shredded chicken, black beans, corn, olive oil, chili powder, salt, and pepper. Make sure everything blends well. 3. Spread tortilla chips evenly on a large baking sheet. Cover the whole sheet for the best nacho experience. 4. Spoon the chicken and bean mix over the chips. Distribute it evenly so every chip gets some toppings. 5. Add sliced jalapeños on top for extra flavor. Use as many as you like! 6. Sprinkle a good amount of cheddar cheese over everything. Make sure every chip is cheesy. 7. Bake in the oven for 10-12 minutes. Watch closely to avoid burning. 8. Once the cheese is melted and bubbly, take it out. Add diced tomatoes and avocado for a fresh taste. 9. Top with sour cream and fresh cilantro. This adds color and flavor to your dish. - Use fresh ingredients for the best taste. - Keep an eye on the baking time. You want melted cheese, not burnt edges. - Serve directly on the baking sheet for a casual vibe. - Add lime wedges on the side for an extra zing. For the full recipe, check out the [Full Recipe]. Enjoy your nachos! To get super gooey cheese, use fresh cheese. Shredded cheese from a block melts better than pre-shredded cheese. Try mixing different cheeses, like Monterey Jack or mozzarella, with cheddar. This mix adds flavor and creaminess. For an even stretchier finish, add a splash of milk to the cheese before melting. This small tip can elevate your nacho game! To keep your nachos crispy, layer them smartly. Start with a solid base of tortilla chips. Then, spread your toppings evenly. Avoid piling too much wet stuff on top. If you add items like beans or salsa, limit their amounts. Try heating these toppings first to reduce moisture. Bake the nachos until the cheese is bubbling, but don’t overdo it. This will help keep everything crunchy. For a fun meal, serve nachos right from the baking sheet. You can add lime wedges and extra cilantro for bright flavors. Pair your nachos with a cold drink, like soda, beer, or a fruity mocktail. You could also serve them with a side of guacamole and salsa for dipping. Each bite becomes a new taste adventure! For the full recipe, check out the details above! {{image_4}} You can make nachos without meat! Use a mix of veggies. Swap the chicken for mushrooms or bell peppers. Add extra beans for protein. You can use black, pinto, or kidney beans. Top with your favorite cheese, like Monterey Jack or mozzarella. Add fresh veggies, like diced tomatoes and green onions. Want more heat? Use spicy chicken! Add hot sauce to your chicken mix. You can also use spicy jalapeños for a kick. Consider adding diced green chilies or a sprinkle of cayenne pepper. For an extra layer of flavor, mix in some chipotle powder. Your taste buds will thank you! Make your nachos taste like tacos! Use taco seasoning on your chicken. Add toppings like salsa, guacamole, and sour cream. You can also include chopped lettuce for crunch. Crumbled tortilla chips can add extra texture. This twist makes the dish fun and tasty! For the full recipe, check the detailed instructions above. To store leftover nachos, first let them cool. Place them in an airtight container. Use parchment paper to separate layers, if needed. Keep them in the fridge for up to three days. This helps retain some crunch and flavor. For reheating, use an oven for the best taste. Preheat the oven to 350°F (175°C). Spread the nachos on a baking sheet. Bake for about 10 minutes, or until warmed through. The cheese should melt again, making them tasty. If you want to freeze nachos, do it before baking. Layer the chips and toppings on a baking sheet. Cover it well with plastic wrap and foil. Store in the freezer for up to a month. When ready to eat, bake directly from the freezer. Adjust the time to about 15-20 minutes. Enjoy your quick and easy meal! For the full recipe, refer to the earlier section. Yes, you can swap chicken for other proteins. Shredded beef, turkey, or pork work well. You could also use canned tuna or beans for a meatless option. Just ensure the protein is cooked before adding it to your nachos. This keeps everything safe and tasty. Toppings can make or break your nachos! Here are some favorites: - Diced red onion for crunch and flavor. - Sliced olives for a briny touch. - Fresh jalapeños for extra heat. - Pineapple for a sweet twist. - A drizzle of hot sauce for spice. - Fresh lime juice for brightness. Feel free to mix and match based on your taste. Scaling is easy! Just double or triple the ingredients based on the number of guests. Use a larger baking sheet or two sheets if needed. Keep the cooking time the same but check for doneness. More nachos can mean a longer cooking time. Enjoy your party with this fun dish! You can find the full recipe [Full Recipe]. This blog post covered everything you need to know about making great nachos. We explored key ingredients, how to pick the best ones, and what to replace them with. The step-by-step guide gave clear instructions for delicious results. We shared tips for gooey cheese and keeping nachos crisp. Plus, you learned tasty variations and smart storage methods. Now you’re ready to enjoy nachos your way. Dive in and get creative!](https://blissfulmeal.com/wp-content/uploads/2025/07/767c19f7-8b8b-4c24-9bb2-1cef3c7d1ad0-768x768.webp)
![To create this vibrant Roasted Beet and Goat Cheese Salad, you’ll need the following fresh ingredients: - 4 medium-sized beets, with tops removed - 2 cups fresh arugula or a mix of vibrant salad greens - 1/2 cup creamy goat cheese, crumbled - 1/4 cup walnuts, toasted and coarsely chopped - 1/4 red onion, sliced thinly - 3 tablespoons extra virgin olive oil - 2 tablespoons balsamic vinegar - 1 tablespoon honey - Salt and freshly ground black pepper to taste Each ingredient plays an important role in this salad. The beets bring a lovely earthy flavor and bright color. The arugula adds a peppery taste, while the goat cheese offers a creamy richness. Walnuts add crunch, and red onion gives a sharp bite. The honey vinaigrette ties it all together, creating a flavor burst that you’ll love. For the full recipe, including step-by-step instructions, check out the [Full Recipe]. - Set oven to 400°F (200°C). - Wrap beets in aluminum foil, drizzle olive oil, and sprinkle with salt. - Place on a baking sheet and roast for 45-60 minutes. - Cool, peel, and cut beets into wedges. - Combine olive oil, balsamic vinegar, honey, salt, and pepper. - Whisk until smooth. - In a large bowl, add greens, beet wedges, red onion, and walnuts. - Drizzle vinaigrette over the salad and toss gently. - Transfer salad to a serving platter, sprinkle goat cheese, and serve fresh. For the full recipe, check out the details above. Enjoy this salad! - Serve in a shallow bowl to highlight colors. - Garnish with mint or parsley sprigs for a fresh touch. When you present this salad, think about how to show off those rich colors. The deep reds of the beets contrast beautifully with the green arugula. A shallow bowl works best to let these colors shine. Adding fresh mint or parsley not only looks pretty but also adds a nice aroma. - Alternative greens: Spinach or kale for a different taste. - Use feta cheese instead of goat cheese if you prefer. If you can’t find arugula, spinach or kale are great choices. They bring their own flavor and nutrition. Feta cheese gives a tangy taste that works well too. Feel free to mix and match based on what you have at home. - Add fresh herbs like dill or basil for extra zest. - Incorporate roasted cherry tomatoes for added flavor. To take this salad up a notch, fresh herbs can make a big difference. Dill or basil adds depth and freshness. Roasted cherry tomatoes bring a sweet burst that complements the beets perfectly. Try these options for a unique twist on the classic dish. {{image_4}} You can change up your salad based on the seasons. One fun way is to add seasonal fruits. Slices of pears or apples bring a sweet crunch. They balance the earthiness of the beets and cheese. Another great option is to toss in roasted pumpkin seeds. They add a tasty crunch and healthy fats. You can use these seeds in the fall for a cozy touch. If you want to make this salad vegan, it's simple! Just leave out the goat cheese. Instead, try using agave syrup in the dressing. This sweetener keeps the flavor bright and fresh. For those needing gluten-free options, check your dressings. Make sure they are certified gluten-free. This way, everyone can enjoy the salad without worry. These variations keep your Roasted Beet and Goat Cheese Salad lively and fun. You can always explore new flavors while enjoying this classic dish. - Keep in an airtight container in the fridge for up to 3 days. - Separate dressing from salad for longer freshness. This helps maintain the crispness of the greens and the creaminess of the cheese. - Best enjoyed cold; avoid reheating due to texture changes. The beets may become mushy, and the salad will lose its fresh taste. Instead, serve it chilled straight from the fridge for a delightful crunch! Yes, prepare the components and assemble just before serving. This keeps the greens fresh. Beets are rich in fiber, vitamins, and minerals. They are good for heart health, too. They should be tender enough to easily pierce with a fork. If they resist, roast longer. Yes, grilled chicken or quinoa makes great additions. Both options add flavor and nutrition. Honey vinaigrette complements the flavors well. You could also use a lemon vinaigrette for a twist. Roasted Beet and Goat Cheese Salad is a delightful dish. It mixes vibrant colors and flavors. Here is the full recipe for you to enjoy. Ingredients: - 4 medium-sized beets, with tops removed - 2 cups fresh arugula or a mix of vibrant salad greens - 1/2 cup creamy goat cheese, crumbled - 1/4 cup walnuts, toasted and coarsely chopped - 1/4 red onion, sliced thinly - 3 tablespoons extra virgin olive oil - 2 tablespoons balsamic vinegar - 1 tablespoon honey - Salt and freshly ground black pepper to taste Instructions: 1. Preheat Oven: Set your oven to 400°F (200°C). This heats up for the beets. 2. Prepare Beets: Wrap each beet in aluminum foil. Drizzle olive oil and sprinkle salt on them. Place them on a baking sheet for easy handling. 3. Roasting Beets: Put the baking sheet in the oven. Roast for about 45-60 minutes. They should be tender and easy to pierce with a fork. After roasting, let them cool. Then, peel off the skins and cut them into wedges. 4. Make Vinaigrette: In a small bowl, mix olive oil, balsamic vinegar, honey, salt, and pepper. Whisk until smooth and set aside. 5. Combine Salad Ingredients: In a large bowl, add arugula or mixed greens, roasted beet wedges, red onion, and walnuts. 6. Dress the Salad: Drizzle the honey vinaigrette over the salad mix. Toss gently, coating everything well. 7. Plate the Salad: Transfer the salad to a serving platter or individual plates. Sprinkle the crumbled goat cheese on top. 8. Serve and Enjoy: This salad shines when served fresh. Enjoy the burst of colorful flavors! Prep time is just 15 minutes, and total time is about 1 hour and 15 minutes. This recipe serves four people. Presentation Tips: Serve in a large, shallow bowl. This highlights the salad’s vibrant colors. For a fresh touch, add mint or parsley sprigs. You can drizzle a little honey on top for extra sweetness. In this post, we explored how to create a delicious Roasted Beet and Goat Cheese Salad. You learned about the fresh ingredients, step-by-step instructions, and helpful tips to make it shine. Remember, you can easily customize this salad with seasonal fruits or dietary alternatives. It's not only tasty but also nutritious. Enjoy this vibrant dish as a meal or a side. Make it your own, and share it with family and friends next time!](https://blissfulmeal.com/wp-content/uploads/2025/07/f57e6af7-2ce5-4f21-8672-b02c119cbe55-768x768.webp)
![Here’s a detailed list of the ingredients you need for garlic butter mushrooms: - 500g fresh button mushrooms, cleaned and halved - 4 tablespoons unsalted butter - 6 cloves garlic, minced - 1 tablespoon fresh thyme leaves (or substitute with 1 teaspoon dried thyme) - 1 tablespoon soy sauce - Salt and pepper to taste - 2 tablespoons fresh parsley, finely chopped (for garnish) - Zest of 1 lemon These ingredients come together to create a rich and savory dish. Fresh button mushrooms provide a tender texture, while the unsalted butter adds a creamy base. Garlic offers a punch of flavor that enhances the mushrooms' earthiness. Thyme adds a fresh herbal note, and soy sauce gives depth and umami. The salt and pepper balance the flavors perfectly. Finally, fresh parsley and lemon zest brighten the dish, making it as beautiful as it is tasty. For the full recipe, you can refer to the instructions above. Start by cleaning the mushrooms. Rinse them gently under running water to remove dirt. Pat them dry with a paper towel. Once clean, cut each mushroom in half. This helps them cook evenly and soak up flavor. Next, mince the garlic finely. The smaller the pieces, the more flavor you release. This step is key for the rich taste of garlic butter mushrooms. Heat a large skillet over medium heat. Add the unsalted butter. Watch it closely as it melts. When it starts to foam, it's ready. Add the minced garlic to the skillet. Stir it for about one minute. You want it to be fragrant but not burnt. This is where the magic begins. Add the halved mushrooms to the skillet. Sprinkle in the fresh thyme, soy sauce, and a pinch of salt and pepper. Stir everything well. You want the mushrooms to get coated in that lovely garlic butter. Cook for about 8-10 minutes. Stir occasionally. Look for a golden-brown color and tender texture. This shows your mushrooms are perfectly cooked. Once done, remove the skillet from heat. Stir in the lemon zest for a fresh kick. This brightens the dish and adds a zesty flavor. Transfer the mushrooms to a serving dish. For a pretty touch, sprinkle with chopped parsley. It adds color and freshness to your garlic butter mushrooms. For the full recipe, check out the details above. To cook mushrooms just right, timing is key. Cook them for about 8 to 10 minutes. Look for a lovely golden-brown color. The mushrooms should feel tender when you poke them with a fork. This means they are done and ready to enjoy. For even coating with garlic butter, toss the mushrooms well in the skillet. Use a wooden spoon to mix them gently. This will help each piece soak up that amazing garlic butter flavor. Want to boost the taste? Try adding some red pepper flakes for heat. A pinch of paprika can also give a nice smoky flavor. Fresh herbs like basil or oregano are great options too. They add a new twist to the dish. When serving, think about presentation. Serve the mushrooms in a nice bowl or on a wooden board. Drizzle some leftover garlic butter from the skillet on top. This makes the dish look even more inviting and delicious. For a pop of color, sprinkle fresh parsley on top before serving. This little touch makes a big difference! If you want the full experience, check out the Full Recipe for detailed steps. {{image_4}} You can use many mushroom types for this recipe. Portobello mushrooms give a meaty texture. Shiitake mushrooms add a rich, earthy flavor. Oyster mushrooms are tender and light, making them a great choice. Each type brings its unique taste and texture, so feel free to experiment! If you need gluten-free options, look for gluten-free soy sauce. This will keep the dish safe for those with gluten issues. For a dairy-free version, use vegan butter. There are many good brands that taste great and work well in this recipe. Want to make your dish richer? Try adding cheese or cream. A sprinkle of parmesan or a dollop of cream can elevate the flavor. You can also add other vegetables like spinach or bell peppers. This makes the dish more colorful and adds nutrition. Check out the Full Recipe for more ideas! To keep your garlic butter mushrooms fresh, follow these tips: - Refrigeration tips: Place the mushrooms in an airtight container. They stay good for about 3-5 days in the fridge. - Freezing guidelines: If you want to freeze them, let them cool first. Then, place them in a freezer-safe bag. They can last up to 3 months in the freezer. To enjoy your garlic butter mushrooms again, you need to reheat them right. Here are the best methods: - Stovetop method: Heat a skillet over medium heat. Add a touch of butter or oil. Add the mushrooms and stir for about 3-5 minutes. - Microwave method: Place the mushrooms in a microwave-safe dish. Cover it loosely with a lid. Heat in short bursts of 30 seconds until warm. This keeps their texture nice. This way, you can enjoy the flavors of garlic butter mushrooms anytime! For the full recipe, check out the [Full Recipe]. Garlic butter mushrooms can last about 3 to 5 days in the fridge. Store them in an airtight container to keep them fresh. Make sure they cool before you seal them. This helps prevent moisture build-up, which can ruin the texture. Yes, you can make garlic butter mushrooms ahead of time! Cook them as usual and then let them cool. After that, store them in the fridge. Reheat them gently before serving. They taste great even after a day or two. Garlic butter mushrooms are versatile and can pair well with many dishes. Here are some tasty options: - Steak or Chicken: The rich flavor of mushrooms complements grilled meats well. - Pasta: Toss them with pasta for a quick, flavorful meal. - Rice or Quinoa: Serve them over rice or quinoa for a hearty side. - Salads: Add them to salads for extra flavor and texture. - Bread: Pair with crusty bread to soak up the garlic butter sauce. Feel free to mix and match your favorites for a delicious spread! For the full recipe, check out the previous sections. Garlic butter mushrooms are easy and delicious. We covered everything from fresh ingredients to cooking steps. You learned how to make them perfectly and store any leftovers. Think about trying different mushrooms or adding your favorite spices. These tips will help you enjoy this dish anytime. Simple methods and rich flavors make garlic butter mushrooms a win. Enjoy your cooking adventure!](https://blissfulmeal.com/wp-content/uploads/2025/07/c785d193-bf5d-4495-ae30-a6cfebec27ce-768x768.webp)
![To make soft pretzels at home, you need some key ingredients: - 4 cups all-purpose flour - 1 packet (2 ¼ teaspoons) active dry yeast - 1 ½ cups warm water (around 110°F/43°C) - 1 tablespoon granulated sugar - 1 teaspoon salt - ⅓ cup baking soda (for boiling) - 1 large egg, beaten (for egg wash) - Coarse sea salt (for topping) These ingredients work together to create a tasty dough that rises well and bakes into a soft, chewy pretzel. You can add some fun flavors to your pretzels. Here are some optional ingredients: - Melted butter (for brushing on top after baking) - Garlic powder - Sesame seeds - Cheese powder Using these toppings can give your pretzels a unique twist. Melted butter adds richness, while garlic powder and cheese powder bring savory notes. If you don’t have all-purpose flour, you can use bread flour for a chewier texture. If you want a gluten-free option, try a gluten-free flour blend. For the yeast, make sure it’s active. If it doesn't foam in the warm water, it may be dead. You can also use honey or brown sugar instead of white sugar for a different flavor. When using baking soda, be careful as it reacts with boiling water. Always add it slowly to avoid spills. If you want a deeper flavor in your pretzels, consider adding a little malt extract to the dough. For more details on the full recipe, check out the Full Recipe section. Start by mixing warm water, sugar, and yeast. Use a medium bowl for this step. Stir gently and let it sit for 5 to 10 minutes. You want it to bubble and foam. This shows your yeast is alive and ready. Next, take a large bowl. Add flour and salt, then mix them well. Make a well in the center and pour in your yeast mix. Stir with a wooden spoon until a dough forms. Transfer the dough to a floured surface and knead it for about 5 to 7 minutes. The dough should feel smooth and elastic when done. Now comes the fun part! Preheat your oven to 450°F (232°C). Punch down the risen dough to release air. Divide it into 8 equal pieces. Roll each piece into a long rope and twist it into a pretzel shape. For boiling, bring 10 cups of water to a rolling boil in a large pot. Carefully add baking soda and dip each pretzel in for 30 seconds. Use a slotted spoon to take them out. Place your pretzels on a parchment-lined baking sheet. Brush them with a beaten egg for a shiny look. Sprinkle coarse sea salt on top. Bake them for 12 to 15 minutes. They should turn golden brown with a nice crust. Enjoy the smell of fresh pretzels filling your kitchen! For full details, check the Full Recipe. To get the best texture, use warm water for the yeast. The water should be about 110°F. This helps the yeast activate well. Knead your dough until it feels smooth and elastic. This step is key. When you shape the pretzels, don’t make them too thick. A thinner rope will bake better and give you that soft bite. Boiling the pretzels in baking soda water adds to their chewy crust. Remember, this is a crucial step in getting that classic pretzel texture. One common mistake is not letting the dough rise enough. Make sure it doubles in size before you shape it. Another mistake is skipping the boiling step. This step is important for the right crust. Also, avoid using too much flour when kneading. It can make your dough dry. Finally, don't skip the egg wash. It gives your pretzels a nice shine and helps toppings stick. Serve your soft pretzels warm for the best taste. They pair well with dips like mustard or cheese sauce. You can also try a sweet dip, like chocolate sauce, for a fun twist. For a great presentation, place them on a wooden board. Add fresh herbs or a small bowl of your favorite dip. This makes your snack look as good as it tastes. For the full recipe, check out Twisted Delight: Homemade Soft Pretzels. {{image_4}} You can dress up your pretzels with fun toppings. Here are some ideas: - Coarse sea salt - Garlic powder - Sesame seeds - Cheese powder - Everything bagel seasoning Each topping adds a unique flavor. Experiment with these to find your favorite! Sweet pretzels are a treat! You can easily change your dough for a sweet taste: - Add cinnamon and sugar to the dough. - Brush with melted butter after baking. - Top with a glaze made of powdered sugar and milk. These sweet twists are great for dessert or a snack. You can make pretzel bites or sticks instead of the classic shape. Here’s how: - Roll out the dough into long ropes. - Cut into small pieces for bites or keep them long for sticks. - Follow the same boiling and baking steps. These bite-sized pretzels are perfect for dipping and sharing. You can find the full recipe to guide you through making these fun variations! To keep your leftover pretzels fresh, place them in a zip-top bag. Ensure you remove as much air as possible. You can also wrap them in plastic wrap. This helps prevent them from getting hard. Store them at room temperature for up to two days. If you want to keep them longer, move to the freezer. When you are ready to enjoy your pretzels again, here’s how to reheat them: - Preheat your oven to 350°F (175°C). - Place the pretzels on a baking sheet. - Heat them for about 5-10 minutes. This method keeps them soft and warm. You can also microwave them. Wrap each pretzel in a damp paper towel, then heat for 20-30 seconds. This will add moisture back. Freezing pretzels is easy and great for later use. First, let them cool completely. Then, place them in a single layer on a baking sheet. Freeze until firm, about one hour. After that, transfer the pretzels to a zip-top bag. Label the bag with the date. Pretzels can last up to three months in the freezer. When you want to eat them, thaw in the fridge overnight, then reheat them. You will enjoy a fresh pretzel again! For the full recipe, check out the detailed steps in the main guide. To keep your pretzels fresh, place them in a paper bag. This lets them breathe. Avoid plastic, as it traps moisture and makes them soggy. You can also wrap them in a clean kitchen towel. For longer storage, seal them in an airtight container. Store at room temperature for up to two days. If you want to keep them longer, freeze them. Just place them in a freezer bag. They’ll stay good for about three months. Yes, you can make pretzels without yeast. Use baking powder instead. This will create a lighter texture. You can mix baking powder with flour and water. This method will give you a quicker option. However, the taste and texture may differ from traditional soft pretzels. Soft pretzels have roots in Europe, especially Germany. They started as a snack for peasants. The shape is said to represent arms crossed in prayer. German immigrants brought them to America in the 1700s. Today, they are popular in many places, especially at fairs and sporting events. To get a chewy texture, use high-gluten flour. This type of flour has more protein, which helps with chewiness. Boiling the pretzels in water mixed with baking soda is key too. This process creates a crust. Bake them until they turn golden brown for the best results. For a perfect bite, follow the [Full Recipe]. Making homemade soft pretzels is fun and easy. We explored the key ingredients, from basics to some optional flavors. Step-by-step, we learned how to activate yeast, mix dough, shape pretzels, and bake them to perfection. I shared tips to avoid common mistakes and presented various topping ideas. Lastly, I covered storage and reheating methods, along with answers to common questions. Enjoy your pretzel-making journey and experiment with different flavors to find your favorite!](https://blissfulmeal.com/wp-content/uploads/2025/07/06a71223-340a-48e1-903a-4442090db355-768x768.webp)
![To make a fresh and tasty Mango Avocado Salsa, you’ll need a few simple ingredients. Here’s a list to get you started: - 1 ripe mango, peeled and diced into small cubes - 2 avocados, halved, pitted, and diced into bite-sized pieces - 1 small red onion, finely chopped - 1 small red bell pepper, diced - 1 jalapeño, seeds removed and minced - 2 tablespoons fresh cilantro, chopped finely - Juice of 2 fresh limes - 1 tablespoon honey (or agave syrup) - Salt and freshly ground black pepper to taste Each ingredient brings its own flavor to the salsa. The mango adds sweetness, while the avocado gives creaminess. The red onion and bell pepper add crunch and color. The jalapeño gives a little kick, and the lime juice brightens it all up. Honey or agave syrup adds a touch of sweetness, balancing the flavors. Using fresh cilantro enhances the taste and gives a nice herbal note. You can adjust the salt and pepper to fit your taste. This simple mix creates a salsa that is fresh, flavorful, and perfect for any occasion. For the full recipe, check out the details above! - Preparing the mango and avocados Start by peeling your ripe mango. Cut it into small, even cubes. Next, take two ripe avocados. Halve them, remove the pit, and dice the flesh into bite-sized pieces. Be gentle to keep the pieces intact. - Chopping the onion, bell pepper, and jalapeño Now, finely chop the red onion until you have a small, tidy pile. Dice the red bell pepper into small cubes. For the jalapeño, slice it in half, remove the seeds for less heat, and then mince it finely. This will add just the right kick. - Mixing ingredients in a bowl In a large mixing bowl, combine the diced mango, avocado pieces, finely chopped red onion, diced red bell pepper, and minced jalapeño. Use a large spoon and mix gently. You want everything to blend well without mashing the avocados. - Whisking together lime juice and honey In a small bowl, whisk together the fresh lime juice and honey. This mixture will create a bright dressing. Make sure it blends fully for the best flavor. - Tossing the salsa gently Carefully pour the lime dressing over the fruit and vegetable mix in your large bowl. Using a large spoon, toss all the ingredients together gently. This coats everything in the dressing without breaking apart the avocado too much. - Adjusting seasoning to taste Season your salsa with salt and freshly ground black pepper. Taste it and adjust the seasoning as needed. This step enhances all the flavors, making your salsa truly pop. After following these steps, let the salsa sit for about 10-15 minutes. This resting time allows the flavors to meld together beautifully. Enjoy your fresh and flavorful Mango Avocado Salsa! For the complete instructions, check out the Full Recipe. - Choosing ripe fruits: Select a mango that gives slightly when pressed. It should smell sweet. For avocados, look for a dark skin and gentle squeeze. They should feel soft but not mushy. - Mixing techniques to avoid mashing avocados: Use a large spoon or spatula to gently fold in the avocados. This helps keep them intact. Avoid stirring too hard; you want chunks, not mush. - Flavor enhancements: Add a pinch of cumin or a splash of orange juice for extra zest. You can also try adding diced mango for more sweetness. - Best pairings: Serve this salsa with crispy tortilla chips for a classic snack. It also goes well on grilled chicken or fish. The fresh taste brightens any dish. - Presentation tips for an appealing display: Use a colorful bowl to showcase the salsa. Add a sprig of cilantro on top for a touch of green. This makes your dish look vibrant and fresh. For the full recipe, check out the detailed steps above. Enjoy your cooking! {{image_4}} To make this salsa fit your needs, consider these swaps: - Low-Carb Adjustments: Instead of mango, use diced cucumber for a crunch. This keeps the carbs low while still offering freshness. - Vegan Alternatives for Honey: If you want a vegan option, swap honey for agave syrup. It adds sweetness without any animal products. - Other Herbs to Consider: Try using mint or basil instead of cilantro. These herbs bring a unique twist to your salsa. Want to shake things up? Here are some fun ideas: - Adding Different Chilies for Heat: Use serrano or habanero peppers if you like more spice. Adjust the amount to your heat level. - Incorporating Fruits Like Pineapple or Kiwi: Toss in diced pineapple or kiwi for a sweet surprise. These fruits add a juicy burst and balance the flavors. - Experimenting with Spices: Add a pinch of cumin or smoked paprika for depth. These spices can enhance the overall taste in a delightful way. For a full recipe, check out the [Full Recipe]. To keep your mango avocado salsa fresh, use an airtight container. Glass or plastic containers work well. Seal it tightly to keep out air and moisture. Store the salsa in the fridge to keep it cool. Avoid leaving it out at room temperature for too long, as this can cause spoilage. You can keep the salsa in the fridge for about 2 to 3 days. After that, the avocados may brown and lose their taste. Look for signs of spoilage, like an off smell or a slimy texture. If you see any brown spots on the avocados, it's best to toss the salsa. Always trust your senses—if it smells or looks off, don't eat it. For the full recipe, check out the details above. Can I make this salsa in advance? Yes, you can make this salsa ahead of time. I suggest preparing it no more than two hours in advance. This keeps the avocado fresh and green. If you make it too early, the avocado can turn brown. To avoid this, add lime juice to slow browning. What can I substitute for lime juice? You can use lemon juice instead of lime juice. It adds a nice tangy flavor too. Vinegar is another option, but it will change the taste a bit. I prefer lime juice for its bright taste. Is this salsa spicy? The spice level depends on the jalapeño. If you remove the seeds, it will be milder. If you like more heat, keep some seeds in. You can also add more jalapeño or use a hotter chili. Can I freeze Mango Avocado Salsa? I do not recommend freezing this salsa. The texture of the avocado changes when frozen. It may become mushy after thawing. However, you can freeze just the mango and add fresh avocado later. This keeps the flavors fresh. In this blog post, I shared how to make a delicious Mango Avocado Salsa. You learned about the ingredients, preparation steps, and tips to perfect your salsa. I also provided ways to customize your recipe and how to store it properly. Remember, fresh ingredients and careful mixing ensure great taste. Experiment with flavors and enjoy the vibrant dishes you create. This salsa is easy to make and packed with taste. Enjoy it with friends or at a gathering!](https://blissfulmeal.com/wp-content/uploads/2025/07/6b0543fa-75ce-4ab9-99e0-33a33bcefd8d-768x768.webp)

![To make this tasty dish, you will need the following main ingredients: - 2 slices of whole grain or sourdough bread - 1 ripe avocado - 1 medium heirloom tomato, sliced - 1 ball of fresh mozzarella cheese, sliced - A handful of fresh basil leaves - 1 tablespoon balsamic glaze - 1 tablespoon extra virgin olive oil - Salt and freshly cracked pepper, to taste You can add some fun twists to your Caprese Avocado Toast with these optional ingredients: - A pinch of red pepper flakes for heat - A drizzle of lemon juice for brightness - Sliced radishes for crunch - Chopped nuts like walnuts or pine nuts for texture This dish is not only delicious but also nutritious. Here’s a quick look at its benefits: - Avocados provide healthy fats and fiber. - Tomatoes are rich in vitamins C and K. - Mozzarella adds calcium and protein. - Fresh basil brings antioxidants and flavor. Enjoy this Caprese Avocado Toast knowing it’s both tasty and good for you! For the full recipe, check the details above. Start by toasting your slices of whole grain or sourdough bread. You can use a toaster or a skillet. Aim for a golden-brown crust, as this adds a nice crunch. This step is key for the perfect base of your dish. Next, choose a ripe avocado. Cut it in half and remove the pit. Scoop the creamy flesh into a bowl. Mash the avocado with a fork until smooth. Add a tablespoon of extra virgin olive oil, salt, and pepper to taste. Mix everything well. Your spread should be creamy and flavorful. Once your bread is toasted and your avocado spread is ready, it’s time to assemble. Spread a generous layer of mashed avocado on each slice of toast. Then, layer fresh mozzarella slices on top, followed by heirloom tomato slices. Alternate their placement for a colorful look. Tuck fresh basil leaves between the layers for added flavor. Drizzle balsamic glaze over the top to give it a gourmet touch. If you like a bit of heat, sprinkle red pepper flakes on top. Finish with a little salt and pepper. This Caprese Avocado Toast is now ready to enjoy! For the complete recipe, check out the [Full Recipe]. To find the best avocados, look for a smooth skin. The fruit should feel firm but yield slightly when you press it gently. Avoid any avocado with dark spots or bruises. When you slice it open, the flesh should be bright green. If it’s brown, it’s overripe. Always choose ripe avocados for your toast to ensure a creamy texture. For the best toast, use whole grain or sourdough bread. I recommend toasting it in a skillet for even browning. Heat a little olive oil in the pan before adding the bread. This will give it a nice crisp and add flavor. Toast until golden brown, about 3-4 minutes per side. You can also use a toaster if you want a quick option. To make your Caprese Avocado Toast look amazing, stack the ingredients artfully. Start with the avocado, then layer the mozzarella and tomato. Use fresh basil leaves to add color and aroma. Drizzle balsamic glaze over the top for a touch of elegance. Serve it on a wooden board or a nice plate, and garnish with extra basil for a pop of green. Enjoy your beautiful creation right away for the best flavor! {{image_4}} For a Mediterranean twist, add some olives and feta cheese. Slice black or green olives and scatter them on top of your toast. The salty flavor of the olives pairs perfectly with creamy avocado. Crumble feta cheese over the top for a tangy kick. This combination gives your Caprese Avocado Toast a unique taste and texture. If you want a vegan version, skip the mozzarella. Instead, use a plant-based cheese or skip it entirely. Spread some hummus on the toast for added creaminess. You can also add sliced cucumbers or radishes for crunch. These swaps keep the dish fresh and full of flavor without using dairy. To add a spicy kick, drizzle Sriracha on top of your toast. You can also slice fresh jalapeños and layer them on your toast. This extra heat balances well with the cool avocado and fresh tomato. If you like it hot, try adding more red pepper flakes for an extra burst of flavor. Feel free to mix and match these ideas with the full recipe to keep your Caprese Avocado Toast exciting! Leftover Caprese avocado toast can be tricky. The bread loses its crunch when stored. If you have leftovers, try to eat them soon. If you must save them, keep the toppings separate. Store the bread in a paper bag. This helps it stay a bit crispy. Keep the avocado, tomato, and cheese in an airtight container. Use them within one day for the best taste. To store fresh ingredients, follow these tips. Keep avocados at room temperature until they ripen. Once ripe, store them in the fridge. This slows down the ripening process. For tomatoes, store them at room temperature too. They taste better this way. Mozzarella should go in a sealed container with some water. Change the water daily to keep it fresh. Fresh basil loves water, so store it like a bouquet. Place the stems in water, cover the leaves with a bag, and keep it in the fridge. Reheating can make your toast less tasty. If you want to warm it up, avoid the microwave. Instead, use a toaster oven. This helps maintain the crunch of the bread. Heat at a low temperature for a few minutes. You can also reheat the bread in a skillet. Just warm it on medium-low heat for a few minutes. If you have leftover toppings, add them fresh after reheating. This keeps the flavors bright and delicious. Yes, you can use many types of bread! Whole grain and sourdough work well. But you can try ciabatta, rye, or even gluten-free bread. Each will bring its own flavor and texture. Just ensure the bread is sturdy enough to hold the toppings. To make this recipe gluten-free, choose a gluten-free bread. Many brands offer great options. Look for ones that are dense and can hold the toppings. You can also use lettuce wraps for a lighter option. Just ensure all other ingredients are gluten-free too. If you don't have mozzarella, try ricotta or burrata cheese. They both offer a creamy texture. You can also use feta for a tangy flavor. Vegan cheese options are available if you prefer a dairy-free choice. Just select one that melts well for the best taste. You can find the full recipe for Caprese Avocado Toast above. Caprese avocado toast combines fresh flavors and simple steps. We explored main and optional ingredients, making it easy to craft this dish. I shared tips for picking ripe avocados and mastering toasting. You can also try exciting variations like adding olives or going vegan. For leftovers, we discussed storage and reheating methods. This recipe is fun and delicious. Enjoy making it your own. Your kitchen will become a hub of tasty creativity.](https://blissfulmeal.com/wp-content/uploads/2025/07/e7c4159b-7d18-42ee-ab96-82b5929bade2-768x768.webp)