Skip to content
About
Contact
Cookie Policy
Copyright Policy
Disclaimer
Search
Home
Dinner
Appetizer
Desserts
Drinks
About
Contact
Privacy Policy
Toggle Menu
Home
/
Desserts
- Page 21
Desserts
Chocolate Coconut Energy Bites Simple and Tasty Treat
Apple Pie Overnight Oats Tasty and Easy Recipe
Strawberry Cream Cheese Danish Delightful and Easy Recipe
Tropical Fruit Salad Flavorful and Refreshing Delight
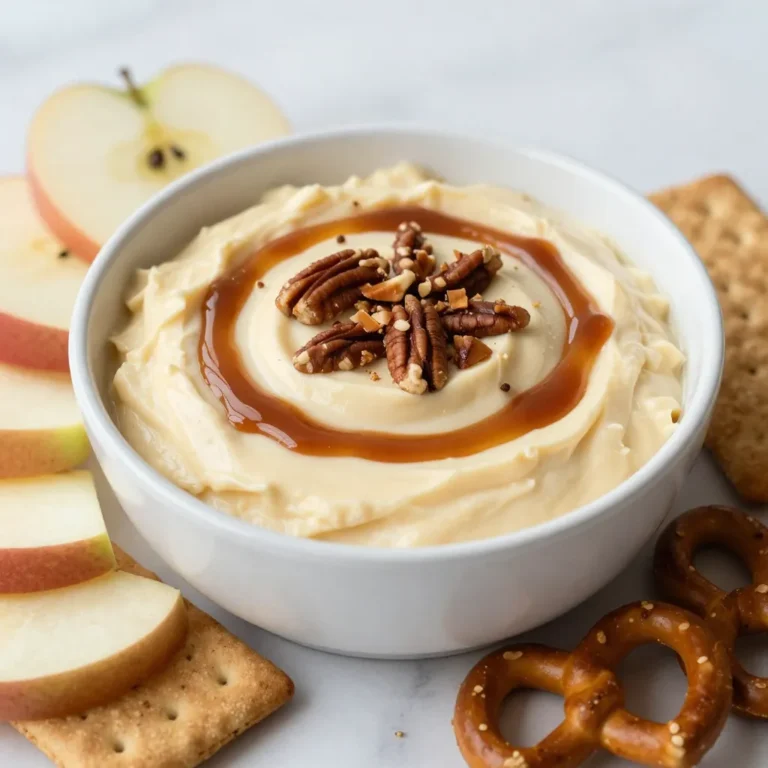
Caramel Pecan Cheesecake Dip Delicious and Simple Treat
Chocolate Covered Strawberry Brownies Irresistible Delight
Apple Pie Overnight Oats Easy and Nutritious Recipe
Hot Cocoa Bombs Delightfully Warm your Winter
Blueberry Cream Cheese Danish Delightful and Flaky Treat
Chocolate Caramel Turtle Cookies Tasty and Easy Recipe
Page navigation
Previous Page
Previous
1
…
19
20
21
22
23
…
27
Next Page
Next
Home
Dinner
Appetizer
Desserts
Drinks
About
Contact
Privacy Policy
Toggle Menu Close
Search for:
Search


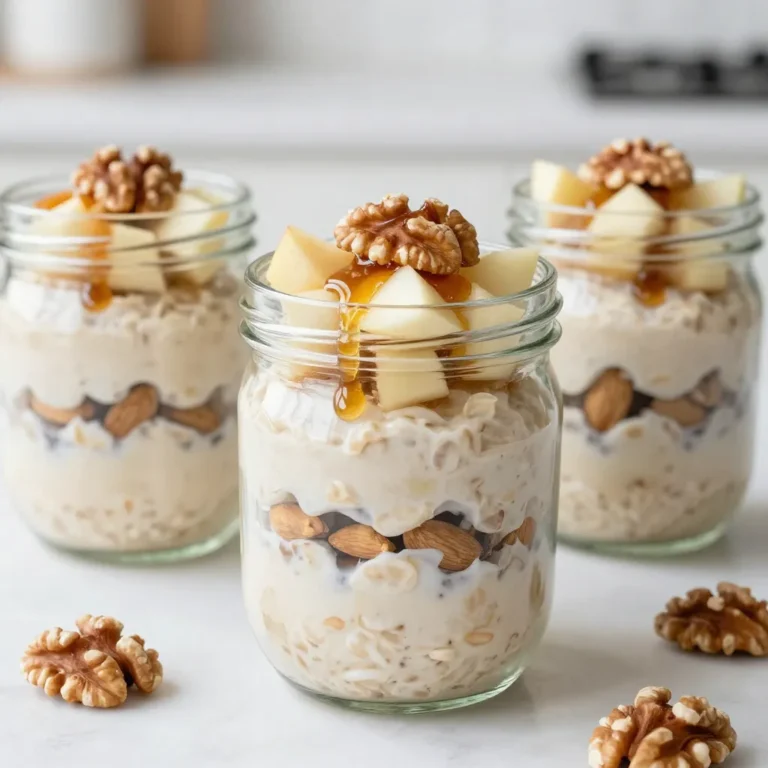
![- 1 cup rolled oats - 1 cup unsweetened almond milk (or any milk of choice) - 1 medium apple, cored and diced - 1 tablespoon maple syrup (or honey) - 1 teaspoon ground cinnamon - 1/2 teaspoon vanilla extract - 1/4 cup Greek yogurt (optional) - 1 tablespoon chia seeds (optional) - Toppings: chopped walnuts or pecans, extra apple slices, sprinkle of cinnamon To make apple pie overnight oats, gather these ingredients. The rolled oats create a hearty base. Almond milk adds creaminess. Choose your favorite type of milk if you prefer. The apple brings natural sweetness. Maple syrup or honey gives a nice touch. Ground cinnamon is key for that apple pie flavor. Vanilla extract adds warmth. Greek yogurt can make it creamy, but it’s not a must. Chia seeds boost nutrition if you want. For toppings, walnuts or pecans add crunch. Extra apple slices make it look lovely. A sprinkle of cinnamon on top gives it that final touch. This full recipe ensures you have everything you need for a tasty breakfast. - Step 1: Combine oats and almond milk In a medium bowl, add 1 cup of rolled oats and 1 cup of almond milk. Stir them well until the oats absorb some liquid. - Step 2: Mix in apple, maple syrup, cinnamon, vanilla, and chia seeds Next, add in 1 medium diced apple, 1 tablespoon of maple syrup, 1 teaspoon of ground cinnamon, 1/2 teaspoon of vanilla extract, and 1 tablespoon of chia seeds. Mix all these ingredients until they blend nicely. - Step 3: Optional: Fold in Greek yogurt If you want a creamier texture, gently fold in 1/4 cup of Greek yogurt. Make sure it mixes smoothly with the oats. - Step 4: Distribute mixture into jars Spoon the oat mixture into two jars. Leave a little space at the top, as the oats will expand. - Step 5: Seal jars and refrigerate Seal the jars tightly. Place them in the fridge for at least 4 hours or overnight. This soaking time helps the flavors develop. - Step 6: Stir and serve the next morning In the morning, take the jars out of the fridge. Stir the oats well. If they seem too thick, just add a splash of almond milk. For a special touch, top your oats with chopped walnuts or pecans, extra apple slices, and a sprinkle of cinnamon. Enjoy your delicious Apple Pie Overnight Oats! For the full recipe, refer to the earlier section. You can make your apple pie overnight oats just how you like them. Adjust the sweetness using maple syrup or honey. If you want a sweeter taste, add more syrup. For a lighter option, use less. Try different types of milk for a unique flavor. Almond milk gives a nice nutty taste. You can also use oat milk or coconut milk for a twist. Each type changes the final dish a bit. Adding extra spices can personalize your oats. Try nutmeg or allspice to enhance that apple pie flavor. A pinch of ginger can also add warmth to the taste. Serving your oats in clear jars makes for a fun look. You can see the oats, apples, and toppings. This adds to the appeal when you enjoy your breakfast. Garnish with colorful toppings for extra flair. Use fresh apple slices for a pop of color. A light sprinkle of cinnamon on top makes it look tasty and adds more flavor. {{image_4}} You can twist the classic apple pie flavor. Try a Pumpkin Pie version. Just swap the apple for pumpkin puree. Add pumpkin spice for that warm taste. It’s a fun fall twist! You can also mix in berries or bananas. Blueberries or strawberries add a nice burst of flavor. Sliced bananas bring a creamy texture. Just fold them in right before serving. If you need a gluten-free option, use gluten-free oats. They taste just as good! You’ll still enjoy that creamy texture. For a vegan choice, skip the Greek yogurt. The oats will still be tasty and filling. You can add more almond milk to keep it creamy. To keep your apple pie overnight oats fresh, store them in the fridge. Use airtight containers or jars. This helps prevent any air from getting in and keeps the oats tasty. If you use glass jars, they are great for checking the oats’ freshness. Also, make sure to leave some space at the top of each jar. This allows the oats to expand as they soak. Your apple pie overnight oats are good for about 3 to 5 days in the fridge. If they look dry or have a strange smell, it’s time to toss them out. Changes in color or texture can also mean they’ve gone bad. Always check before eating to ensure they are still safe and delicious. You can enjoy this recipe from [Full Recipe] without worry, as long as you store them right! Apple pie overnight oats are packed with good stuff. They provide fiber, which helps digestion. Each serving has protein from oats and yogurt. Oats give you energy and keep you full. The apples add vitamins and antioxidants. Cinnamon can lower blood sugar and support heart health. Overall, this dish is a tasty way to start your day. Yes, you can make them ahead! I like to prep them the night before. Just follow the steps and store them in the fridge. They need at least four hours to soak. For the best taste, leave them overnight. This way, they are ready to go in the morning. To make it dairy-free, just skip the Greek yogurt. Use almond milk or any milk you prefer. For gluten-free oats, swap regular oats for certified gluten-free oats. These changes keep the recipe tasty while meeting your needs. To reheat, use the microwave. Place your oats in a microwave-safe bowl. Heat them for about 30 seconds. Stir, then check if they are warm enough. If you like them cold, enjoy straight from the fridge. You can add more milk if they seem thick. This blog post shared a simple guide to making apple pie overnight oats. You learned about the ingredients, preparation steps, customization tips, and storage advice. With these easy recipes, you can enjoy good nutrition each morning. Don’t shy away from trying different flavors or toppings to make it your own. Personalizing your oats makes breakfast fun! Remember these tips for freshness and storage. Enjoy your tasty and healthy meal!](https://blissfulmeal.com/wp-content/uploads/2025/06/df6fb60e-d2f9-4979-9ad2-992fb7087739-768x768.webp)