Skip to content
About
Contact
Cookie Policy
Copyright Policy
Disclaimer
Search
Home
Dinner
Appetizer
Desserts
Drinks
About
Contact
Privacy Policy
Toggle Menu
Home
/
Dinner
- Page 15
Dinner
Easy Chicken Taco Casserole Flavorful Dinner Delight
Rainbow Spring Roll Bowls Colorful and Fresh Delight
Greek Orzo Pasta Salad Fresh and Flavorful Recipe
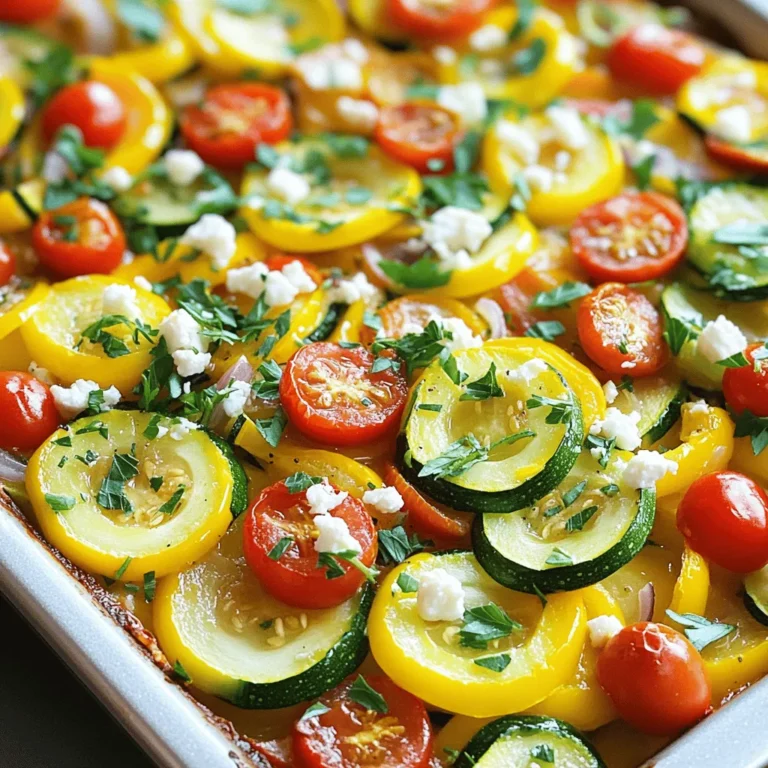
Mediterranean Squash Bake Flavorful and Easy Recipe
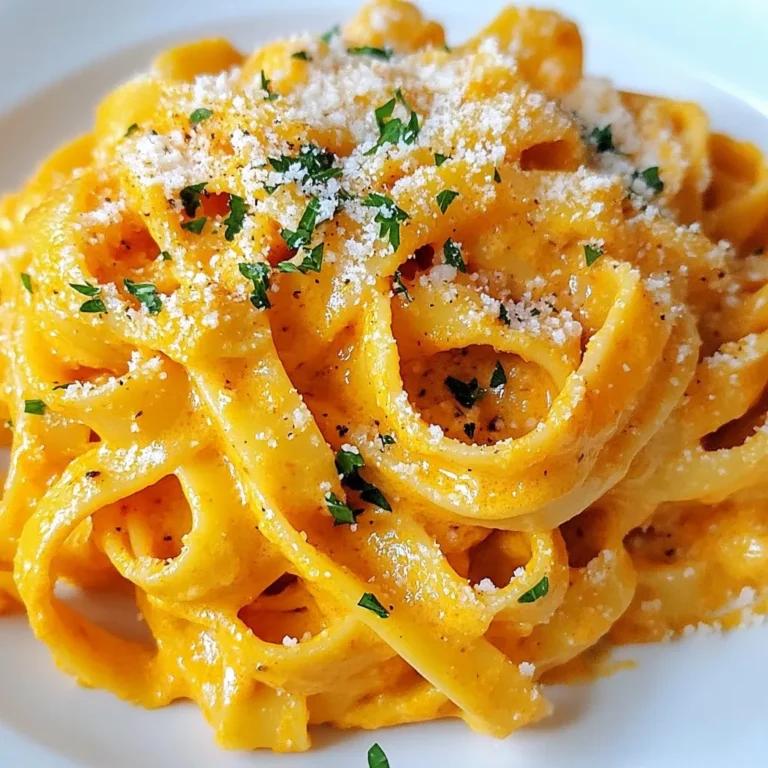
Creamy Roasted Red Pepper Pasta Flavorful Dinner Idea
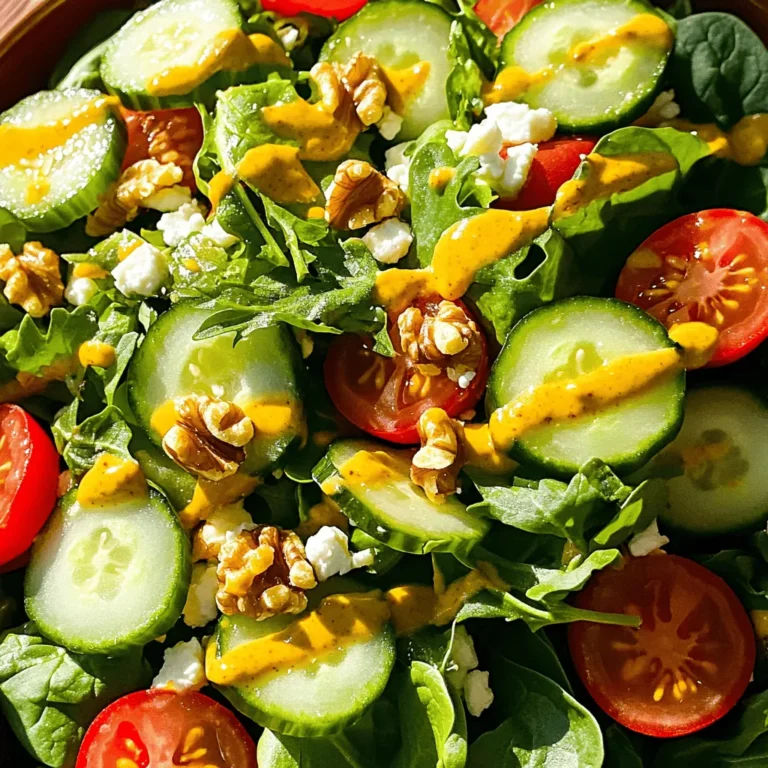
Honey Mustard Chicken Salad Fresh and Flavorful Delight
Creamy Broccoli Cheddar Soup Simple and Flavorful Meal
Stuffed Sweet Potatoes Flavorful and Healthy Dish
Lemon Herb Quinoa Salad Flavorful and Nutritious Dish
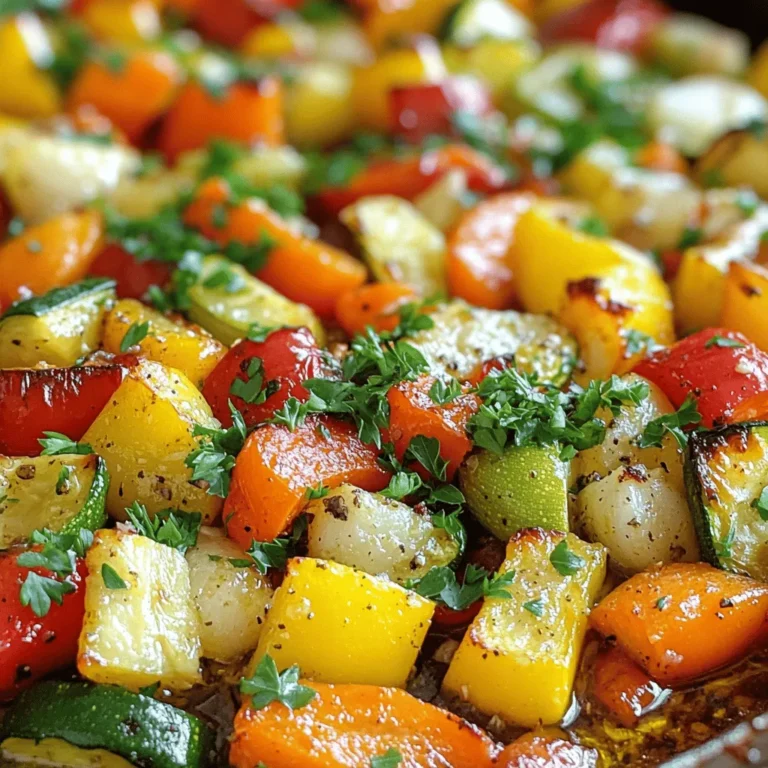
Garlic Herb Roasted Vegetables Flavorful and Easy Dish
Page navigation
Previous Page
Previous
1
…
13
14
15
16
17
…
38
Next Page
Next
Home
Dinner
Appetizer
Desserts
Drinks
About
Contact
Privacy Policy
Toggle Menu Close
Search for:
Search


![- 1 cup rice noodles - 1 cup shredded carrots - 1 cup red cabbage, finely sliced - 1 cucumber, peeled and julienned - 1 bell pepper (your choice of color), julienned - 1 ripe avocado, sliced - 1 cup cooked shrimp or cubed tofu (optional) These main ingredients form the base of your rainbow spring roll bowls. The rice noodles bring a nice chew, while the fresh veggies add crunch and color. Feel free to mix and match your favorite vegetables. You can even add more colors if you like. - 3 tablespoons soy sauce or tamari - 1 tablespoon sesame oil - 1 tablespoon fresh lime juice The dressing ties everything together. Soy sauce gives a salty kick, while sesame oil adds a nutty flavor. Lime juice brings a refreshing zing that wakes up your taste buds. You can adjust the amounts based on your taste. - 1/4 cup fresh cilantro, roughly chopped - 1/4 cup fresh mint leaves, roughly chopped - 1/4 cup peanuts, crushed (for garnish) Garnishes make your bowls pop! Fresh herbs like cilantro and mint add brightness. Crushed peanuts give a lovely crunch. These garnishes enhance both the look and taste of your dish. For the full recipe, check out [Full Recipe]. To start, fill a medium pot with water. Bring it to a rolling boil. Add 1 cup of rice noodles. Cook them for about 3 to 5 minutes. You want them tender but not mushy. When they are done, drain the noodles well. Rinse them under cold water. This stops the cooking. Set the noodles aside for now. While the noodles cook, wash all your vegetables. Use fresh and crisp ones for the best taste. I like to peel the cucumber first, then julienne it into thin strips. For the carrots, you can use a grater or a knife. Slice the red cabbage finely. Take a large bowl and mix the shredded carrots, sliced cabbage, julienned cucumber, and bell pepper. Toss them gently to combine. You want a colorful mix that looks great. Grab a small bowl for the dressing. Whisk together 3 tablespoons of soy sauce (or tamari), 1 tablespoon of sesame oil, and 1 tablespoon of fresh lime juice. Make sure to mix it well. Taste it and add a pinch of salt and pepper if needed. Adjusting seasoning helps bring out the flavors. Now, it’s time to build your bowls. Take individual serving bowls. Start with a layer of noodles at the bottom. Next, add a generous amount of the mixed vegetables on top. Then, lay down some slices of avocado. If you want protein, sprinkle cooked shrimp or tofu evenly across the bowls. Finally, top with fresh cilantro and mint leaves. They add a nice aroma and flavor. For a beautiful presentation, use clear or brightly colored bowls. This way, all the vibrant hues shine. For extra zest, place lime wedges on the side. Guests can squeeze them over their bowls before digging in. To roll spring rolls well, start with fresh rice paper. Dip it in warm water briefly until soft. Lay it flat on a clean surface. Place your ingredients close to the edge. Fold the edge over the filling. Tuck it in tight. Then, roll the paper away from you, folding in the sides. This creates a tight roll. To avoid tearing, don’t soak the rice paper too long. If it feels fragile, let it sit for a moment. You can also layer the filling for extra support. If a roll tears, use it as a guide for your next one. To boost the taste of your bowls, try adding crunchy toppings. Toasted sesame seeds or sliced jalapeños can add a nice crunch. You can also mix in edamame or bean sprouts for extra texture. Adjust the dressing to your liking. If you want more zing, add lime juice. For a richer taste, use more sesame oil. Always taste before you pour it over the bowls. This way, you can find the perfect balance for you. Rainbow Spring Roll Bowls are packed with fresh ingredients. Fresh veggies provide vitamins and minerals. Carrots, for instance, are great for your eyes. Cabbage offers fiber and antioxidants. In terms of calories, this bowl is light but filling. Each serving has around 300 calories, depending on your toppings. This makes it a good choice for lunch or dinner. Plus, the healthy fats from avocado keep you satisfied. Eating fresh is not just tasty; it’s good for your body too! {{image_4}} You can make Rainbow Spring Roll Bowls vegetarian by adding tofu or chickpeas. Tofu gives a nice texture, while chickpeas add protein. For veggies, switch up the mix! Try using sweet bell peppers, zucchini, or snap peas for a fresh taste. You can even add cooked quinoa for extra nutrients. These choices keep your meal colorful and fun! If you need gluten-free options, use gluten-free soy sauce or tamari instead of regular soy sauce. This keeps your sauce flavorful without the gluten. You can also swap rice noodles for rice paper wraps or spiralized veggies. This creates a light and fun meal without losing any taste. In summer, load your bowls with fresh fruits like mango or pineapple. These add a sweet touch that brightens up each bite. For winter, consider using roasted root vegetables like sweet potatoes or beets. They add warmth and depth to your bowls. Mixing in seasonal ingredients makes your bowls exciting all year round. To store your Rainbow Spring Roll Bowls, keep the fresh ingredients separate. This helps maintain their crunch and flavor. Use airtight containers for the rice noodles and veggies. For best results, store them in the fridge. They can stay fresh for about 2-3 days. If you have leftover dressing, place it in a small jar. It will keep well sealed in the fridge too. I love preparing ingredients in advance. Chop your veggies a day early and store them in the fridge. This makes it quick to assemble bowls when you are ready to eat. You can also cook the rice noodles ahead of time. Just make sure to rinse them in cold water to stop the cooking process. Assemble your bowls right before serving. This keeps everything fresh and colorful. If you need to reheat the noodles, do it gently. Place them in a microwave-safe bowl and add a bit of water. Heat for 30 seconds, then stir. This helps avoid sogginess. If you want to keep the textures nice, try not to overheat them. Serve the noodles warm, but enjoy the fresh veggies cold. This contrast makes each bite delightful. Yes, you can prep your Rainbow Spring Roll Bowls in advance. Start by cooking the rice noodles and letting them cool. You can chop all the veggies and store them in an airtight container. This keeps them fresh and crunchy. Mix the dressing and keep it in a separate jar. Assemble the bowls just before you serve. This way, the colors stay bright, and the veggies stay crisp. If you want to switch up the noodles, try using soba or glass noodles. They offer a nice texture and flavor. You can even use zucchini noodles for a low-carb option. Just remember to adjust your cooking time based on what you choose. Each type of noodle brings its own taste to the dish. Leftovers from your Rainbow Spring Roll Bowls will last about three days in the fridge. Store them in an airtight container to keep them fresh. The veggies might soften over time, so it’s best to eat them quickly. If you have leftovers, you can also use them in stir-fries or salads. You now have all the key steps to create delicious Rainbow Spring Roll Bowls. From selecting fresh ingredients like rice noodles and vibrant veggies to crafting a flavorful dressing, everything is at your fingertips. Remember to store your leftovers properly and follow meal prep tips for easy weeknight meals. These bowls are not just tasty; they are also a healthy choice. Get creative with seasonal variations and toppings to suit your taste. Enjoy the process and share the joy of cooking with others!](https://blissfulmeal.com/wp-content/uploads/2025/07/ff6bcafe-2a83-4847-80a2-ea869bc38522-768x768.webp)
![To make this tasty Greek Orzo Pasta Salad, you will need the following ingredients: - 1 cup orzo pasta - 1 ½ cups vegetable broth (or water) - 1 cup cherry tomatoes, halved - ½ cucumber, diced - ¼ red onion, finely chopped - ½ cup kalamata olives, pitted and sliced - 1 cup feta cheese, crumbled - ¼ cup fresh parsley, chopped - 2 tablespoons lemon juice - 2 tablespoons extra virgin olive oil - 1 teaspoon dried oregano - Salt and freshly ground black pepper to taste This Greek Orzo Pasta Salad is more than just delicious; it also has great nutrition. Each serving packs a good amount of protein from the feta cheese and fiber from the veggies. Here’s a breakdown of the nutrition per serving: - Calories: Approximately 300 - Protein: 10g - Carbohydrates: 35g - Dietary Fiber: 3g - Fat: 15g - Saturated Fat: 5g This salad is a balanced option for lunch or a side dish. It brings fresh flavors and nutrients to your plate. If you want to change things up, here are some fun swaps: - Orzo: Use quinoa or farro for a gluten-free version. - Feta Cheese: Try goat cheese or omit it for a vegan option. - Olives: Swap kalamata olives for green olives or capers for a different taste. - Vegetables: Add bell peppers, spinach, or artichokes for more color and flavor. These substitutions let you customize the salad to your taste and dietary needs. Enjoy experimenting! For the full recipe, check out Mediterranean Orzo Delight. Start by boiling 1 ½ cups of vegetable broth or water. Use a medium saucepan over medium-high heat. When it boils, add 1 cup of orzo pasta. Cook the orzo according to the package directions. This usually takes about 8-10 minutes. You want it to be al dente, which means it should still have a firm bite. Once done, drain the orzo in a fine-mesh strainer. Rinse it under cold water to stop the cooking. This helps keep the orzo from getting mushy. Then, pour the cooled orzo into a large mixing bowl and set it aside. While your orzo cools, it's time to chop the veggies. Take 1 cup of cherry tomatoes and cut them in half. Next, grab ½ of a cucumber and dice it into small cubes. Then, finely chop ¼ of a red onion. These fresh vegetables add color and crunch to your salad. Toss the halved tomatoes, diced cucumber, and chopped onion into the bowl with the orzo. Stir them together gently to mix. Now, let’s make a simple dressing. In a small bowl, whisk together 2 tablespoons of lemon juice and 2 tablespoons of extra virgin olive oil. Add 1 teaspoon of dried oregano, and a pinch of salt and freshly ground black pepper. Whisk until everything combines well. This dressing will give your salad a bright and zesty flavor. Drizzle your dressing over the orzo and vegetable mix. Use a spatula or large spoon to toss everything gently. Make sure all the ingredients are coated without breaking the orzo. Next, fold in ½ cup of crumbled feta cheese and ¼ cup of chopped fresh parsley. Mix gently so the feta stays intact. Taste your salad and adjust the seasoning with more salt, pepper, or lemon juice if needed. For the best flavor, cover the bowl and chill in the fridge for at least 30 minutes. This cooling time helps the flavors blend nicely. To make your Greek orzo pasta salad pop, focus on fresh ingredients. Use ripe cherry tomatoes and crisp cucumbers for the best taste. Here are some quick tips: - Add fresh herbs like basil or dill for extra zest. - Use high-quality olive oil for a richer flavor. - A dash of red wine vinegar can brighten the dish. This salad is great for many occasions. Serve it at picnics, barbecues, or family dinners. You can enjoy it as a light main dish or a side. Pair it with grilled chicken or fish for a full meal. If you want a heartier option, add chickpeas or grilled shrimp for protein. Make your dish eye-catching. Serve your Mediterranean orzo delight in a large, colorful bowl. Garnish with extra parsley and a few whole olives on top. This adds color and texture to your dish. You can also layer it in clear cups for individual servings. Let the vibrant colors shine through for a beautiful display! {{image_4}} You can make Greek Orzo Pasta Salad even heartier by adding protein. Some great options include: - Grilled chicken, diced - Shrimp, cooked and peeled - Canned chickpeas, rinsed and drained - Tuna, drained and flaked These proteins not only boost nutrition but also add different flavors. Adjust the amount to fit your taste. To make this salad vegetarian, simply leave out the feta cheese or use a dairy-free version. For a vegan option, replace the feta with avocado. Avocado adds creaminess without dairy. You can also add more veggies, like bell peppers or artichokes, for extra crunch. This keeps the dish fresh and vibrant. Using seasonal ingredients can enhance your salad's flavor. In summer, add fresh corn or zucchini. In fall, consider roasted butternut squash or Brussels sprouts. These ingredients change the dish and make it exciting all year round. You can mix and match based on what’s fresh and available. This makes your Greek Orzo Pasta Salad unique and fun! For the complete recipe, check out the [Full Recipe]. After enjoying your Greek orzo pasta salad, store leftovers in an airtight container. This helps keep the flavors fresh. Place the container in the fridge. Your salad will stay good for about 3 to 5 days. Make sure to check for any signs of spoilage before eating. You can freeze orzo pasta salad, but be aware that some ingredients may change texture. To freeze, pack the salad into a freezer-safe container. Leave some space at the top for expansion. It can last in the freezer for about 1 to 2 months. When ready, thaw in the fridge overnight. Reheating orzo pasta salad is simple. If you prefer it warm, use a microwave-safe dish. Heat on medium power for 30-second intervals, stirring in between. You can also reheat it on the stove over low heat. Add a splash of olive oil or lemon juice to revive flavors. Enjoy your meal at the temperature you like best! Greek Orzo Pasta Salad is a bright and tasty dish. It mixes orzo pasta with fresh veggies. You’ll find cherry tomatoes, cucumber, red onion, and kalamata olives in it. Feta cheese adds creaminess, while parsley gives a fresh touch. A simple lemon dressing ties all the flavors together. This salad is great as a side or a light meal. Yes, you can make Greek Orzo Pasta Salad ahead of time. In fact, making it a few hours in advance improves the flavor. Just prepare the salad and chill it in the fridge. The longer it sits, the more the flavors blend. Greek Orzo Pasta Salad lasts about three to five days in the fridge. Keep it in an airtight container to maintain freshness. If you notice any changes in color or smell, it’s best to toss it out. No, orzo is not gluten-free. It is made from wheat, similar to pasta. However, you can find gluten-free orzo made from rice or corn. Just check the package to be sure. For a gluten-free option, substitute orzo with quinoa or rice. We covered the key ingredients and their nutrition for Greek Orzo Pasta Salad. You learned how to cook orzo, prepare fresh veggies, and make a tasty dressing. I shared tips to boost flavor and ideas for serving. You can also find fun variations and storage tips. Making this salad is simple and fun. Enjoy trying new things in your kitchen!](https://blissfulmeal.com/wp-content/uploads/2025/07/2fd08110-7687-4c4c-9a69-8e728ee04873-768x768.webp)

. Enjoy making this tasty dish! Stuffed sweet potatoes are tasty, healthy, and easy to make. We discussed the ingredients, spices, and toppings that give them flavor. You learned how to prep, fill, and bake them perfectly. Use my tips to improve your dish further or explore fun variations. Whether you choose classic flavors or try something new, these sweet potatoes will impress everyone. Enjoy your cooking adventure and make every bite count!](https://blissfulmeal.com/wp-content/uploads/2025/07/2145883e-7368-476c-93c8-66514b5f2e96-768x768.webp)
![- Quinoa: 1 cup, thoroughly rinsed - Vegetables: 1 cup cherry tomatoes, 1 cucumber, 1 bell pepper, 1/4 small red onion - Herbs and Extras: 1/4 cup fresh parsley, 1/4 cup fresh mint, 1/4 cup feta cheese (optional) - Olive oil: 3 tablespoons - Lemon: Juice and zest of 1 large lemon - Seasoning: Salt and freshly cracked black pepper When I make this Lemon Herb Quinoa Salad, I love the bright flavors. The quinoa is the star here. It’s light, fluffy, and fills you up without feeling heavy. Rinsing the quinoa is key. It removes the bitter coating called saponin. This makes your salad taste better. Next, I chop the vegetables. I choose colorful cherry tomatoes, crisp cucumbers, and sweet bell peppers. A little red onion adds a nice bite. These veggies give the salad a fresh crunch. You can mix and match based on what you have. Herbs are vital for flavor. I use parsley and mint for a burst of freshness. The feta cheese adds creaminess if you like. It’s optional, but I think it makes the salad even better. For the dressing, I combine olive oil, lemon juice, and zest. This adds a zesty kick. A pinch of salt and pepper ties everything together. It’s simple yet full of flavor. This combination of ingredients creates a tasty and nutritious dish. You can find the full recipe for the Lemon Herb Quinoa Salad to try it out yourself! First, bring 2 cups of vegetable broth or water to a boil. This will add flavor to the quinoa. Next, add 1 cup of rinsed quinoa to the boiling liquid. Cover the pot and reduce the heat. Let it simmer for about 15 minutes. The quinoa will absorb all the liquid and become fluffy. While the quinoa cooks, wash and chop all your vegetables. You need cherry tomatoes, cucumber, bell pepper, and red onion. Once chopped, transfer them into a large mixing bowl. This bowl will hold all the tasty ingredients. Now it’s time to add flavor. Toss in 1/4 cup of chopped parsley and 1/4 cup of chopped mint. If you like cheese, sprinkle in 1/4 cup of crumbled feta. This adds a creamy touch. In a separate small bowl, combine 3 tablespoons of olive oil, juice, and zest of one lemon along with a pinch of salt and pepper. Whisk them together until mixed well. Once the quinoa has cooled, fluff it with a fork to separate the grains. Add the quinoa to your bowl of veggies and herbs. Drizzle the dressing over everything. Gently toss the salad to coat all the ingredients evenly. Taste your salad. If it needs more flavor, add more salt, pepper, or lemon juice. You can adjust it to suit your taste. If you want to enhance the flavors, cover the salad and chill it for about 30 minutes in the fridge before serving. This step-by-step guide will lead you to a fresh and vibrant Lemon Herb Quinoa Salad. For the complete list of ingredients, check out the Full Recipe. To make the best quinoa, rinse it thoroughly before cooking. This step removes the bitter coating called saponin. Use cold water and a fine mesh strainer. After cooking, allow the quinoa to cool completely before mixing it with other ingredients. This keeps the grains light and fluffy. When serving your Lemon Herb Quinoa Salad, present it in a decorative bowl or serve it in individual portions. This adds a nice touch to your meal. Garnish with extra herbs or lemon wedges for a pop of color and flavor. These small details make your dish more inviting. You can enhance the nutrition of your salad by making a few simple swaps. Substitute quinoa with farro or barley for a different texture. These grains offer unique flavors and more fiber. You might also add protein like chickpeas or grilled chicken. This will make your salad a complete meal and keep you satisfied longer. For a full recipe of this vibrant dish, check out the [Full Recipe]. {{image_4}} You can change this salad based on the season. In summer, add fresh bell peppers. In fall, try roasted squash for a warm touch. Seasonal herbs like basil or cilantro can boost the flavor too. These swaps keep your salad fresh and exciting. Spices can take your salad to the next level. Try cumin for warmth or smoked paprika for a smoky kick. You can also use different dressings. A tahini dressing adds creaminess, while a yogurt-based dressing gives a tangy twist. Experiment with flavors to find what you love. If you want a vegan salad, simply skip the feta cheese. This keeps it light and plant-based. To make it gluten-free, ensure your vegetable broth is certified gluten-free. This way, everyone can enjoy the salad without worry. For the full recipe, check out the details on how to prepare this flavorful dish. Store any leftover Lemon Herb Quinoa Salad in an airtight container in the refrigerator. It stays fresh for up to 3 days. Make sure to close the container tightly to keep the flavors intact. Freezing this salad is not recommended. The texture of the quinoa and vegetables changes when frozen. You will lose the fresh crunch and bright flavors. Enjoy your salad fresh or chilled for the best taste. If you want to reheat the salad, use a microwave. Add a splash of water to keep it moist and prevent it from drying out. Heat in short bursts, checking often until it's warm. To cook quinoa properly, rinse it well first. This removes any bitterness. Use a 2:1 water-to-quinoa ratio. For every cup of quinoa, use two cups of water or broth. This method yields fluffy grains. Bring the water to a boil, add the quinoa, cover, and simmer for 15 minutes. Once done, let it cool a bit before using it in your salad. Yes, you can make this salad ahead of time. It tastes even better when you let it sit in the fridge for a couple of hours or overnight. The flavors blend nicely, giving you a more delicious dish. Just cover it well in the fridge to keep it fresh. Absolutely! Adding protein makes this salad a complete meal. You can use grilled chicken, chickpeas, or beans. These options boost the taste and nutrition. Mix them into the salad before serving or on the side. Yes, this recipe is gluten-free. Quinoa is naturally gluten-free, making it suitable for gluten-sensitive diets. You can enjoy this dish without worry. Just make sure any broth you use is also gluten-free. For the full recipe, check the details above! Lemon Herb Quinoa Salad is simple, fresh, and packed with flavor. You learned about its main ingredients, dressing, and how to combine them. I shared tips for perfect quinoa and offered tasty variations. This salad is not just great for a meal, but also adaptable for every season. Remember, enjoy your quinoa salad fresh and experiment with flavors. It’s a healthy choice that satisfies.](https://blissfulmeal.com/wp-content/uploads/2025/07/898821f7-31ba-491c-a008-039d38dec293-768x768.webp)