Skip to content
About
Contact
Cookie Policy
Copyright Policy
Disclaimer
Search
Home
Dinner
Appetizer
Desserts
Drinks
About
Contact
Privacy Policy
Toggle Menu
Home
/
Dinner
- Page 19
Dinner
Chicken Souvlaki Skewers Flavorful Grilled Delight
Vegan Sweet Potato Curry Flavorful and Easy Recipe
One-Pan Honey Garlic Chicken Easy and Flavorful Meal
Spicy Black Bean Tacos Flavorful and Easy Recipe
Honey Garlic Chicken Stir Fry Flavorful and Easy Meal
Garlic Parmesan Crockpot Chicken Savory Family Meal
Roasted Sweet Potato Buddha Bowl Fresh and Flavorful Meal
Honey Sriracha Chicken Skewers Flavorful Grilling Delight
Easy Egg Roll in a Bowl Delightful and Quick Meal
Easy Vegan Lentil Sloppy Joes Simple and Tasty Meal
Page navigation
Previous Page
Previous
1
…
17
18
19
20
21
…
38
Next Page
Next
Home
Dinner
Appetizer
Desserts
Drinks
About
Contact
Privacy Policy
Toggle Menu Close
Search for:
Search


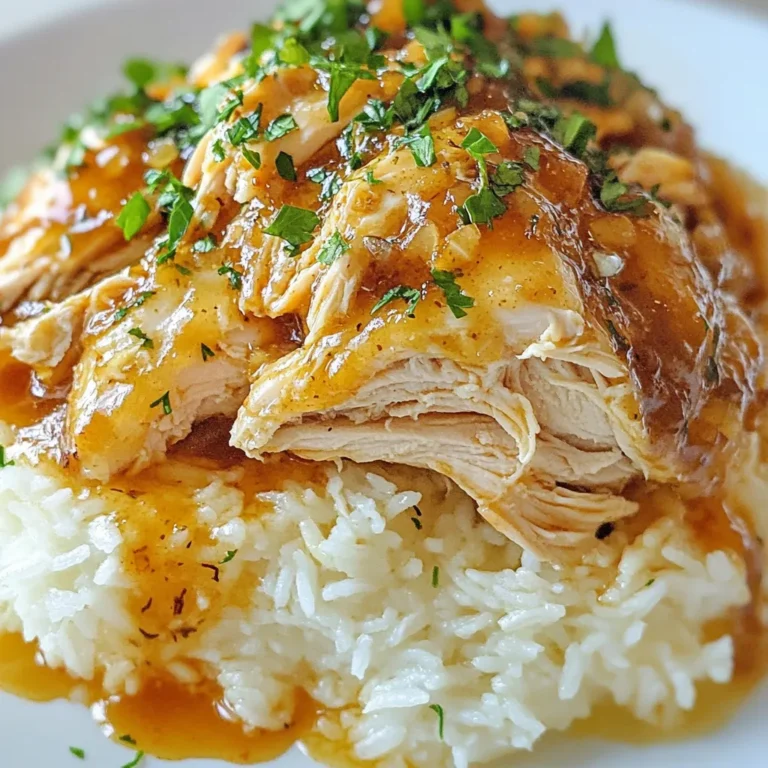
![- 4 boneless, skinless chicken thighs - 1 tablespoon olive oil - 4 garlic cloves, minced - 1/4 cup honey - 1/4 cup low-sodium soy sauce - 1 tablespoon apple cider vinegar - 1 teaspoon fresh ginger, grated - Salt and black pepper to taste - 1 cup fresh broccoli florets - 1 cup bell pepper, thinly sliced - 1 cup jasmine rice (optional, for serving) - Sesame seeds - Thinly sliced green onions When I create One-Pan Honey Garlic Chicken, I start with some key ingredients. First, I need four boneless, skinless chicken thighs. They stay juicy and tender during cooking. Next, I grab a tablespoon of olive oil to get that nice sear. Garlic is a must in this recipe. Four cloves, minced, add a strong flavor. I then pour in a quarter cup of honey, which gives sweetness. For a bit of saltiness, I add a quarter cup of low-sodium soy sauce. A tablespoon of apple cider vinegar adds a nice tang. To serve this dish, I include fresh ginger. Just one teaspoon, grated, makes a big difference. I also season with salt and black pepper to taste. For healthy veggies, I use one cup of fresh broccoli florets and one cup of thinly sliced bell pepper. If I want to make it a fuller meal, I prepare jasmine rice as an option. For garnishing, I sprinkle sesame seeds and add thinly sliced green onions. This adds color and flavor to the final dish. I find these ingredients create a delicious and easy meal that everyone loves. For the complete recipe, check out the Full Recipe section. - Marinate the Chicken: Begin by making the marinade. In a bowl, mix honey, soy sauce, apple cider vinegar, minced garlic, and grated ginger. Stir until the honey dissolves. Set aside half of this marinade for later. - Combine and Marinate the Chicken: Place chicken thighs in a dish or a zip-lock bag. Pour the honey garlic marinade over the chicken, coating each piece well. Seal the bag or cover the dish. Let it marinate in the fridge for at least 30 minutes or up to 2 hours for more flavor. - Sear the Chicken: Heat olive oil in a large skillet over medium heat. Remove the chicken from the marinade, letting any extra drip off. Sear the chicken for about 5 minutes on each side, until golden brown. - Simmer with Sauce: Lower the heat to medium-low. Pour the reserved marinade over the chicken. Cover the skillet and let it cook for 10-15 minutes. The chicken should reach an internal temperature of 165°F or 75°C. - Add Vegetables: In the last 5 minutes of cooking, add broccoli florets and sliced bell peppers to the skillet. Toss them gently in the sauce. Cover again and steam until they are tender. - Cook Rice (Optional): If you want to serve rice, cook jasmine rice according to package instructions while the chicken and veggies cook. - Rest and Slice: After cooking, take the skillet off the heat. Let the chicken rest for a few minutes. Then, slice it into bite-sized pieces. - Serve the Dish: Spoon the chicken and vegetables over jasmine rice, if using. Drizzle some sauce from the skillet on top. Finish with sesame seeds and sliced green onions for a fresh touch. For the complete recipe, check out the [Full Recipe]. For the best flavor, marinate your chicken well. A good marinade helps to tenderize the meat and adds depth. I recommend using a zip-lock bag. This method keeps the chicken fully coated. Marinate for at least 30 minutes, but 2 hours is even better. This extra time allows the flavors to soak in. If you can, marinate overnight for the best results. Just remember to keep it in the fridge! To achieve a perfect sear, heat your pan well before adding the chicken. A hot pan makes a nice brown crust. This crust adds flavor and texture. Once you place the chicken in the pan, let it cook without moving it for about 5 minutes. This creates that beautiful sear. Flip the chicken and sear the other side for the same time. To ensure your chicken is cooked through, use a meat thermometer. The chicken should reach 165°F (75°C). This will give you juicy and safe-to-eat chicken. For a beautiful plate, start with a base of jasmine rice. Spoon the chicken and veggies on top. The colors should pop! Garnishing is key. Use sesame seeds and thinly sliced green onions. This not only looks great but adds flavor too. A well-presented dish makes your meal feel special! You can find the full recipe for One-Pan Honey Garlic Chicken to guide you as you cook. {{image_4}} You can easily change the protein in this dish. Try using tofu for a plant-based option. Shrimp also works well with the honey garlic sauce. If you want to swap out the honey, consider using maple syrup or agave nectar. For a soy sauce alternative, try tamari or coconut aminos for a gluten-free option. Adding spices can boost the flavor of your meal. Consider garlic powder or red pepper flakes for a little heat. You can mix in herbs like thyme or basil for a fresh twist. Feel free to toss in different vegetables too. Carrots, snap peas, or zucchini can add color and crunch. You can also make this dish in the oven. Preheat to 400°F (200°C) and bake the chicken in a dish with the sauce for about 25-30 minutes. If you prefer a slow cooker, simply place the marinated chicken and vegetables in the cooker. Cook on low for 4-6 hours or high for 2-3 hours for a tender meal. Each method offers a unique taste and texture. For the full recipe, check the previous section. After you enjoy your One-Pan Honey Garlic Chicken, store it in the fridge. Place leftovers in an airtight container. This keeps the chicken fresh and safe to eat. You can keep it in the fridge for about 3 to 4 days. Want to save some for later? You can freeze this dish easily. Let the chicken cool down first. Then, put it in a freezer-safe bag or container. It will stay good for about 2 to 3 months. When you are ready to eat it, thaw the chicken in the fridge overnight. Reheat it gently on the stove or in the microwave until warm. Get creative with leftover chicken! You can shred it for tacos or salads. Mix it with pasta for a quick meal. You could also make a stir-fry with your favorite veggies. If you prep meals for the week, this chicken is perfect for that. It saves time and adds flavor to your lunches. For the full recipe, check the detailed instructions on how to make this tasty dish. Marinating chicken adds great taste. I recommend marinating for at least 30 minutes. For more flavor, you can marinate up to 2 hours. The longer you marinate, the deeper the flavor gets. Just remember not to go overboard, as too long can make the chicken mushy. Yes, you can use frozen chicken thighs! Just make sure to thaw them first. The best way to do this is by placing them in the fridge overnight. If you’re short on time, you can run them under cold water. However, avoid using hot water, as it can cook the chicken unevenly. To make your meal complete, consider these side dishes: - Steamed jasmine rice - Roasted sweet potatoes - A fresh garden salad - Garlic bread - Sautéed green beans These sides enhance the meal and complement the chicken's sweet and savory flavors. Check out the Full Recipe to see how everything comes together! In this post, we covered how to make tasty One-Pan Honey Garlic Chicken. We discussed essential ingredients, preparation, cooking methods, and serving tips. Following these steps ensures your chicken is flavorful and beautifully plated. Remember to adjust your ingredients based on what you have. You can also try new ways to store or serve leftovers. Enjoy cooking, and make this dish your own!](https://blissfulmeal.com/wp-content/uploads/2025/06/449aaf76-cb03-4bc1-972d-dd44b1ae3528-768x768.webp)
![- 2 cans black beans, rinsed and drained - 1 tablespoon extra virgin olive oil - 1 small onion, finely chopped - 2 cloves garlic, minced - 1 jalapeño pepper, finely minced - 1 teaspoon ground cumin - 1 teaspoon smoked paprika - 1 cup shredded cabbage or lettuce - 1 ripe avocado, sliced - Fresh cilantro, chopped, for garnish - Lime wedges, for serving To make spicy black bean tacos, you need simple, fresh ingredients. Start with black beans. They are protein-packed, filling, and full of flavor. Next, you will want olive oil to sauté your veggies. The onion adds sweetness, while garlic and jalapeño give it a kick. Cumin and smoked paprika bring a warm, earthy taste. Use them to season the beans beautifully. For toppings, shredded cabbage or lettuce adds crunch. Avocado gives creaminess, and cilantro adds freshness. Lastly, lime wedges enhance the tacos with zest. The full recipe includes all these ingredients and steps for a fantastic meal. Each bite will be a mix of spicy, creamy, and crunchy. You will love how easy it is to prepare these tacos at home! Start by rinsing and draining the black beans. This step helps remove extra salt and improves flavor. Next, chop one small onion, two cloves of garlic, and one jalapeño pepper. If you want less heat, remove the seeds from the jalapeño. This simple prep makes cooking easier and faster. Heat one tablespoon of extra virgin olive oil in a large skillet over medium heat. When the oil shimmers, add the chopped onion. Sauté until it softens, about five minutes. Then, stir in the minced garlic and jalapeño. Cook for one to two minutes until the mixture smells great. Now, it’s time to add the black beans. Toss them in along with one teaspoon each of ground cumin, smoked paprika, and chili powder. Add salt and pepper to taste. Mix it all well and let it cook for five to seven minutes. Stir occasionally to keep it from sticking. This step brings all the flavors together. While the beans cook, warm up the tortillas. Heat a pan over medium heat and add the tortillas for about thirty seconds on each side. This step makes them soft and easy to fold. To assemble the tacos, scoop a generous amount of the black bean mixture into each tortilla. Top with shredded cabbage or crisp lettuce, several slices of ripe avocado, and a sprinkle of fresh cilantro. These toppings add crunch and freshness. Serve with lime wedges on the side for a zesty kick. For the full recipe, check the complete ingredients and steps. To make your tacos just right, adjust the heat level. If you want more spice, add more jalapeños. If you prefer mild, use fewer. You can also experiment with other spices. Try adding cayenne for a kick or chipotle for a smoky flavor. This lets you customize the dish to match your taste. Make your tacos look as good as they taste. Arrange them on a platter with lime wedges and fresh cilantro. This adds color and a fresh pop. You can also use different colored tortillas. A mix of corn and flour tortillas creates a beautiful display. This makes your meal exciting and fun. Pair your spicy black bean tacos with side dishes for a full meal. Mexican rice or a fresh salad works well. They balance the flavors and add variety. You can also offer a range of hot sauces. This way, everyone can choose their spice level for an enjoyable experience. {{image_4}} For a vegan twist, you can swap sour cream for cashew cream. Cashew cream is rich and creamy, making it a great choice. To make cashew cream, simply blend soaked cashews with a bit of water. This will give you a smooth texture. It adds a nice flavor without dairy. You can enjoy your spicy black bean tacos while keeping it plant-based. Want to make these tacos heartier? Add some protein! Grilled chicken, shrimp, or tofu work great. If you use chicken or shrimp, grill them first. Then, slice them up and mix them with the black beans. For tofu, press it to remove extra water, then sauté until golden. This will add texture and flavor to your tacos. It’s a simple way to make your meal more filling. If you want to change up the taste, consider adding sautéed bell peppers or corn. Bell peppers add a nice crunch and sweetness. Just slice them and sauté with onions. Corn adds a pop of sweetness too. You can use fresh corn or frozen. Both options work well. These additions can brighten up your tacos and make them even more delicious. For the full recipe, check out the [Full Recipe]. You can store any leftover black bean mixture in an airtight container. Keep it in the fridge for up to 3 days. This makes it easy to enjoy more tacos later. Just make sure the container is sealed well. For longer storage, freeze the black bean mixture and tortillas separately. Place the bean mixture in a freezer-safe bag. Remove as much air as you can before sealing. For the tortillas, stack them with parchment paper between each one. This helps keep them from sticking together. When you’re ready to enjoy your tacos again, reheat the beans in a skillet or microwave. If using a skillet, warm them over low heat. Stir often until they are hot. For the tortillas, heat them gently to keep them pliable. This way, they won’t crack when you fill them. Enjoy your tasty meal! To make spicy black bean tacos, start by heating olive oil in a skillet. Then, sauté chopped onions until soft. Add minced garlic and jalapeño for flavor. Next, stir in rinsed black beans and spices like cumin and chili powder. Cook for about seven minutes, letting the flavors mix. Warm the tortillas in another pan for a few seconds. Fill each tortilla with the bean mix, top with cabbage, avocado, and cilantro. Squeeze lime juice on top for a fresh taste. Yes, you can prepare these tacos ahead of time. Cook the black bean mixture and store it in the fridge. It stays good for up to three days. When you are ready to eat, just warm the mixture and tortillas. This method saves time on busy days and makes meals easy. If you don’t have black beans, you can use other beans. Pinto beans or kidney beans work well. Lentils are also a great option. They add a different texture and flavor but still taste amazing. Feel free to experiment with what you have. Yes, there are many gluten-free tortillas available. Corn tortillas are naturally gluten-free. You can also find brands that make gluten-free flour tortillas. Look for options at your local store or online. Check the labels to ensure they meet your needs. In this blog post, we explored how to make spicy black bean tacos. We covered ingredients like black beans, spices, and toppings. You learned simple steps for cooking and assembling the tacos. I shared tips to tweak the heat and make the dish pop. Whether you want to keep it vegan or add protein, there are options. Remember, leftovers can be stored easily in the fridge or freezer. Enjoy your tasty creation and share it with friends and family for a fun meal!](https://blissfulmeal.com/wp-content/uploads/2025/06/39823553-4dcd-436d-b898-149929483da4-768x768.webp)
![To make a tasty honey garlic chicken stir fry, gather these ingredients: - 1 lb boneless, skinless chicken thighs, sliced into thin strips - 1 cup broccoli florets - 1 bell pepper (any vibrant color), sliced into strips - 1 medium carrot, julienned - 2 cloves garlic, finely minced - 1 tablespoon fresh ginger, finely minced - 3 tablespoons honey - 2 tablespoons low-sodium soy sauce - 1 tablespoon cornstarch - 1 tablespoon vegetable oil - 2 green onions, chopped (for garnish) - Sesame seeds (for garnish) - Salt and pepper to taste You can swap some ingredients based on what you have. For chicken, try using chicken breast if you prefer leaner meat. You can mix up the veggies too! Snow peas, snap peas, or bell peppers all work well. If you want a different flavor, use maple syrup instead of honey. For a gluten-free option, choose tamari sauce instead of soy sauce. When buying chicken, look for bright pink meat with no smell. Fresh garlic should feel firm and have no sprouts. For veggies, choose bright broccoli with firm stems. The bell pepper should feel heavy and have a shiny skin. Always smell your produce; it should smell fresh and clean. Fresh ingredients make your honey garlic chicken stir fry taste even better. First, gather all your ingredients. You need chicken, vegetables, honey, and sauces. This makes the cooking flow smooth. Wash and cut the veggies before starting. This way, you save time while cooking. 1. Make the Sauce: In a small bowl, mix honey, soy sauce, and cornstarch. Whisk until smooth. This sauce adds flavor and sweetness to your stir fry. 2. Prepare the Chicken: Take your sliced chicken thighs. Season them with salt and pepper. Make sure every piece is coated well. This seasoning boosts the taste. 3. Heat the Oil: In a large skillet or wok, heat the vegetable oil over medium-high heat. Wait until it’s hot. This step is key for a good stir fry. 4. Cook the Chicken: Add the seasoned chicken to the skillet. Stir-fry it for about 5-7 minutes. You want the chicken to turn golden brown and fully cooked. 5. Sauté Garlic and Ginger: Remove the chicken and set it aside. In the same skillet, add minced garlic and ginger. Sauté for 30 seconds until fragrant. This adds a lovely aroma to your dish. 6. Add the Veggies: Toss in the broccoli, bell pepper, and carrot. Stir-fry for 3-4 minutes. The veggies should become vibrant and tender-crisp. 7. Combine Everything: Return the chicken to the skillet. Pour your honey-garlic sauce over the mix. Toss everything together. This allows the sauce to coat the chicken and veggies. Cook for about 2 minutes until heated through. 8. Garnish: Remove from heat. Sprinkle with green onions and sesame seeds. This adds color and crunch. Serve your honey garlic chicken stir fry on a big platter. Drizzle any leftover sauce over the top. For extra flair, add more green onions and sesame seeds. Pair it with steamed rice or noodles for a complete meal. Enjoy your tasty creation! Stir-frying is quick and fun! Here are some tips for best results: - Preheat Your Pan: Heat your skillet or wok before adding oil. A hot surface cooks food faster. - Cut Ingredients Evenly: Slice chicken and veggies in similar sizes. This helps them cook evenly. - Cook in Batches: Don’t overcrowd the pan. Cook chicken first, then add veggies. This keeps everything crisp. - Use High Heat: Stir-fry on high heat, so ingredients sear and keep their flavor. Avoid these common blunders to perfect your dish: - Skipping the Marinade: Always marinate chicken for flavor. Even a quick soak makes a difference. - Not Prepping Ingredients: Have all your ingredients ready before cooking. This keeps the stir-fry moving. - Overcooking the Veggies: Cook veggies just until they are bright and tender. You want them to stay crunchy. - Forgetting to Stir: Keep stirring! This prevents burning and ensures even cooking. You can make this dish truly yours. Here are some ideas: - Add Heat: Mix in some red pepper flakes or sriracha for a spicy kick. - Try Different Veggies: Swap broccoli with snap peas or add mushrooms for new textures. - Use Different Proteins: Chicken is great, but try shrimp or tofu for variety. - Garnish Creatively: Top with toasted nuts or fresh herbs like cilantro for extra flavor. For the full recipe, check out the [Full Recipe]. {{image_4}} To make a low-carb or keto version, swap chicken thighs for shrimp or tofu. Both options cook quickly and soak up the honey garlic sauce well. Use zucchini noodles or cauliflower rice instead of regular rice. These choices keep your meal low in carbs and high in flavor. Remember to check the honey amount; you can use a keto-friendly sweetener like erythritol to cut down on sugar. For a vegetarian dish, replace the chicken with firm tofu or tempeh. Cut the tofu into small cubes and pan-fry until golden. You can also use seitan for a meat-like texture. Ensure you use a plant-based honey substitute to keep it vegan. Mix in more colorful vegetables like snap peas or bell peppers for extra crunch and nutrition. This makes the stir fry vibrant and satisfying. If you like heat, add chili paste or flakes to the sauce. Start with a small amount and adjust to your taste. You can also toss in sliced jalapeños or serrano peppers during cooking. For an extra kick, serve with a drizzle of sriracha on top. The spice balances the sweetness of the honey, creating a delightful contrast in flavors. To keep your honey garlic chicken stir fry fresh, store it in an airtight container. Let the dish cool to room temperature before sealing. This helps prevent moisture buildup. Place it in the fridge if you plan to eat it in the next few days. It stays good for up to three days. Make sure to label the container with the date. When you’re ready to eat your leftovers, reheat them gently. You can use the microwave or a skillet. If using a microwave, heat it in short bursts. Stir the food between each burst for even heating. If using a skillet, add a splash of water or broth. This helps keep the chicken moist. Heat over low to medium heat until warmed through. You can freeze honey garlic chicken stir fry for later use. Place the cooled dish in a freezer-safe container. It can last up to three months in the freezer. When ready to eat, thaw it in the fridge overnight. Reheat it as described above. The flavors will still shine, just like when it was fresh! For the best taste, avoid freezing any garnishes. You can serve this dish with rice or noodles. Steamed jasmine rice pairs well. You can also use brown rice for a healthier option. If you want more veggies, try a side of stir-fried greens. A fresh salad can also balance the meal nicely. To thicken the sauce, add more cornstarch. Mix one tablespoon of cornstarch with cold water. Stir it into the sauce as it cooks. Let it simmer for a minute. This will help the sauce become glossy and thick. Yes, you can use frozen vegetables. They save time and are easy to use. Just add them straight to the pan. Cook them a little longer since they are frozen. This way, they will be tender and warm. You can prepare the chicken and sauce ahead of time. Store them separately in the fridge. When you’re ready to cook, just stir-fry the veggies and add the chicken and sauce. This keeps everything fresh and tasty. Leftovers can last in the fridge for about three days. Store them in an airtight container. Reheat in the microwave or on the stovetop. Add a splash of water to keep the chicken moist. You can use shrimp, beef, or tofu instead of chicken. Each option brings its own flavor. Shrimp cooks quickly and adds a nice touch. Beef gives a hearty taste, while tofu is great for a vegetarian option. This recipe is not spicy. It has a sweet and savory flavor. If you like heat, add red pepper flakes or chili sauce. You can adjust the heat to match your taste. Use pure honey for the best flavor. Raw honey has a rich taste and adds depth. Avoid honey blends or flavored honey for this recipe. They might alter the dish's overall taste. Absolutely! Feel free to add your favorite vegetables. Snap peas, zucchini, or mushrooms work well. Just make sure to cut them evenly for even cooking. This adds color and nutrients to your stir fry. You can view the full recipe [here](insert-link). In this blog post, I shared a complete guide for making honey garlic chicken stir fry. You learned about the best ingredients, helpful tips, and storage methods. I also covered tasty variations, like low-carb or vegan options. Remember, using fresh ingredients makes a big difference in taste. Avoid common mistakes to perfect your stir-frying skills. Now, you can create a delicious meal that fits your needs. Enjoy cooking this dish, and make it your own!](https://blissfulmeal.com/wp-content/uploads/2025/06/dd86b261-07b3-46ee-9b6e-0410420d32b2-768x768.webp)
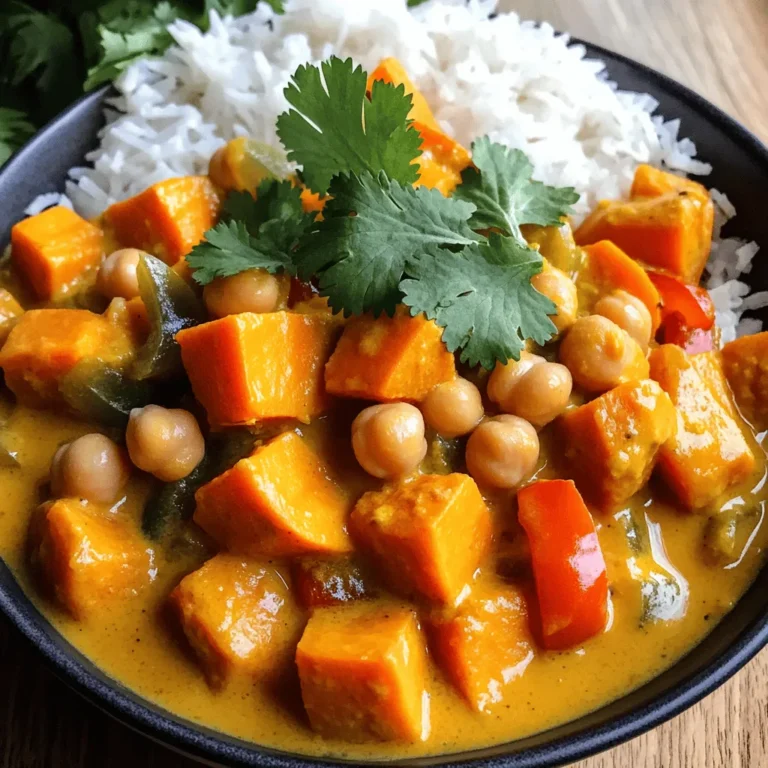
![- Sweet Potatoes - Chickpeas - Quinoa - Fresh Vegetables Sweet potatoes are the star of this dish. They are sweet, creamy, and full of nutrients. Chickpeas add protein and a nice texture. Quinoa serves as a hearty base. You can use any fresh vegetables you like. I enjoy adding avocado and baby spinach for a fresh flavor. - Olive Oil - Smoked Paprika - Ground Cumin - Sea Salt and Black Pepper The spices elevate the sweet potatoes. Olive oil helps them roast well and adds richness. Smoked paprika gives a warm, smoky taste. Ground cumin adds earthiness. Sea salt and black pepper enhance all the flavors, making the dish pop. - Tahini - Lemon Juice - Water - Sesame Seeds The tahini dressing ties everything together. It adds creaminess and zest. Lemon juice brightens the flavor. Water adjusts the dressing's thickness. Finally, sesame seeds add crunch and a nutty finish. For the full recipe, check out the details above! Preheat the Oven Start by preheating your oven to 425°F (220°C). This helps the sweet potatoes roast evenly and get that nice, crispy texture we all love. Prepare Sweet Potatoes Peel and cut your sweet potatoes into 1-inch cubes. Place them in a medium bowl. Drizzle with one tablespoon of extra virgin olive oil. Add one teaspoon of smoked paprika, half a teaspoon of ground cumin, and a sprinkle of sea salt and black pepper. Toss well until all the cubes are coated. Season and Arrange on Baking Sheet Spread the seasoned sweet potatoes on a baking sheet lined with parchment paper. Make sure they lay in a single layer to roast properly. Roast and Check Doneness Roast the sweet potatoes for 25-30 minutes. Halfway through, flip them for even cooking. They should be golden brown and tender when done. A fork should slide in easily. Whisk Tahini, Lemon Juice, and Water While the sweet potatoes roast, grab a small bowl. Add a quarter cup of tahini, two tablespoons of freshly squeezed lemon juice, and two tablespoons of water. Whisk until smooth and creamy. If it feels too thick, add a bit more water until it’s pourable. Layer Quinoa, Vegetables, and Toppings In four bowls, start with a base of warm quinoa. Then, add the roasted sweet potatoes on top. Next, layer in chickpeas, avocado slices, and fresh baby spinach. Arrange them nicely for a beautiful look. Drizzle with Dressing and Garnish Finish by drizzling the tahini dressing over each bowl. Sprinkle sesame seeds on top for that added crunch and flair. Enjoy your vibrant and tasty meal! For the full recipe, check out the details above. Timing and Temperature Considerations The key to great sweet potatoes is the right timing and temperature. Roast them at 425°F (220°C) for 25-30 minutes. This high heat gives you a nice caramelization. Check them halfway through to see if they need flipping. They should be golden brown and soft inside. Ensuring Even Cooking To cook sweet potatoes evenly, cut them into 1-inch cubes. This size helps them roast well. Spread them out on the baking sheet in a single layer. Avoid crowding them, as this can lead to steaming instead of roasting. Adding Proteins You can make your Buddha bowl heartier by adding proteins. Chickpeas are a great start, but you can also add grilled chicken, tofu, or beans. This boosts the meal's nutrition and keeps you full longer. Incorporating Different Vegetables Feel free to mix in different vegetables. Roasted broccoli, bell peppers, or kale add color and flavor. You can also use fresh veggies like cucumbers or radishes for crunch. Best Pairings Pair your Buddha bowl with a refreshing drink like lemon water or iced tea. This balances the dish's richness. You can also enjoy it with crusty bread for a complete meal. Presentation Tips Presentation is key! Use deep, colorful bowls to show off the layers of your ingredients. Drizzle the tahini dressing right before serving. This keeps it fresh and appealing. Add a lemon wedge on the side for a pop of color and extra flavor. For the complete recipe, check out the [Full Recipe]. {{image_4}} You can easily switch grains in your Buddha bowl. Instead of quinoa, try brown rice or farro. Both add a nice texture and flavor. Each grain gives a different feel to your meal. When it comes to dressings, don’t hesitate to get creative. Soy sauce can add a salty kick. A balsamic reduction brings sweetness and tang. Each option can change the whole taste of the bowl. For vegan options, this recipe is already set. All the ingredients are plant-based. You can enjoy this bowl without any animal products. It’s perfect for anyone looking to eat more plants. If you need gluten-free variations, quinoa is a great choice. It is naturally gluten-free, so you can enjoy it freely. Just make sure any dressings or sauces are gluten-free too. Using seasonal produce can elevate your Buddha bowl. In spring, add fresh asparagus or peas. In summer, try ripe tomatoes or zucchini. Fall brings great choices like roasted Brussels sprouts. Winter can include hearty root veggies. Adjust your bowl for the weather or occasion. On cold days, warm your grains and toppings. For hot days, serve it cold and refreshing. This makes the meal fit for any time of year. Refrigeration Tips After you enjoy your Roasted Sweet Potato Buddha Bowl, store leftovers in an airtight container. Keep it in the fridge for up to three days. Make sure to separate the dressing from the other ingredients to keep everything fresh. Freezing Instructions If you want to save your Buddha bowl for later, you can freeze certain parts. The sweet potatoes and chickpeas freeze well. Place them in a freezer-safe container. They can last up to three months. However, avoid freezing the avocado and tahini dressing, as they do not thaw well. Best Practices for Reheating When you're ready to enjoy your leftovers, reheat the sweet potatoes and chickpeas in the oven or microwave. If using the oven, set it to 350°F (175°C) and heat for about 10-15 minutes. For the microwave, heat in short bursts of 30 seconds, stirring in between. Maintaining Texture and Flavor To keep the sweet potatoes from getting soggy, avoid using too much moisture while reheating. If you prefer a crisp texture, reheat in the oven. This method helps revive the original flavors of the dish. How Long Ingredients Last Cooked sweet potatoes can last in the fridge for about three days. Chickpeas stored properly can last for up to four days. Quinoa, if kept in an airtight container, can last up to a week in the fridge. Signs of Spoilage Always check for signs of spoilage. Look for any unusual odors, changes in color, or slimy textures. If anything seems off, it’s best to discard it to avoid any health risks. To get crispy sweet potatoes, follow these tips: - Cut Smaller: Chop sweet potatoes into smaller pieces. This helps them cook faster and crisp up. - Use Enough Oil: Coat them well in extra virgin olive oil. This helps in achieving that nice golden color. - Single Layer: Spread the sweet potatoes in a single layer on the baking sheet. Crowding them can lead to steaming instead of roasting. - High Heat: Roast at 425°F (220°C). The higher the heat, the crispier they will get. - Flip Halfway: Turn them halfway through cooking. This helps both sides get nice and crispy. Yes, you can prepare this Buddha bowl ahead of time. Here’s how: - Cook Quinoa and Sweet Potatoes: Make these items in advance and store them in the fridge. - Store Separately: Keep the quinoa, sweet potatoes, and dressing in separate containers. This keeps everything fresh. - Assemble Before Eating: When ready to eat, just assemble your bowl. This keeps the ingredients crunchy and delicious. If you want to switch from quinoa, try these grains: - Brown Rice: A great source of fiber and has a nutty flavor. - Farro: Chewy and hearty, it adds a nice texture. - Barley: Adds a slightly sweet taste and is rich in nutrients. - Bulgur: Quick to cook and has a light, fluffy texture. Yes, this recipe works well for meal prep. To help with portioning and storing: - Divide Evenly: Split the ingredients into four equal portions. This makes it easy to grab and go. - Use Containers: Store in airtight containers to keep the food fresh. - Reheat Gently: When eating, reheat the sweet potatoes and quinoa gently in the microwave. Absolutely! Here are some great protein options: - Grilled Chicken: Adds a nice flavor and pairs well with sweet potatoes. - Shrimp: Quick to cook and tastes fantastic with the tahini dressing. - Tofu: A good plant-based protein that soaks up flavors well. - Eggs: Soft-boiled or poached eggs add creaminess and protein. Try these tips for a tasty twist on your Roasted Sweet Potato Buddha Bowl! For the full recipe, check out the detailed instructions above. This Buddha bowl recipe brings healthy ingredients together for a tasty meal. Sweet potatoes, chickpeas, and quinoa form a great base. Fresh veggies add crunch, while spices and tahini dressing boost flavor. Roasting sweet potatoes perfectly requires attention to time and temperature. You can customize your bowl with different grains or proteins. Use these tips to store leftovers and reheat them without losing taste. I hope you feel inspired to try this recipe. Enjoy creating your own delicious and healthy Buddha bowl!](https://blissfulmeal.com/wp-content/uploads/2025/06/a79ea0b9-151b-490d-b2e8-0ca30952d38a-768x768.webp)


. {{image_4}} If you love heat, adding spice can transform your lentil sloppy joes. Start with the basic recipe. Then, include more chili powder or some diced jalapeños. A few dashes of hot sauce can also do the trick. You can even use chipotle powder for a smoky kick. This adds depth and a nice kick to your dish. To make these sloppy joes gluten-free, it's easy! Simply swap out the whole wheat buns for gluten-free burger buns. Many stores offer great options. Ensure your vegetable broth is gluten-free. This way, you can still enjoy the same tasty meal without gluten. The flavors will still shine through! Feel free to get creative with veggies! You can add chopped mushrooms for a meaty texture. Spinach or kale can boost the nutrition. Just toss them in with the lentils as they cook. You can also use zucchini or corn for sweetness. Each veggie adds its own unique taste and texture. Enjoy experimenting with your favorite vegetables to find the perfect mix! For the complete recipe, check out the [Full Recipe]. To store leftover lentil sloppy joes, let them cool first. Place them in an airtight container. This keeps them fresh for up to four days in the fridge. Be sure to separate the lentil mix from the buns. This way, the buns stay soft and do not get soggy. You can freeze the lentil mix for later use. Just let it cool completely. Then, transfer it to a freezer-safe container. It can last up to three months in the freezer. When you're ready to eat, pull it out and thaw it in the fridge overnight. Reheat your lentil sloppy joes over medium heat on the stove. Stir occasionally until it's hot throughout. If it seems dry, add a splash of vegetable broth or water. You can also microwave it. Just cover the container and heat in short bursts, stirring in between. Enjoy your meal just like fresh! The main ingredients are simple and fresh. Here’s what you will need: - 1 cup dried green or brown lentils, thoroughly rinsed - 2 tablespoons extra virgin olive oil - 1 medium onion, finely chopped - 2 cloves garlic, minced - 1 red bell pepper, finely diced - 1 medium carrot, grated - 2 tablespoons concentrated tomato paste - 1 cup vegetable broth (low-sodium recommended) - 2 tablespoons pure maple syrup - 1 tablespoon apple cider vinegar - 1 tablespoon Dijon mustard - 1 teaspoon smoked paprika - 1/2 teaspoon chili powder (adjust for heat preference) - Salt and freshly ground black pepper to taste - 4 whole wheat burger buns - Fresh parsley, chopped (for garnish, optional) These ingredients come together to create a hearty meal that’s full of flavor. Yes, you can make this recipe ahead of time. The lentil mixture stores well in the fridge. Just let it cool and place it in an airtight container. It will keep for about 3-4 days. When ready to eat, warm it on the stove or in the microwave. This makes for a quick meal on busy days. To enhance the flavor, try adding a few extra ingredients. You can use: - A splash of soy sauce or tamari for umami - A teaspoon of liquid smoke for depth - Fresh herbs like thyme or basil for freshness - A dash of hot sauce for a kick Mix in these extras while cooking. Adjust seasoning to your taste. This will give your sloppy joes a richer and more complex flavor. Enjoy! In this article, we explored easy vegan lentil sloppy joes. We covered the key ingredients and their benefits. Cooking lentils perfectly is vital, and I shared helpful steps. You learned tips for flavor, cooking methods, and unique variations. We also discussed how to store leftovers and answered common questions. With these insights, you can make delicious and healthy lentil sloppy joes with ease. Enjoy your cooking journey and experiment with new flavors!](https://blissfulmeal.com/wp-content/uploads/2025/06/1f2c2a9d-cc45-4ff8-a9b1-55897e20e129-768x768.webp)