Skip to content
About
Contact
Cookie Policy
Copyright Policy
Disclaimer
Search
Home
Dinner
Appetizer
Desserts
Drinks
About
Contact
Privacy Policy
Toggle Menu
Home
/
Dinner
- Page 25
Dinner
Easy Greek Lemon Chicken Flavorful and Simple Meal
Honey Garlic Chicken Drumsticks Quick and Easy Recipe
Feta and Tomato Baked Gnocchi Flavorful Easy Recipe
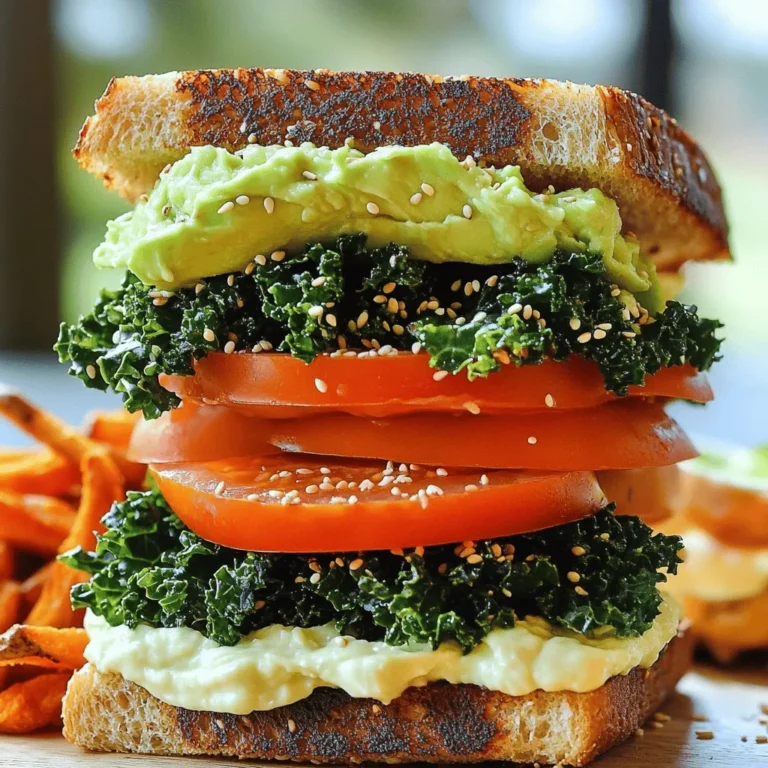
Vegan BLT Sandwich Flavorful and Simple Delight
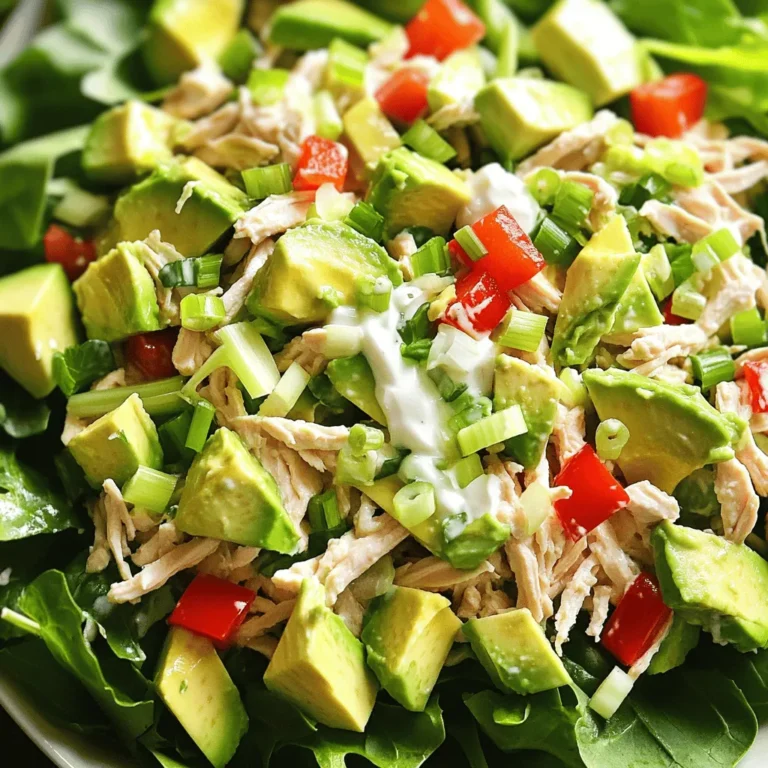
Avocado Chicken Salad Flavorful and Nutritious Recipe
Baked Parmesan Crusted Tilapia Tasty and Simple Dish
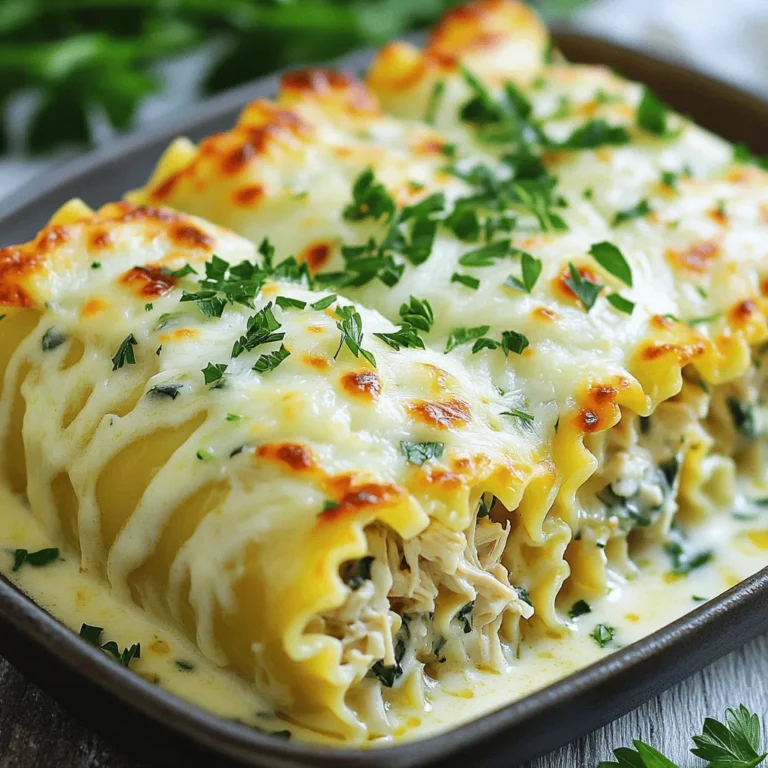
Chicken Alfredo Lasagna Roll Ups Creamy and Easy Meal
Creamy Mushroom Risotto Simple Comfort Dish
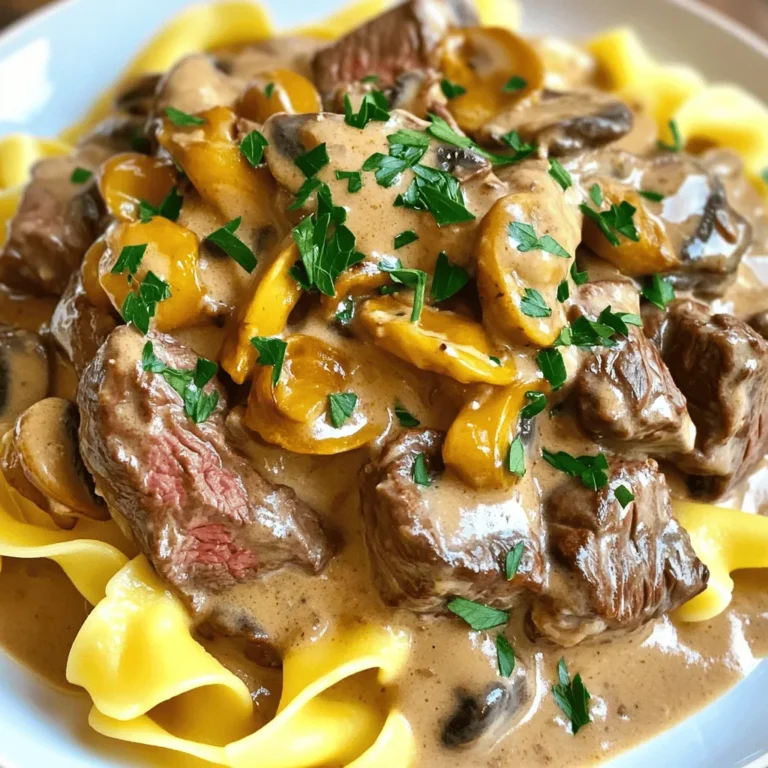
Classic Beef Stroganoff Hearty and Simple Recipe
Easy Cheesy Taco Skillet Flavorful and Quick Dish
Page navigation
Previous Page
Previous
1
…
23
24
25
26
27
…
38
Next Page
Next
Home
Dinner
Appetizer
Desserts
Drinks
About
Contact
Privacy Policy
Toggle Menu Close
Search for:
Search


![To make Feta and Tomato Baked Gnocchi, you need these key ingredients: - 500g gnocchi (store-bought or homemade) - 250g cherry tomatoes, halved - 200g feta cheese, crumbled - 2 tablespoons extra-virgin olive oil - 3 cloves garlic, minced - 1 teaspoon dried oregano - 1 teaspoon red chili flakes (optional for a spicy kick) - Sea salt and freshly cracked black pepper to taste - Fresh basil leaves, torn, for garnish When choosing ingredients, quality matters. For the best taste: - Gnocchi: Fresh gnocchi is softer and more flavorful than dried. - Feta cheese: Opt for good quality, preferably Greek feta. Look for creamy, tangy, and crumbly varieties. - Cherry tomatoes: Select ripe, vibrant tomatoes for sweetness. - Olive oil: Use high-quality extra-virgin olive oil for richness in flavor. You can easily swap some ingredients if needed: - Gnocchi: If you don't have gnocchi, you can use pasta, like penne or rigatoni. - Feta: Try goat cheese or ricotta for a different texture and taste. - Cherry tomatoes: If these are out of season, canned diced tomatoes work in a pinch. - Herbs: Use fresh herbs like thyme or parsley instead of dried oregano for a fresh twist. This recipe offers flexibility without losing its delicious flavor. If you want the full recipe, check out the provided details. Start by preheating your oven to 200°C (400°F). This step is key for even baking. A hot oven ensures that your dish cooks just right. Grab a large baking dish. In it, mix the halved cherry tomatoes, crumbled feta cheese, and minced garlic. Drizzle the olive oil over everything. Add dried oregano next. If you want a spicy kick, toss in the red chili flakes. Boil a large pot of lightly salted water. Once it boils, add the gnocchi. Cook them for 2-3 minutes, or until they float. This floating means they are ready. Drain the gnocchi and set them aside. Now, fold the cooked gnocchi into the baking dish with the tomato and feta mix. Stir gently until the gnocchi are well coated. This is where all the flavors come together. Transfer the dish to the oven and bake for about 20-25 minutes. You’ll see the tomatoes burst and the feta turn golden. Once baked, carefully pull the dish from the oven. Let it cool for a minute. Before serving, add freshly torn basil leaves for a pop of color and flavor. Enjoy your flavorful meal! For the full recipe, check out the details above. Cooking gnocchi is easy if you follow a few key steps. First, always use a large pot. This helps the gnocchi cook evenly. Make sure your water is at a rolling boil before adding the gnocchi. This helps them cook quickly and float to the top. Cook them until they rise, which usually takes about 2-3 minutes. Do not overcook them, or they may turn mushy. Drain them well and set aside to keep them from sticking. Herbs and spices can take your dish to the next level. I love adding fresh basil for a bright taste. You can also try thyme or rosemary for a more earthy flavor. If you want some heat, add red chili flakes. They give a nice kick without being too spicy. Mix these in when you prepare the baking dish. The flavors will blend while baking and make the dish even more delicious! To ensure your baked gnocchi comes out perfect, pay attention to your oven temperature. Preheat it to 200°C (400°F) for an even bake. Use a shallow baking dish. This allows the heat to circulate and helps the tomatoes burst beautifully. Keep an eye on the dish as it bakes. You want the feta to turn golden and the tomatoes to soften. This will give you the best texture and taste. For the final touch, add fresh basil just before serving for added color and flavor. {{image_4}} To make Feta and Tomato Baked Gnocchi even more tasty, you can add veggies. Spinach, zucchini, or bell peppers work great. Just chop them up and toss them in with the tomatoes. This adds color and nutrition to your dish. You can even mix in some artichoke hearts for a fun twist. If you want a meatier meal, consider adding chicken or sausage. Cook the meat first, then mix it in with the gnocchi and cheese. Ground turkey or Italian sausage gives a nice kick. You could also use diced ham or bacon for a savory touch. This makes your dish filling and satisfying. Though feta is the star, you can switch cheeses for different flavors. Try goat cheese for a tangy twist. Mozzarella melts nicely and gives a creamy texture. If you like sharpness, consider aged cheddar. Mixing different cheeses can create a unique taste that keeps everyone excited about dinner. You can explore more ideas in the Full Recipe. To keep your Feta and Tomato Baked Gnocchi fresh, let it cool first. Then, place any leftovers in an airtight container. Store it in the fridge for up to three days. If you want to enjoy it later, refrigerating works best. When you're ready to eat the leftovers, preheat your oven to 180°C (350°F). Transfer the gnocchi to an oven-safe dish. Cover it with foil to keep it moist. Heat for about 15-20 minutes. You can also microwave it, but the oven gives better results. To freeze the dish, let it cool completely. Portion it into freezer-safe bags or containers. Make sure to label them with the date. You can freeze it for up to three months. When you're ready to eat, thaw it overnight in the fridge. Then, reheat it as mentioned before. Enjoy your delicious meal anytime! For the full recipe, check out the [Full Recipe]. Yes, you can prepare Feta and Tomato Baked Gnocchi ahead of time. Assemble the dish but do not bake it. Cover it and store it in the fridge for up to 24 hours. When ready to eat, just preheat the oven and bake it as directed. It saves time and makes meal prep easier. This dish pairs well with a simple green salad. A light arugula or spinach salad adds freshness. You could also serve crusty bread to soak up the tasty sauce. Garlic bread is another great option for those who love bold flavors. To control the spice level, adjust the red chili flakes. For mild heat, use less than the recipe states. If you like more spice, add a bit more. You can also use fresh chili peppers for a different kick. Keeping it balanced will help enhance the overall flavor without overwhelming your taste buds. In this post, we explored essential ingredients for creating a delicious Feta and Tomato Baked Gnocchi. You learned how to choose quality ingredients and find alternatives. I provided step-by-step instructions, along with tips for perfecting your dish. We also discussed fun variations and how to store leftovers. Cooking is about enjoying the process and trying new flavors. Now, you can impress anyone with your skills. Get ready to bake and enjoy!](https://blissfulmeal.com/wp-content/uploads/2025/06/dd77fd81-0e46-4fbf-81c0-4a154bd11018-768x768.webp)
![- 4 tilapia fillets - 1 cup finely grated Parmesan cheese - 1/2 cup panko breadcrumbs - 1 teaspoon garlic powder - 1 teaspoon onion powder - 1 teaspoon smoked paprika - Salt and freshly ground black pepper - 2 tablespoons extra virgin olive oil - 1 tablespoon fresh lemon juice - 2 tablespoons fresh parsley, finely chopped When I create this dish, I focus on using fresh ingredients. The tilapia is mild and flaky, making it perfect for a flavorful crust. I use finely grated Parmesan for that rich, cheesy taste. Panko breadcrumbs give the crust a nice crunch, which I love! For spices, I choose garlic powder, onion powder, and smoked paprika. These add depth and warmth. A pinch of salt and black pepper enhances the flavors without overpowering them. To finish, I drizzle the fillets with olive oil and lemon juice. This not only adds flavor but keeps the fish moist. Finally, I sprinkle chopped parsley on top for a fresh touch. This combination makes every bite delightful! You can find the full recipe in the article. Enjoy your cooking adventure! - Preheat the oven to 400°F (200°C). This will ensure your fish cooks evenly. - Line a baking sheet with parchment paper. This helps with easy cleanup and prevents sticking. - In a medium bowl, mix together 1 cup of finely grated Parmesan cheese, 1/2 cup of panko breadcrumbs, 1 teaspoon of garlic powder, 1 teaspoon of onion powder, and 1 teaspoon of smoked paprika. - Add a pinch of salt and pepper to taste. This mixture gives the fish a nice crispy crust and great flavor. - Take your 4 tilapia fillets and drizzle them with 2 tablespoons of extra virgin olive oil and 1 tablespoon of fresh lemon juice. This adds moisture and flavor to the fish. - Press each fillet into the breadcrumb mixture, coating both sides well. Ensure each piece is covered to get that crunch you’ll love. - Arrange the coated fillets on the baking sheet, leaving space between them. This allows the heat to circulate and cook the fish evenly. - Bake the tilapia for about 15-20 minutes. You’ll know it’s done when the fish is opaque and flakes easily with a fork. The crust will be a beautiful golden brown. - After baking, remove the sheet from the oven and let the tilapia rest for 2-3 minutes. This helps keep the fish moist. For the full recipe, visit the complete article. - To get a good crust, coat the tilapia well. Press it firmly into the breadcrumb mix. This helps it stick better. Make sure both sides are covered. - After baking, let the fish rest for 2-3 minutes. This keeps it moist and tasty. - For a great look, serve the tilapia on warmed plates. Add lemon wedges on the side. This adds a fresh touch. - Pair the tilapia with steamed vegetables or a crisp salad. These sides balance the meal well. - You can add more spices to the crust. Try a pinch of cayenne for heat or dried herbs for extra flavor. - Want to mix it up? Use different cheeses like cheddar or add nuts for crunch. Customize the crust to fit your taste. For the full recipe, check out the details above. {{image_4}} You can use other fish for this recipe. Cod, haddock, or even salmon work well. Each fish has a unique taste and texture. Cooking times may change slightly. Thicker fish fillets need a bit more time. Thin fillets, like sole, will cook faster. Always check for doneness by gently flaking the fish with a fork. If you want a gluten-free version, use crushed rice cereal instead of panko. It gives a nice crunch. For a dairy-free crust, try using nutritional yeast and ground almonds. This will add flavor and texture without dairy. Always read labels to ensure your substitutes are gluten-free or dairy-free. Add citrus zest to the coating for a bright taste. Lemon or lime zest can really enhance the dish. You can also mix in different cheeses, like cheddar or feta. Each cheese will give its own twist to the crust. Experiment with flavors to find your favorite! Use the [Full Recipe] for guidance. To store your baked tilapia, let it cool down first. Place the leftover fish in an airtight container. This keeps it fresh and safe. Baked tilapia lasts about 3 to 4 days in the fridge. Always check for any off smells or changes in texture before eating. If you want to freeze your tilapia, wrap each piece tightly in plastic wrap. Then, place the wrapped fish in a freezer bag. This helps prevent freezer burn. Baked tilapia can last for about 2 months in the freezer. To thaw, move it to the fridge for several hours. You can also thaw it in cold water for a quick option. When ready to eat, reheat it in the oven at 350°F (175°C) for about 10 minutes. Don’t let leftovers go to waste! You can flake the baked tilapia and add it to salads or tacos. It makes a great filling for wraps too. You can use it in a creamy pasta dish or mix it into a vegetable stir-fry. This way, you get to enjoy the tasty tilapia in a new way! For more ideas, check out the Full Recipe for inspiration on how to use your leftovers. Baked Parmesan Crusted Tilapia usually takes about 15 to 20 minutes. You want it to be opaque and flaky. The crust should turn a nice golden brown. Yes, you can use frozen tilapia fillets. Just make sure to thaw them first. You can thaw them overnight in the fridge or use the microwave. If using frozen fillets, add a few extra minutes to the baking time. This dish pairs well with many sides. You can serve it with steamed vegetables or a fresh garden salad. Some might like to add rice or quinoa for a filling meal. Lemon wedges add a nice touch too. Yes! You can prepare this dish in advance. Cook the tilapia and let it cool. Store it in airtight containers in the fridge. It will last for about three days. Reheat in the oven to keep the crust crispy. This blog post covered the delicious Baked Parmesan Crusted Tilapia recipe. We explored main ingredients, spices, and seasonings. You learned easy steps for preparation and baking. I shared tips for serving and flavor enhancements. Variations included alternative fish and dietary adjustments. Plus, we discussed storage info and answered common questions. You now have all you need to create a tasty dish that impresses. Enjoy your cooking adventure and try out these ideas for a meal full of flavor.](https://blissfulmeal.com/wp-content/uploads/2025/06/778d739a-27fc-4892-b3e9-362da569218e-768x768.webp)

![To make the Easy Cheesy Taco Skillet, you will need: - 1 lb ground beef (or ground turkey for a lighter option) - 1 medium onion, finely chopped - 2 cloves garlic, minced - 1 bell pepper (any color), diced - 1 can (15 oz) black beans, drained and rinsed - 1 can (15 oz) corn, drained - 1 packet taco seasoning (about 1 ounce) - 1 cup diced tomatoes (fresh or canned, preferably with juices) - 1 cup shredded cheddar cheese - Salt and pepper to taste - 2 tablespoons olive oil - Fresh cilantro or sliced green onions for garnish (optional, but recommended for freshness) You can switch things up based on what you have. Here are some fun ideas: - Protein: Try ground chicken or plant-based meat for a different taste. - Beans: Swap black beans with pinto or kidney beans for a new flavor. - Cheese: Use pepper jack for a spicy kick or mozzarella for a milder taste. - Veggies: Add in zucchini, corn, or spinach for extra nutrients and color. If you run out of something, don’t worry! Here’s how to adapt: - Ground Meat: If you don’t have beef or turkey, use canned beans for a vegetarian option. - Taco Seasoning: Blend your own with chili powder, cumin, and paprika if needed. - Fresh Herbs: If you lack fresh cilantro or green onions, dried herbs work well too. Use half the amount since they are more potent. These simple swaps help you create a dish that suits your taste and what you have on hand. Enjoy the process! For the full recipe, check out the instructions above. Start by heating 2 tablespoons of olive oil in a large skillet over medium heat. Once the oil shimmers, add 1 medium onion, finely chopped. Sauté for 3-4 minutes until the onion turns transparent. This builds a nice base of flavor. Then, add 2 cloves of minced garlic and 1 diced bell pepper. Cook for another 2-3 minutes. Stir occasionally until the peppers soften. Next, raise the heat to medium-high and add 1 pound of ground beef or ground turkey. Break up the meat with a wooden spoon, cooking for 5-6 minutes. Ensure the meat is browned and there is no pink left. Now, stir in 1 packet of taco seasoning. This adds a burst of flavor. Mix in 1 can of black beans (drained), 1 can of corn (drained), and 1 cup of diced tomatoes. Let this mixture simmer for about 5 minutes to meld the flavors. Once the mixture simmers, lower the heat. Sprinkle 1 cup of shredded cheddar cheese evenly over the top. Cover the skillet with a lid and wait 2-3 minutes for the cheese to melt. The gooey cheese makes the dish irresistible! Finally, season with salt and pepper to taste. Gently stir to combine all the ingredients. If you like, garnish with fresh cilantro or sliced green onions for a pop of color and flavor. - Prep Time: 10 minutes - Cook Time: 20 minutes - Total Time: 30 minutes - Heat Settings: Start at medium heat, increase to medium-high, then lower to low for cheese melting. For presentation, serve the cheesy taco skillet right in the skillet for a rustic look. You can also spoon it into bowls. Consider adding a dollop of sour cream or slices of avocado for creaminess. A sprinkle of lime zest on top brightens the dish. Feel free to explore the [Full Recipe] for more details and tips! To make your Easy Cheesy Taco Skillet shine, follow these simple tips. Start with fresh ingredients. Fresh vegetables boost taste and color. Always chop your onion and bell pepper evenly. This ensures they cook at the same rate. Cook the meat until it’s brown and there’s no pink left. This step adds depth to your dish. Use a large skillet for easy stirring. A non-stick skillet works best to prevent sticking. Want to take your skillet to the next level? Try adding spices! A pinch of cumin or chili powder can kick up the heat. Fresh herbs like cilantro or parsley brighten the flavors. If you love heat, add diced jalapeños or a splash of hot sauce. For a creamy twist, mix in some sour cream before serving. This adds richness and balances the spices. And don’t forget about lime juice! A squeeze of lime adds freshness and zest. Avoid common pitfalls to make your dish perfect. Don’t rush the cooking of your onions and garlic. Cooking them slowly brings out their sweetness. If you don’t drain the beans and corn well, your dish may become soggy. Always taste before adding salt. The taco seasoning can be salty, so cautious seasoning is key. Finally, let the dish rest for a few minutes after cooking. This lets the flavors meld beautifully. For the complete recipe, check the Full Recipe section! {{image_4}} You can easily make a vegetarian version of the Easy Cheesy Taco Skillet. Swap the ground beef for plant-based meat, like lentils or crumbled tofu. You can also use mushrooms for a meaty texture. Add extra veggies like zucchini or spinach for more flavor. Black beans and corn will still give a hearty base. This way, you keep all the flavors while being meat-free. Want more heat? You can add diced jalapeños or a pinch of cayenne pepper to the mix. Stir in hot sauce at the end for that extra kick. If you like smoky flavors, try adding chipotle peppers in adobo sauce. These changes will give your dish a new twist without changing too much. Meal prep with this dish is simple. Cook the taco skillet ahead of time and store it in the fridge for up to four days. You can reheat it in a skillet or microwave. Serve it with warm tortillas or over rice for a filling meal. Top with fresh avocado, sour cream, or fresh salsa for extra flavor. You can even freeze portions for later. Just thaw and heat when you’re ready to eat! For more ideas, check out the Full Recipe. To keep your Easy Cheesy Taco Skillet fresh, let it cool first. Then, transfer it to an airtight container. This method helps lock in flavors and prevent spoilage. You can also use resealable bags. Just make sure to squeeze out any extra air before sealing. Label the containers with the date to keep track of freshness. When you're ready to enjoy leftovers, reheat them on the stove or microwave. For the stove, place the skillet over low heat. Stir often until it's warm. This method keeps the texture nice. In the microwave, use a microwave-safe dish. Heat in short bursts of 30 seconds, stirring in between. Make sure it's heated through. Properly stored, your Easy Cheesy Taco Skillet lasts in the fridge for about 3 to 4 days. If you want to keep it longer, consider freezing it. In the freezer, it can last up to 2 to 3 months. Just remember to thaw it in the fridge before reheating. This ensures it stays safe and tasty. To make the Easy Cheesy Taco Skillet gluten-free, choose a gluten-free taco seasoning. Many store brands offer gluten-free options. Always check the label to be sure. You can also use fresh vegetables and beans that are certified gluten-free. This way, you enjoy the same tasty flavors without gluten. Yes, you can use different types of cheese! If you want a sharper taste, try pepper jack or Monterey Jack. For a creamier texture, use cream cheese or a blend of cheeses. Cheese choices can change the dish's flavor, so feel free to experiment. Many sides go well with this dish. Here are some ideas: - Rice: White or brown rice adds a nice base. - Salad: A fresh green salad balances the rich flavors. - Tortilla Chips: Crispy chips provide crunch and fun. - Guacamole: Creamy guacamole enhances the meal. - Sour Cream: A dollop adds coolness and creaminess. These sides can make your meal more complete and enjoyable. For the full recipe, check out the Easy Cheesy Taco Skillet! The Easy Cheesy Taco Skillet is simple to make with various ingredient choices. We explored cooking steps, including times and tips. Remember, adjusting flavors enhances the dish. Consider vegetarian or spicy twists for fun. Store it well for easy meals later. This dish is great for any night of the week. Enjoy the comfort and taste of your creation!](https://blissfulmeal.com/wp-content/uploads/2025/06/53464daf-492c-4705-ae27-01403e715834-768x768.webp)