Skip to content
About
Contact
Cookie Policy
Copyright Policy
Disclaimer
Search
Home
Dinner
Appetizer
Desserts
Drinks
About
Contact
Privacy Policy
Toggle Menu
Home
/
Drinks
- Page 2
Drinks
Easy Peach Smoothie Tasty and Quick Refreshment
Spinach Berry Protein Smoothie Refreshing and Healthy
Tropical Mango Pineapple Smoothie Refreshing Treat
Peach Iced Green Tea Refreshing Summer Drink Recipe
Raspberry Lemon Basil Fizz Refreshing Summer Drink
Pineapple Coconut Refresher Refreshing Summer Drink
Vanilla Bean Iced Coffee Refreshing Summer Drink
Apple Pie Smoothie Irresistible and Healthy Drink
Ginger Citrus Immune Booster Simple Health Tonic
Coconut Lime Coconut Water Smoothie Energizing Treat
Page navigation
Previous Page
Previous
1
2
3
4
Next Page
Next
Home
Dinner
Appetizer
Desserts
Drinks
About
Contact
Privacy Policy
Toggle Menu Close
Search for:
Search

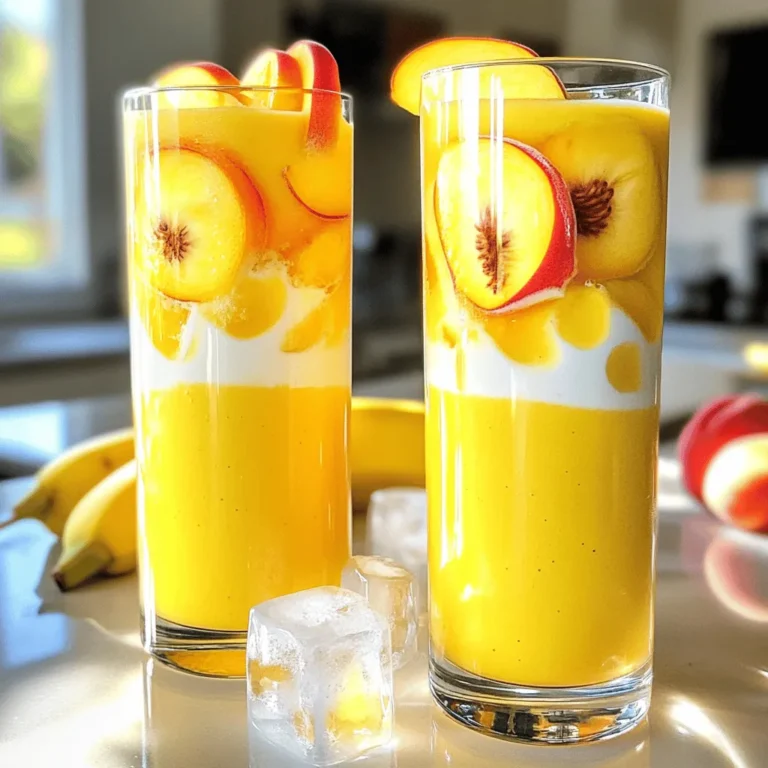

![- 1 ripe mango, expertly peeled and diced into bite-sized pieces - 1 cup fresh pineapple chunks, juicy and sweet - 1 banana, fully peeled - 1 cup silky coconut milk, for a tropical essence - 1/2 cup smooth Greek yogurt, adding creaminess and protein - 1 tablespoon honey or agave syrup (optional, depending on your preferred sweetness) - 1/2 teaspoon freshly grated ginger, for a spicy zest - 1 cup ice cubes, to achieve that refreshing chill These ingredients create a burst of tropical flavor. Mango brings a sweet, juicy taste. Pineapple adds a tangy kick. The banana gives the smoothie a creamy texture. Coconut milk enhances the tropical feel and makes it rich. Greek yogurt adds protein, making this smoothie filling. Ginger offers a zesty touch, which makes every sip exciting. Ice cubes chill the smoothie and keep it refreshing. You can customize your smoothie with a few add-ins. Consider these options: - 1 tablespoon chia seeds for added fiber - A handful of spinach for extra nutrients - A scoop of protein powder for a post-workout boost - A splash of vanilla extract for a hint of sweetness These add-ins can enhance both flavor and nutrition. Chia seeds add texture and fiber. Spinach blends in without changing the taste much. Protein powder helps you feel full longer. Vanilla extract adds a nice aroma. This smoothie packs many health benefits: - Mango: High in vitamin C, boosts the immune system. - Pineapple: Contains bromelain, which aids digestion. - Banana: Rich in potassium, good for heart health. - Coconut Milk: Provides healthy fats for energy. - Greek Yogurt: A good source of protein and probiotics. - Honey or Agave: Natural sweeteners with antioxidants. - Ginger: Can help reduce inflammation and nausea. These ingredients work together to offer vitamins and minerals. They help support your body while tasting great. Enjoy this Tropical Mango Pineapple Smoothie as a tasty and healthy treat. For the full recipe, check out the [Full Recipe]. To make the best Tropical Mango Pineapple Smoothie, start with fresh fruits. Choose a ripe mango that feels slightly soft when you press it. The pineapple should be sweet and fragrant. You want both fruits to be at their peak for the best taste. Peel and dice the mango. Cut the pineapple into chunks. Use a fully ripe banana for a smooth blend. These fresh ingredients will give your smoothie a delicious flavor. When blending, add your fruits first. Then pour in the coconut milk and Greek yogurt. This order helps everything blend smoothly. Use high speed for about 30 seconds. Stop to check the texture. If it’s too thick, add a little more coconut milk. For a chilled smoothie, don’t skip the ice. It makes the drink refreshing and cool. Blend until no chunks remain for a creamy finish. Pour your smoothie into tall glasses for a lovely presentation. You can garnish with a slice of mango or a sprig of mint. This adds color and a hint of freshness. Enjoy your smoothie right away to savor the flavors. Feel free to experiment with toppings like shredded coconut or chia seeds. They can enhance both look and taste. For the full recipe, check the details above. To pick a ripe mango, look for one that feels slightly soft. It should have a sweet scent at the stem end. A ripe mango often has a golden-yellow color. For pineapple, check the leaves; they should be green and fresh. The fruit should feel heavy for its size. A sweet smell at the base is a good sign too. Avoid ones that look dull or have dark spots. You can change the sweetness of your smoothie easily. If you like it sweeter, add more honey or agave syrup. If you want less sweetness, skip the added sweeteners. For creaminess, use more Greek yogurt or coconut milk. Remember, each change will change the flavor, so taste as you go. For a smooth smoothie, blend in order. Start with the soft fruits like mango and banana. Add liquids next, then the thicker Greek yogurt. Finally, toss in ice cubes. Blend on high speed until everything is creamy. If your smoothie is too thick, add a splash of coconut milk. If it’s too thin, add more fruit or ice. Always taste before serving to ensure it meets your liking. {{image_4}} You can mix it up with other fruits. Try using strawberries, blueberries, or kiwi. These fruits add different flavors and colors. A strawberry-pineapple blend brings a sweet and tart taste. Blueberries give a rich color and antioxidants. Kiwi adds a fun twist with its tangy flavor. Want a dairy-free option? Use almond milk or oat milk instead of coconut milk. You can swap Greek yogurt for coconut yogurt too. This keeps your smoothie creamy while making it vegan. For a nut-free choice, choose soy milk or rice milk. These options keep the smoothie tasty and smooth. Want to make your smoothie even healthier? Add some superfoods! Chia seeds pack in fiber and omega-3s. Spinach adds vitamins without changing the taste. A scoop of protein powder boosts energy and keeps you full. You can also add ground flaxseed for extra nutrients. These small changes can make a big difference in nutrition. Try these variations to keep your Tropical Mango Pineapple Smoothie exciting. For the complete recipe, check out the Full Recipe. If you have leftover smoothie, store it in the fridge. Pour it into a clean jar or bottle. Seal it tightly to keep it fresh. The smoothie will stay good for up to 24 hours. Give it a good shake before you drink it. To save your smoothie for later, freeze it in ice cube trays. Pour the extra smoothie into the trays and freeze. After a few hours, pop the cubes out and store them in a freezer bag. This way, you can enjoy a quick smoothie anytime. Just blend the cubes with a bit of coconut milk for a fresh treat. Choose glass or BPA-free plastic containers for best results. Glass jars are great for short-term storage. They do not stain or hold odors. Plastic containers are lightweight and easy to carry. Make sure they fit in your fridge or freezer space. A good seal helps keep your smoothie fresh longer. You can enjoy this smoothie anytime! It works well for breakfast, snacks, or dessert. The bright flavors wake you up in the morning. After a workout, it helps you refuel. It’s also a great way to cool down on a hot day. Pair it with a light meal or sip it on its own. Yes, you can make this smoothie ahead of time. Store it in the fridge for up to 24 hours. The taste may change a bit, but it will still be tasty. To keep it fresh, put it in a sealed container. If you want, blend it again just before serving. This gives it a nice, smooth texture. Mango and pineapple both offer many health benefits. - Mango is rich in vitamins A and C. It helps boost your immune system and improves skin health. - Pineapple contains bromelain, which aids digestion and reduces inflammation. - These fruits are low in calories and high in fiber. They can help keep you full and satisfied. Together, they create a delicious blend that is both refreshing and nutritious. For more details, check the Full Recipe. A Tropical Mango Pineapple Smoothie is easy to make and fun to enjoy. We discussed the key ingredients and their benefits. I shared tips for preparation and how to blend for the best texture. You can try variations and add other fruits or superfoods for fun twists. Remember to store any leftovers properly for a quick treat later. I hope you feel inspired to blend up something delicious and nutritious!](https://blissfulmeal.com/wp-content/uploads/2025/07/83c14fa0-f63c-4501-9478-637d8160cbd0-768x768.webp)
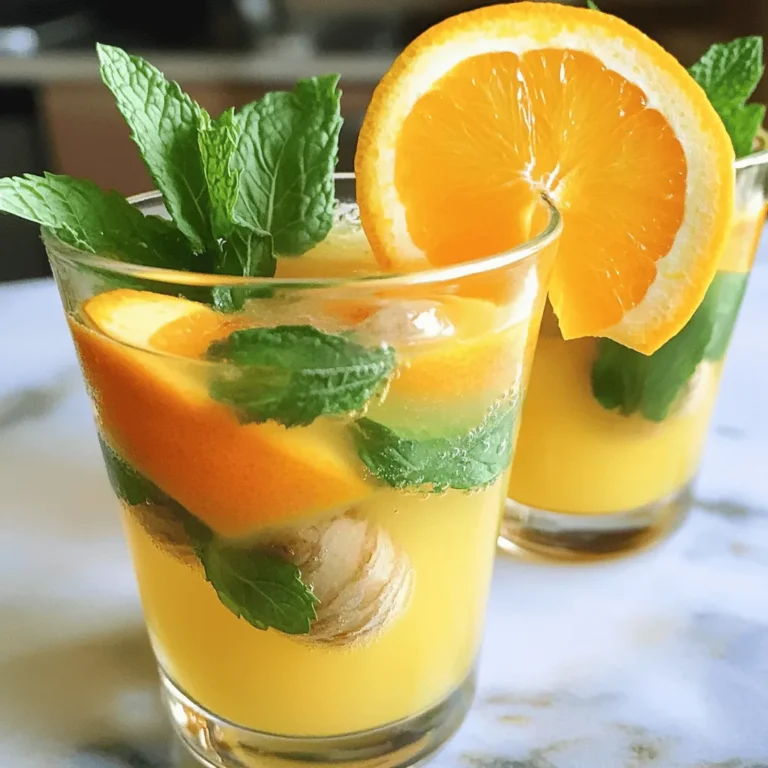
![To make a refreshing Peach Iced Green Tea, you need a few simple ingredients. Here's what you'll need: - Green tea bags - Ripe peaches - Honey or sweetener alternatives - Fresh lemon juice - Fresh mint leaves - Ice cubes - Water Using ripe peaches is key. They add natural sweetness and flavor. Honey or your favorite sweetener lets you control how sweet your drink is. Fresh lemon juice gives a nice zing that balances the tea's taste. Mint leaves not only look pretty but also add a fresh aroma. For the best taste, use high-quality green tea bags. They have great flavor and health benefits. The water should be fresh and clean, as it makes a big difference in your drink. With these ingredients ready, you're set to create a delicious summer drink. For the complete recipe, check out the Full Recipe. How to boil water for tea Start by filling a large saucepan with 4 cups of water. Heat it on high until it reaches a rolling boil. This is crucial for making the tea taste great. Correct steeping time for the best flavor Once the water boils, take it off the heat. Add 4 green tea bags. Let them steep for 3-4 minutes. For a stronger flavor, steep for a few extra minutes. Remove the bags carefully when you finish steeping. Blending peaches for a smooth puree While your tea cools, take 2 ripe peaches. Slice them and remove the pits. Place the slices in a blender. Blend on high speed until you have a smooth puree. Check for any chunks to ensure a silky texture. Mixing ingredients perfectly In a large pitcher, combine the cooled green tea, peach puree, 1/4 cup honey, and 1 tablespoon of fresh lemon juice. Use a long spoon or whisk to mix well until the honey dissolves. This creates a deliciously sweet and fruity drink. Best practices for serving Fill each glass with ice cubes before pouring in the tea mixture. Leave space at the top for garnish. This keeps your drink cold and refreshing. Recommended glassware for presentation Use clear glasses to show off the lovely color of the peach iced green tea. Tall glasses work well, making your drink look fancy and inviting. Garnishing ideas for enhanced aesthetics Garnish each glass with fresh mint leaves and a slice of peach on the rim. This adds a nice touch and makes your drink look even more appealing. The mint also gives it a fresh aroma as you sip. For the complete recipe, check out the [Full Recipe]. Using fresh ingredients makes all the difference. Fresh peaches give the best taste. They are juicy and sweet, perfect for your drink. Adjust the sweetness to what you like. Start with 1/4 cup of honey, then taste. Add more if you want it sweeter. For the best tea balance, steep the green tea correctly. A 3-4 minute steep is ideal. This gives a nice flavor without bitterness. One big mistake is over-steeping green tea. If you steep too long, the tea tastes bitter. Keep an eye on the clock! Another mistake is using unripe peaches. They lack sweetness and flavor. Always choose ripe peaches for the best results. Also, blending techniques matter. Blend the peaches until smooth. No chunks should remain. This ensures a silky texture in your drink. For the full recipe, check out the Peach Iced Green Tea section. {{image_4}} You can make your peach iced green tea even more exciting! Here are some fun ideas: - Mango or Berries: Add diced mango or fresh berries to the mix. They give a nice sweet twist. - Herbs: Try tossing in some basil or rosemary. These herbs add a fresh and unique taste. - Additional Flavors: You can infuse the tea with ginger or vanilla for a warm touch. Just a small amount can change the whole drink. If you want to change up the sweetness in your drink, consider these options: - Natural Sweeteners: Use honey, agave, or maple syrup. These give a pure sweetness and are often healthier. - Low-Calorie Options: If you watch your calories, try stevia or monk fruit. They add sweetness without extra calories. - Flavored Syrups: For a fun twist, use flavored syrups, like peach or raspberry. These can add a new layer of flavor to your drink. Don't forget to check out the Full Recipe for detailed steps and tips! Store your peach iced green tea in the fridge. Use a clean glass pitcher with a lid. This keeps the tea fresh and tasty. It lasts about 3-5 days in the fridge. If you have leftover peach puree, save it in a sealed container. Use it in smoothies or yogurt for a quick treat. You can freeze peach iced green tea for later use. Pour the tea into ice cube trays or freezer-safe bags. Freezing makes it easy to enjoy later on hot days. When you want to drink it, take out what you need. Thaw in the fridge overnight or at room temperature. Serve it over ice for a quick and refreshing drink. How do I make peach iced green tea from scratch? To make peach iced green tea from scratch, you need a few simple steps. Start by boiling 4 cups of water. Then, steep 4 green tea bags in the hot water for 3-4 minutes. While the tea cools, blend 2 ripe peaches into a smooth puree. Mix the cooled tea with the peach puree, 1/4 cup of honey, and 1 tablespoon of lemon juice in a pitcher. Finally, serve over ice and garnish with mint leaves. You can find the full recipe for better clarity. Can I use bottled green tea instead? Yes, you can use bottled green tea. However, it may not taste as fresh. If you do, make sure it is unsweetened. This way, you can control the sweetness by adding honey or your favorite sweetener. What are the health benefits of green tea? Green tea is packed with antioxidants. It can help boost your metabolism and support heart health. Drinking green tea also improves brain function and may lower the risk of certain diseases. It’s a great choice for hydration, too. How do I make my peach iced green tea less sweet? To make your tea less sweet, reduce the amount of honey. You can start with 2 tablespoons and taste. If it needs more sweetness, add a little more. Also, fresh peaches add natural sweetness, so choose them wisely. Can I use frozen peaches instead of fresh? Yes, frozen peaches work well too! They can add a nice chill to your drink. Just let them thaw a bit before blending. This way, you still get a smooth texture without losing flavor. In this blog post, we explored how to make delicious peach iced green tea. We discussed key ingredients like ripe peaches and fresh mint leaves. You learned step-by-step how to prepare and serve this refreshing drink. I shared tips to enhance flavor and avoid common mistakes. We also looked at fun variations and how to store your tea for later. Remember, fresh ingredients make all the difference. Try new flavors and sweeteners to find what you love best. Enjoy your thirst-quenching creation!](https://blissfulmeal.com/wp-content/uploads/2025/07/5811f612-8d74-4071-8268-59c3944be6ef-768x768.webp)
. This blog post showed you how to make a refreshing Raspberry Lemon Basil Fizz. You learned about the fresh ingredients, sweeteners, and beverage base. The step-by-step guide made blending and straining easy. Tips offered ways to enhance flavor and present it well. You also discovered fun variations for any season. In the end, this drink is simple, tasty, and perfect for sharing. Enjoy creating your own unique twist!](https://blissfulmeal.com/wp-content/uploads/2025/06/cad92a08-5015-4811-ac6c-13a6b1a483c3-768x768.webp)

![To make a tasty Coconut Lime Coconut Water Smoothie, you need these main ingredients: - 1 cup coconut water - 1 ripe banana, peeled and sliced - 1/2 cup Greek yogurt (or dairy-free alternative like coconut yogurt) - 1/2 cup fresh pineapple chunks - Zest and juice of 1 lime These ingredients blend together to create a creamy and refreshing drink. The coconut water adds hydration, while the banana gives a smooth texture. Pineapple adds sweetness and a tropical twist. The lime zest and juice give it a bright, tangy flavor. You can enhance your smoothie with these optional ingredients: - 1 tablespoon honey or agave syrup (for added sweetness) - 1/4 teaspoon vanilla extract - Ice cubes (for a refreshing chilled smoothie) Adding honey or agave syrup can make your smoothie sweeter. Vanilla extract brings a warm flavor that pairs well with the other fruits. Ice cubes can make the smoothie icy and more refreshing, especially on hot days. To make this smoothie, you will need: - A blender - Measuring cups - A cutting board - A knife - Glasses for serving A good blender is key to mixing everything smoothly. Measuring cups help ensure you get the right amounts. A cutting board and knife are needed to prep the banana and pineapple. Finally, have some glasses ready to enjoy your delicious treat. For the full recipe, check out the Coconut Lime Bliss Smoothie. To make this Coconut Lime Coconut Water Smoothie, start by gathering your ingredients. You will need: - 1 cup coconut water - 1 ripe banana, peeled and sliced - 1/2 cup Greek yogurt (or coconut yogurt) - 1/2 cup fresh pineapple chunks - Zest and juice of 1 lime - 1 tablespoon honey or agave syrup (optional) - 1/4 teaspoon vanilla extract - Ice cubes (optional) Make sure your banana is ripe. A ripe banana adds natural sweetness. Cut it into slices for easy blending. If you use fresh pineapple, chop it into chunks. The zest from the lime brings extra flavor, so don’t skip it. Now, it’s time to blend! Add coconut water, banana slices, Greek yogurt, and pineapple chunks to your blender. Next, sprinkle in the lime zest and squeeze in the lime juice. If you like it sweet, add honey or agave syrup along with the vanilla extract. Blend on high speed. Keep blending until it is smooth and creamy. If you want a chilled smoothie, throw in some ice cubes. Blend again until everything is fully mixed and frosty. Taste your smoothie. If it needs more sweetness, add a bit more honey or agave and blend briefly. Pour your smoothie into chilled glasses. For a fun touch, garnish each glass with a slice of lime on the rim. You can also sprinkle a little lime zest on top for color. This adds a nice aroma too. Enjoy your Coconut Lime Coconut Water Smoothie! For the full recipe, check out the recipe section above. To get a smooth drink, blend your ingredients well. Start with the coconut water and yogurt. Then, add the banana and pineapple. Blend until it is creamy. If you like it colder, toss in some ice cubes. Blend again until smooth. This helps to make the drink light and frothy. Some may want a sweeter taste. After blending, take a sip. If it needs more sweetness, add honey or agave syrup. Start small, maybe a teaspoon. Blend it again and taste. You can always add more, but you can’t take it out once it’s in. This way, you’ll find the perfect balance for your taste. You can easily boost the health benefits. Add a handful of spinach or kale for extra greens. They blend well and you won’t taste them. You can also sprinkle in some chia seeds or flaxseeds. These add fiber and omega-3s. Just a tablespoon goes a long way. This smoothie can be a tasty way to pack in nutrients. For the full recipe, check out the details above. {{image_4}} You can make the Coconut Lime Coconut Water Smoothie even better with fruits! Try adding a handful of mango or a cup of strawberries. These fruits add natural sweetness and color. You can also use papaya or kiwi for a unique twist. Each new fruit brings its own flavor, making your smoothie exciting. Mix and match fruits to find your favorite combination. If you want a dairy-free version, switch the Greek yogurt for coconut yogurt. This keeps the smooth texture while adding a hint of coconut flavor. You can also use almond milk or cashew yogurt if you prefer. These options still give you creaminess without dairy. It’s a great way to enjoy this smoothie if you have dietary needs. Want to add some extra health benefits? Toss in a scoop of spinach or kale. They blend well and add nutrients without changing the taste. You can also add chia seeds or flaxseeds for fiber and omega-3s. These superfoods make your smoothie even more nourishing. They help keep you full and energized throughout the day. Explore the [Full Recipe] for the Coconut Lime Coconut Water Smoothie to see how to make this refreshing treat. If you have leftover Coconut Lime Coconut Water Smoothie, store it in a sealed container. Place it in the fridge. It stays fresh for up to 24 hours. The smoothie may separate, so stir it before drinking. This way, you keep the great taste and texture. You can freeze the smoothie for later. Pour it into ice cube trays or freezer-safe bags. This keeps it fresh for up to three months. When you want to enjoy it again, thaw it in the fridge overnight. You can also blend frozen cubes for a quick, icy drink. To keep your smoothie fresh, use ripe fruits and fresh yogurt. Choose organic if you can, as they taste better. Always check the expiration date on yogurt. Store ingredients in a cool place. This ensures that you have the best flavor when you make your smoothie. Yes, you can make the smoothie without yogurt. If you skip yogurt, use a banana for creaminess. This keeps the smoothie thick and smooth. You can also add avocado or extra coconut water for a rich texture. Dairy-free options like coconut yogurt work well too. To thicken your smoothie, add frozen fruits like bananas or mangoes. They create a thicker texture without changing the taste much. You can also use oats or chia seeds. These ingredients soak up liquid and add fiber. Another option is to use less coconut water than the recipe suggests. Coconut water is low in calories and has natural sugars. It hydrates your body well since it’s rich in electrolytes. It helps with digestion due to its high potassium content. Coconut water also supports heart health as it may lower blood pressure. Overall, it’s a great choice for a refreshing drink. You can store the smoothie in the fridge for up to 24 hours. It tastes best when fresh, but if you need to save it, use an airtight container. Stir well before drinking. If it separates, that’s normal. Just give it a good shake or stir to mix it back together. We covered how to make a coconut lime smoothie from start to finish. You learned about the best ingredients and tools to use. I shared easy steps for blending and serving. Remember the tips for the right texture and sweetness. You can also try fun variations and know how to store your smoothie. Embrace creativity in your smoothie-making. Enjoy your tasty drink now and feel good about it!](https://blissfulmeal.com/wp-content/uploads/2025/06/b18096e9-d46f-4642-82fe-42792921ee0e-768x768.webp)