Herb Garlic Pull-Apart Rolls Soft and Flavorful Treat


Are you ready to elevate your bread game? Herb Garlic Pull-Apart Rolls are soft, flavorful, and perfect for any meal. With a blend of fresh herbs and rich garlic, these rolls will delight your taste buds. Whether it’s a cozy dinner or a festive gathering, they make the ideal side dish. Follow my easy recipe to create these irresistible treats that will have everyone asking for seconds. Let’s bake some magic together!
Why I Love This Recipe
- Homemade Goodness: There’s nothing quite like the smell of fresh bread baking in the oven, and these rolls fill your home with an irresistible aroma that makes everyone feel cozy.
- Pull-Apart Fun: These rolls are designed for sharing! The pull-apart style makes them perfect for gatherings, allowing everyone to enjoy warm, buttery bites together.
- Flavor Explosion: The combination of fresh herbs and garlic creates a delightful flavor that elevates any meal. They pair beautifully with soups, salads, or as a standalone snack.
- Customizable: You can easily adapt the fillings to suit your taste. Add different cheeses, spices, or herbs to create your unique version of these delicious rolls.
Ingredients
List of Essential Ingredients
– 3 cups all-purpose flour
– 1 packet (2 1/4 tsp) instant yeast
– 1 tablespoon granulated sugar
– 1 teaspoon fine salt
– 1 cup warm milk (approximately 110°F or 43°C)
– 2 tablespoons unsalted butter, melted
– 2 tablespoons extra-virgin olive oil
Herb and Cheese Add-ins
– 4 cloves garlic, finely minced
– 2 tablespoons fresh parsley, chopped
– 1 tablespoon fresh rosemary, finely chopped
– 1 tablespoon fresh thyme, chopped
– 1/4 cup grated Parmesan cheese
– 1 tablespoon Italian seasoning
Additional Ingredients
– Extra melted butter for brushing
When making herb garlic pull-apart rolls, having the right ingredients is key. Each item adds flavor and texture. The all-purpose flour serves as a perfect base. Instant yeast helps the dough rise. Sugar and salt enhance the taste. Warm milk hydrates the dough, making it soft. Melted butter and olive oil add richness.
Now, let’s talk about the herb and cheese add-ins. Minced garlic gives a strong taste. Fresh parsley, rosemary, and thyme add brightness. Grated Parmesan cheese brings a savory depth. Italian seasoning ties all these flavors together.
Finally, we need extra melted butter for brushing. This golden layer adds a nice shine and extra flavor. With these ingredients, your rolls will be soft, flavorful, and hard to resist!

Step-by-Step Instructions
Preparation of Dough
– In a large bowl, whisk together the all-purpose flour, instant yeast, sugar, and salt. This blends the dry ingredients well.
– In another bowl, whisk the warm milk, melted butter, and olive oil until combined. Slowly pour this into the dry mix while stirring. Keep stirring until a soft dough forms.
– Transfer the dough to a lightly floured surface. Knead the dough for 5-7 minutes until it feels smooth and elastic. If it sticks, add a little flour to your hands.
Kneading and Rising
– Use a folding and pushing motion to knead the dough. This builds the dough’s strength.
– Place the dough in a greased bowl. Cover it with a clean kitchen towel. Let it rise in a warm spot for about 1 hour. It should double in size.
Filling Preparation and Assembly
– While the dough rises, mix the minced garlic, chopped parsley, rosemary, thyme, Parmesan, Italian seasoning, and a pinch of salt in a small bowl. This is your herb-garlic filling.
– Once the dough has risen, punch it down gently. Divide the dough into 16 equal pieces.
– Flatten each piece slightly. Add about a teaspoon of the herb-garlic filling in the center. Fold the dough over the filling, pinch to seal, and roll it into a ball.
– Arrange the dough balls in a greased bundt pan or round baking dish. Place them close together for a pull-apart effect.
Baking Process
– Preheat your oven to 350°F (175°C).
– Brush the tops of the rolls with melted butter. If you have leftover filling, sprinkle it on top for added flavor.
– Cover the pan with a towel and let the rolls rise again for about 30 minutes. They should puff up a bit.
– Bake the rolls for 25-30 minutes until they turn golden brown. They should sound hollow when tapped on top.
Tips & Tricks
Perfecting the Dough
To make soft and elastic dough, knead it for about 5-7 minutes. Use your palms to push the dough away and fold it over. This motion builds strength in the dough. If it feels sticky, add a little flour. The dough is ready when it springs back after a light poke.
To know if your dough has risen enough, look for its size. It should double in volume. A good test is to gently poke it. If the indentation stays, it’s ready. If it springs back, let it rise longer.
Enhancing Flavor
You can add more herbs to boost flavor. Try oregano, basil, or chives for a twist. For a bolder taste, sprinkle in some crushed red pepper flakes.
Cheese also adds a nice touch. Instead of Parmesan, use mozzarella for a gooey texture. Feta gives a tangy flavor, while cheddar adds sharpness. Mix and match to find your favorite combo!
Serving Suggestions
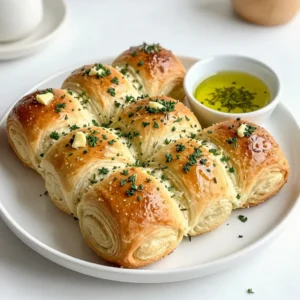
For a lovely presentation, serve the rolls on a rustic wooden board. This adds charm to your table. Place a small bowl of herb-infused olive oil next to the rolls for dipping.
To make it even better, garnish the board with fresh herb sprigs. This makes the dish look inviting and fresh. Enjoy these rolls with soups, salads, or as a tasty snack!
Pro Tips
- Use Fresh Herbs: Fresh herbs provide a vibrant flavor that dried herbs cannot match. Ensure you chop them finely to release their oils and flavors fully.
- Check Dough Temperature: Using warm milk is crucial for activating the yeast. Ensure it’s around 110°F (43°C) for the best results. Too hot can kill the yeast; too cold may not activate it.
- Let the Rolls Rise: Allowing the rolls to rise twice enhances their texture and flavor. Don’t rush this step; a good rise makes them airy and delicious.
- Experiment with Fillings: Feel free to customize the herb-garlic filling by adding ingredients like sun-dried tomatoes, olives, or different cheeses for a unique twist.
Variations
Herb Garlic Pull-Apart Rolls with Cheese
You can add cheese to your herb garlic rolls for a tasty twist. Try mozzarella for a gooey center. Cheddar adds a sharp flavor that pairs well with garlic. You can also mix in goat cheese for a creamy texture. Just sprinkle your chosen cheese inside each dough piece with the herb filling. This gives you a cheesy, flavorful treat.
Whole Wheat Option
If you want a whole wheat version, you can use whole wheat flour instead of all-purpose flour. You may need to add a bit more milk since whole wheat absorbs more liquid. Start with the same amount of milk and add more as needed. The rolls may be denser but will still taste great. This option is healthier and adds more fiber to your meal.
Gluten-Free Version
For gluten-free rolls, swap the all-purpose flour with a gluten-free blend. Look for a blend that includes xanthan gum to help with the texture. You may need to adjust the liquid slightly, so start with the same amount and add more if necessary. These rolls can be just as soft and tasty as the original. Enjoy the same flavors without the gluten!
Storage Info
How to Store Leftover Rolls
Store leftover rolls in an airtight container. Keep them at room temperature for up to two days. If you need more time, place them in the fridge. This helps keep them fresh. Make sure to wrap them tightly if using the fridge.
Reheating Methods
When reheating, you want to keep the rolls soft. Preheat your oven to 350°F (175°C). Place the rolls on a baking sheet. Cover them with foil to keep moisture in. Heat for about 10-15 minutes. You can also use the microwave. Heat them for about 10-15 seconds. Add a small cup of water inside to keep them from drying out.
Freezing Instructions
To freeze the rolls, let them cool completely. Then, wrap each roll in plastic wrap. Place them in a freezer-safe bag or container. They can last up to three months in the freezer. To thaw, take them out and let them sit in the fridge overnight. You can also heat them straight from the freezer. Just add extra time when reheating.
FAQs
How long do the rolls take to prepare?
The rolls need about 15 minutes to prep. After that, they need 1 hour to rise. Then, a second rise takes 30 minutes. Finally, bake for 25 to 30 minutes. In total, you will spend about 2 hours from start to finish.
Can I use dried herbs instead of fresh?
Yes, you can use dried herbs. Use about one-third of the amount. For example, if the recipe calls for 1 tablespoon of fresh herbs, use 1 teaspoon of dried. Dried herbs are more potent. So, adjust the taste as needed.
What can I serve with herb garlic pull-apart rolls?
These rolls are great with many sides. Here are a few ideas:
– A warm bowl of soup
– A fresh salad with vinaigrette
– Herb-infused olive oil for dipping
– A creamy cheese spread
How can I make the rolls ahead of time?
You can prep the dough the night before. After kneading, place it in a bowl and cover it. Store it in the fridge overnight. The next day, let the dough warm up for about 30 minutes before shaping and baking. This saves time and is great for busy days.
You now understand the key ingredients and steps to make herb garlic pull-apart rolls. Mix the right ingredients, knead well, and bake perfectly. Remember to play with flavors by adding different herbs and chews. Store leftovers properly, so they stay fresh and tasty. These rolls can elevate any meal. Enjoy making them and share with loved ones. Get creative with variations to suit your taste. Happy bakin
Herb Garlic Pull-Apart Rolls
Ingredients
- 3 cups all-purpose flour
- 1 packet instant yeast (2 1/4 tsp)
- 1 tablespoon granulated sugar
- 1 teaspoon fine salt
- 1 cup warm milk (approximately 110°F or 43°C)
- 2 tablespoons unsalted butter, melted
- 2 tablespoons extra-virgin olive oil
- 4 cloves garlic, finely minced
- 2 tablespoons fresh parsley, chopped
- 1 tablespoon fresh rosemary, finely chopped
- 1 tablespoon fresh thyme, chopped
- 1 4 cup grated Parmesan cheese
- 1 tablespoon Italian seasoning
- 1 tablespoon additional melted butter for brushing
Instructions
- In a large mixing bowl, whisk together the all-purpose flour, instant yeast, sugar, and salt until thoroughly combined.
- In a separate bowl, whisk together the warm milk, melted butter, and olive oil until well mixed. Gradually pour this mixture into the dry ingredients, stirring continuously until a soft dough forms.
- Transfer the dough onto a lightly floured surface. Knead the dough for about 5-7 minutes until it becomes smooth and elastic, making sure to incorporate any bits that stick to your hands or the surface.
- Place the kneaded dough in a lightly greased bowl. Cover the bowl with a clean kitchen towel and allow it to rise in a warm, draft-free area for approximately 1 hour, or until the dough has doubled in size.
- While the dough is rising, prepare the herb-garlic filling. In a small bowl, mix together the minced garlic, chopped parsley, chopped rosemary, chopped thyme, grated Parmesan cheese, Italian seasoning, and a pinch of fine salt until evenly combined.
- Once the dough has risen, gently punch it down to release the air. Divide the dough into 16 equal pieces.
- Flatten each piece slightly and place about a teaspoon of the herb-garlic filling in the center. Carefully fold the dough over the filling, pinch the seams to seal, and roll it into a smooth ball.
- Arrange the dough balls in a greased bundt pan or round baking dish, placing them close together to allow for a pull-apart effect.
- Brush the tops of the rolls generously with the extra melted butter. If desired, sprinkle any remaining herb-garlic filling on top for added flavor.
- Cover the pan with a kitchen towel and let the rolls rise again for about 30 minutes, allowing them to puff up slightly.
- Preheat your oven to 350°F (175°C). Once preheated, bake the rolls for 25-30 minutes, or until they are golden brown on top and sound hollow when tapped.
- After baking, let the rolls cool slightly in the pan before gently pulling them apart to serve warm.