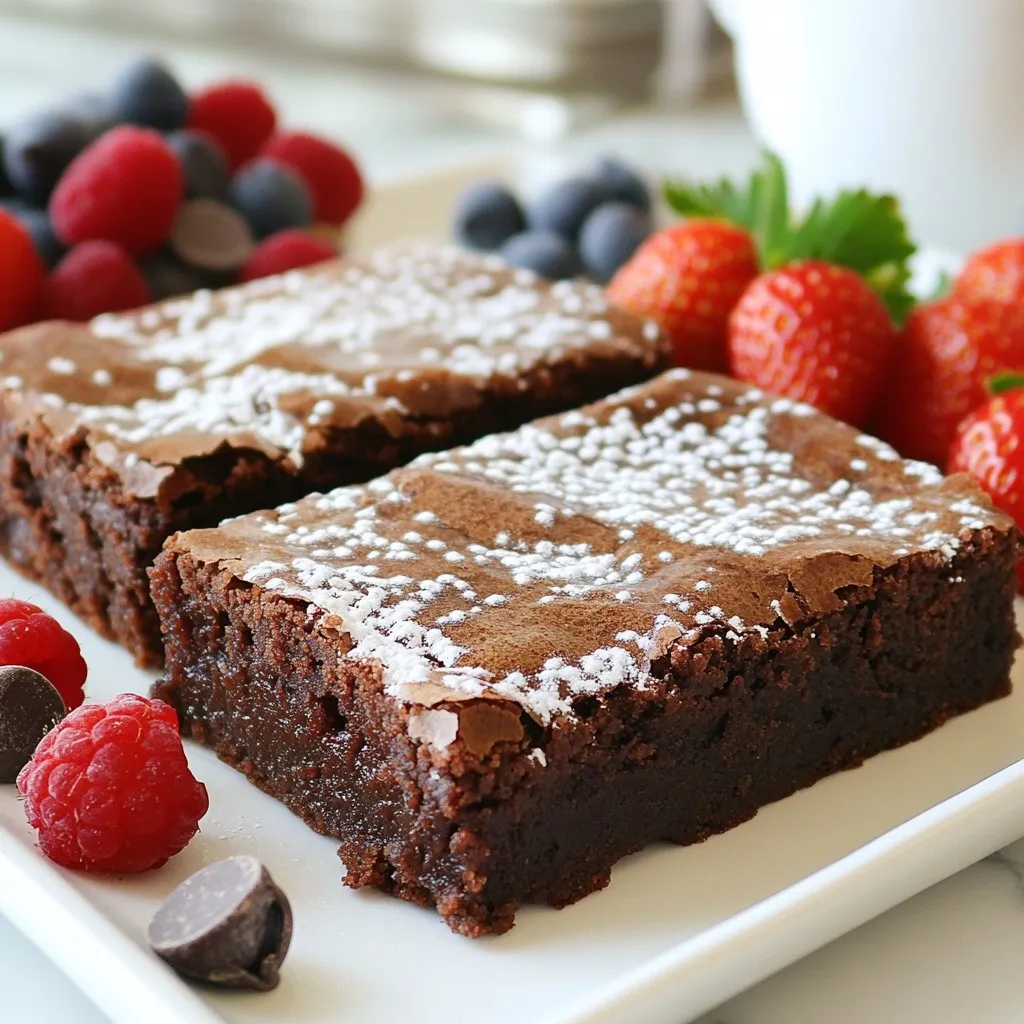
Mochi Brownies Delightful Chewy Treat Recipe


If you crave something unique and delicious, you’ll love mochi brownies! This chewy treat combines the rich taste of chocolate with the fun, stretchy texture of mochi. In this guide, I’ll share my favorite recipe, plus tips to make them perfect every time. Whether you’re a seasoned baker or a beginner, you can whip these up easily. Let’s explore how to create this delightful dessert together!
Why I Love This Recipe
- Unique Texture: The combination of glutinous rice flour creates a chewy, delightful texture that sets these brownies apart from traditional recipes.
- Quick and Easy: With only 15 minutes of prep time, you can whip up these delicious brownies without much hassle, making them perfect for any occasion.
- Chocolate Lovers’ Dream: Packed with cocoa powder and semi-sweet chocolate chips, these brownies deliver an intense chocolate flavor in every bite.
- Versatile Serving Options: They can be enjoyed on their own or dressed up with toppings like powdered sugar, fresh berries, or even a scoop of ice cream for a decadent dessert.
Ingredients
Detailed list of ingredients needed for Mochi Brownies
To make delicious mochi brownies, gather these ingredients:
– 1 cup glutinous rice flour (mochi flour)
– 1 cup granulated sugar
– 1/2 cup cocoa powder
– 1/2 teaspoon baking powder
– 1/4 teaspoon salt
– 1/2 cup milk (or your preferred dairy-free alternative)
– 1/4 cup vegetable oil
– 2 large eggs
– 1 teaspoon vanilla extract
– 1/2 cup semi-sweet chocolate chips
– Powdered sugar for dusting (optional)
Substitutions and dairy-free alternatives
You can easily swap some ingredients for dairy-free options. Use almond milk or oat milk instead of regular milk. For those who need gluten-free choices, look for gluten-free mochi flour. You can also use coconut oil in place of vegetable oil for added flavor. If you prefer a vegan option, substitute eggs with flaxseed meal mixed with water.
Importance of each ingredient
– Mochi flour creates the chewy texture. It helps the brownies stretch and adds a unique flavor.
– Cocoa powder gives the brownies a rich chocolate taste. It’s essential for that classic brownie flavor.
– Sugar adds sweetness and helps with browning during baking.
– Baking powder helps the brownies rise slightly, ensuring they don’t become too dense.
– Salt enhances flavor. It balances the sweetness and makes the chocolate pop.
– Milk adds moisture and richness. It keeps the brownies soft and tender.
– Vegetable oil keeps the brownies moist and adds a smooth texture.
– Eggs bind the ingredients together and help the brownies rise.
– Vanilla extract brings warmth and depth to the flavor.
– Chocolate chips add gooey chocolate bursts in every bite. They make the brownies even more delightful.
– Powdered sugar is optional but adds a nice touch for presentation.

Step-by-Step Instructions
Preparation of baking pan
First, preheat your oven to 350°F (175°C). Next, take an 8-inch square baking pan. Lightly grease it to help the brownies come out. Line the pan with parchment paper, letting some paper hang over the sides. This will help you lift the brownies out easily later.
Mixing dry and wet ingredients
In a large bowl, mix the dry ingredients. Add 1 cup of glutinous rice flour, 1 cup of granulated sugar, 1/2 cup of cocoa powder, 1/2 teaspoon of baking powder, and 1/4 teaspoon of salt. Whisk these together until there are no lumps.
In another bowl, whisk the wet ingredients. Combine 1/2 cup of milk, 1/4 cup of vegetable oil, 2 large eggs, and 1 teaspoon of vanilla extract. Mix until smooth. Slowly pour the wet ingredients into the dry mix. Stir gently until just combined. It’s okay if small lumps remain. Now fold in 1/2 cup of semi-sweet chocolate chips for a rich, chocolaty flavor.
Baking and testing for doneness
Pour the batter into your prepared pan. Use a spatula to spread it evenly. Place the pan in the oven and bake for 30-35 minutes. To check if they are done, insert a toothpick into the center. It should come out with a few moist crumbs. This shows they are chewy and not overbaked. Once done, let the brownies cool in the pan for about 10 minutes. Then, lift them out using the parchment paper and let them cool completely on a wire rack.
Tips & Tricks
How to achieve the perfect chewy texture
To get that perfect chewy texture in your mochi brownies, use glutinous rice flour. This flour gives them their unique chewiness. Make sure you don’t over-mix the batter. A few lumps are okay. Bake at 350°F for 30 to 35 minutes. Check with a toothpick; it should come out with moist crumbs. This tells you they are done.
Common mistakes to avoid when making mochi brownies
One common mistake is using regular rice flour instead of glutinous rice flour. This will not give you that chewy bite. Another mistake is over-mixing the batter. Mix just until combined. Lastly, don’t skip the cooling time after baking. Cutting them too soon can ruin their texture.
Enhancing flavors
You can enhance the flavor of your mochi brownies in simple ways. Add a teaspoon of espresso powder for a richer taste. A sprinkle of sea salt on top can elevate the sweetness. You can even swap in flavored extracts like almond or peppermint for fun twists.
Pro Tips
- Use Fresh Ingredients: Always use fresh eggs and high-quality cocoa powder to enhance the flavor of the brownies.
- Don’t Overmix: Mix the wet and dry ingredients until just combined to ensure a chewy texture; overmixing can lead to dense brownies.
- Cool Completely: Let the brownies cool completely before cutting to achieve clean, neat squares and prevent them from falling apart.
- Experiment with Add-ins: Feel free to add nuts, dried fruit, or different types of chocolate chips to personalize your brownies.
Variations
Adding nuts or other mix-ins
You can make your mochi brownies even better by adding nuts. Walnuts or pecans add a nice crunch. You can also try mixing in shredded coconut for a tropical feel. If you love chocolate, throw in some extra chocolate chips or even white chocolate chunks. These little changes make each bite exciting and unique.
Flavor variations (e.g., matcha, strawberry, or peanut butter)
Want to switch up the taste? Try using matcha powder for a fun green twist. Mix in one tablespoon of matcha with the dry ingredients. For a fruity flavor, add strawberry puree to the wet mix. You can also use peanut butter for a rich, nutty taste. Just swirl in a few tablespoons before baking for a delightful surprise.
Gluten-free options and adjustments
If you need gluten-free brownies, you’re in luck! The main ingredient, glutinous rice flour, is already gluten-free. Just make sure the other ingredients, like baking powder and chocolate chips, are also gluten-free. This means everyone can enjoy these yummy treats without worry. Feel free to share them with friends and family who are gluten-sensitive!
Storage Info
Best practices for storing mochi brownies
To keep your mochi brownies fresh, store them in an air-tight container. This helps maintain their chewy texture. Avoid stacking brownies on top of each other to prevent sticking. If you want to keep them longer, wrap them in plastic wrap before placing them in the container. For added flavor, place a slice of bread in the container. The bread keeps the brownies moist.
Duration for keeping brownies fresh
Mochi brownies stay fresh at room temperature for about three days. If you refrigerate them, they can last up to a week. However, the cold can harden the brownies. For the best taste, enjoy them at room temperature. Always check for any signs of spoilage, like dryness or off smells.
Freezing instructions and thawing tips
You can freeze mochi brownies for up to three months. Wrap each brownie in plastic wrap, then place them in a freezer bag. To thaw, simply take them out and leave them at room temperature for a few hours. For a quick fix, you can microwave them for 10-15 seconds. This helps restore some of their chewy goodness. Enjoy your treats anytime!
FAQs
Can I make mochi brownies ahead of time?
Yes, you can make mochi brownies in advance. Once baked, let them cool completely. Then, store them in an airtight container. They will stay fresh for about three days at room temperature. You can also refrigerate them for up to a week. Just remember to bring them back to room temperature before serving.
Where can I find pre-made mochi brownies?
You can find pre-made mochi brownies at some specialty bakeries or Asian markets. Look for stores that focus on Asian desserts or fusion treats. Many online shops also sell them. You can even find recipes online to try making them yourself at home.
What is the difference between mochi and regular brownies?
Mochi brownies are chewy and soft, thanks to glutinous rice flour. Regular brownies are denser and fudgier, made with all-purpose flour. The texture of mochi brownies is unique, offering a delightful chew. They also have a slightly different taste, adding a fun twist to a classic treat.
Can I use different types of flour?
You can try using other types of flour, but they will change the texture. All-purpose flour will give you a more traditional brownie. Almond flour or coconut flour can work too, but you may need to adjust the liquid. Stick with glutinous rice flour for that classic mochi chew.
Mochi brownies are unique and tasty. You now understand the key ingredients and their purpose. Following the steps ensures a rich, chewy texture. Remember to avoid common mistakes for the best outcome. You can also try different flavors or mix-ins to make them your own. Store them properly to keep them fresh for longer. With these tips, you’re all set to bake perfect mochi brownies. Enjoy every bit

Chewy Mochi Brownies
Ingredients
- 1 cup glutinous rice flour (mochi flour)
- 1 cup granulated sugar
- 0.5 cup cocoa powder
- 0.5 teaspoon baking powder
- 0.25 teaspoon salt
- 0.5 cup milk (or your preferred dairy-free alternative)
- 0.25 cup vegetable oil
- 2 large eggs
- 1 teaspoon vanilla extract
- 0.5 cup semi-sweet chocolate chips
- cup powdered sugar for dusting (optional)
Instructions
- Begin by preheating your oven to 350°F (175°C). Prepare an 8-inch square baking pan by greasing it lightly and lining it with parchment paper, allowing some paper to hang over the sides for easy lifting later.
- In a large mixing bowl, combine the glutinous rice flour, granulated sugar, cocoa powder, baking powder, and salt. Whisk these dry ingredients together until they are thoroughly mixed and no clumps remain.
- In a separate bowl, combine the wet ingredients: whisk together the milk, vegetable oil, eggs, and vanilla extract until the mixture is smooth and homogenous.
- Slowly pour the wet mixture into the bowl containing the dry ingredients. Stir gently, just until combined. It’s important to avoid over-mixing; it’s okay if there are a few small lumps remaining in the batter.
- Carefully fold in the semi-sweet chocolate chips, ensuring they are evenly distributed throughout the batter for delightful chocolaty bites in every piece.
- Transfer the batter into the prepared baking pan, using a spatula to spread it out evenly and smooth the top.
- Place the pan in the preheated oven and bake for 30-35 minutes. Check for doneness by inserting a toothpick into the center; it should come out with a few moist crumbs, indicating the brownies are perfectly chewy.
- Once baked, take the brownies out of the oven and let them cool in the pan for about 10 minutes. Afterward, use the parchment overhang to lift the brownies out before transferring them to a wire rack to cool completely.
- When the brownies have cooled, feel free to dust them lightly with powdered sugar for a sweet finish. Cut them into squares and serve.


![Peanut Butter Oatmeal Energy Balls need simple, wholesome ingredients. Here’s what you need: - 1 cup rolled oats - 1/2 cup peanut butter (smooth or chunky) - 1/3 cup honey or maple syrup - 1/4 cup chocolate chips (dark or semi-sweet) - 1/4 cup ground flaxseed (optional) - 1/2 teaspoon vanilla extract - A pinch of sea salt - 1/3 cup shredded coconut (optional) These ingredients work together to make a tasty snack. Each ingredient brings unique benefits: - Rolled oats: These provide fiber, which helps keep you full. - Peanut butter: This is rich in protein and healthy fats. It fuels your body. - Honey or maple syrup: Both sweeteners offer quick energy. They add natural sweetness. - Chocolate chips: These give a touch of sweetness and can lift your mood. - Ground flaxseed: This adds omega-3 fatty acids, good for heart health. - Vanilla extract: This enhances flavor and aroma, making it more enjoyable. - Sea salt: Just a pinch balances flavors and can boost hydration. - Shredded coconut: This adds a tropical flair and healthy fats. Together, these ingredients create a balanced snack. You can adapt this recipe based on your taste or needs. Here are some ideas: - Nut butter: Swap peanut butter for almond, cashew, or sunflower seed butter. - Sweeteners: Use agave syrup or brown rice syrup instead of honey. - Chocolate chips: Try dried fruit, like raisins or cranberries, for a fruity twist. - Flaxseed: Chia seeds work well as an alternative for added nutrition. - Coconut: Omit shredded coconut if you prefer a different texture or taste. These substitutions keep the energy balls delicious while fitting your diet. For the full recipe, check out the Peanut Butter Oatmeal Energy Balls 🥜 section. To start, gather your ingredients. You will need rolled oats, peanut butter, honey, and more. In a large bowl, combine 1 cup rolled oats, 1/4 cup ground flaxseed (if you choose), and a pinch of sea salt. Mix these dry items well. This step sets a strong base for flavor and texture. Next, melt the peanut butter and honey together. Put 1/2 cup peanut butter and 1/3 cup honey in a microwave-safe bowl. Heat for 20-30 seconds. After melting, pour it into the dry mix. Add 1/2 teaspoon vanilla extract and 1/4 cup chocolate chips. If you want, you can add 1/3 cup shredded coconut too. Use your hands or a spatula to mix everything. The mix should feel sticky but blend well together. Now, take small amounts of the mix and roll them into balls. Aim for about a tablespoon in size. Put each ball on a lined baking sheet, leaving space between them. This helps them not stick together. Finally, place the baking sheet in the fridge. Let the energy balls chill for at least 30 minutes. This will help them firm up nicely. Once they are set, store them in an airtight container or a ziplock bag. Enjoy as you need! For more details, check the Full Recipe. To achieve the best texture, mix your dry and wet ingredients well. Each energy ball should feel sticky but not too wet. If the mix is too dry, add a splash of water or more honey. If it's too wet, add a bit more oats. This balance ensures they hold together well. Store your energy balls in an airtight container. They will stay fresh in the fridge for about one week. For longer storage, freeze them in a ziplock bag. This way, you can grab a quick snack anytime. Just let them thaw for a few minutes before eating. Make your energy balls look great! Drizzle melted chocolate over the tops for a sweet touch. You can also roll them in shredded coconut for added flair. Serve them on a pretty plate to impress friends or family. These simple ideas make your snack both tasty and fun! For the complete recipe, check out the full recipe. {{image_4}} You can change the flavor of your energy balls easily. Try adding cinnamon for warmth. You can use almond butter instead of peanut butter for a nutty twist. How about a touch of cocoa powder? It adds rich chocolate flavor. You could also mix in dried fruits like cranberries or apricots for sweetness and chewiness. Each change gives a new taste to your snack! If you follow a vegan diet, swap honey for maple syrup. This keeps it plant-based and delicious. For a gluten-free version, ensure your oats are certified gluten-free. This way, everyone can enjoy these energy balls! You can also make them nut-free by using sunflower seed butter instead. This way, kids at school can enjoy them too! You can boost the nutrition of your energy balls with some easy add-ins. Consider mixing in chia seeds or hemp seeds for extra fiber and protein. You can also add protein powder for a post-workout snack. Ground flaxseed is a great addition too; it’s already in the recipe. It gives healthy fats and helps keep you full. These small changes can make a big difference in nutrition! For the full recipe, check out the details above. To keep your Peanut Butter Oatmeal Energy Balls fresh, store them in an airtight container. You can use a glass jar or a ziplock bag. Make sure to separate layers with parchment paper to avoid sticking. Keeping them cool helps maintain taste and texture. If you want to enjoy these energy balls later, freezing is a great option. Simply place the energy balls in a single layer on a baking sheet. Freeze them for about an hour until solid. Then transfer them to a ziplock bag. Remove as much air as possible to prevent freezer burn. In the fridge, these energy balls stay fresh for up to one week. If you freeze them, they can last up to three months. Always label your containers with the date. This way, you will know when you made them and use them at their best. Enjoy these snacks anytime! For the full recipe, check the [Full Recipe]. Peanut Butter Oatmeal Energy Balls stay fresh for about one week in the fridge. Store them in an airtight container. For longer storage, you can freeze them. They can last for up to three months in the freezer. Just thaw before eating! Yes, you can make these energy balls vegan. Use maple syrup instead of honey. Choose natural peanut butter that contains only peanuts. This way, your energy balls will be fully plant-based and just as tasty! If you need a substitute for peanut butter, try almond butter or sunflower seed butter. These options work well and add different flavors. They also provide similar nutrition, keeping your energy balls healthy. I recommend enjoying two to three energy balls as a snack. They are filling, thanks to the oats and nut butter. Listen to your body and adjust based on your hunger! You can definitely customize the ingredients! Add nuts, seeds, or dried fruit for extra flavor and nutrition. You can also change the sweetener to fit your taste. Get creative and make these energy balls your own! For the full recipe, check out the details above. In this article, I covered the key parts of making Peanut Butter Oatmeal Energy Balls. We looked at the important ingredients and their benefits. I shared step-by-step instructions for perfecting your mix. Tips helped you with storage and presentation. I also offered great variations and answers to common questions. Now, you have the tools to make tasty snacks at home. Enjoy making and sharing your energy balls!](https://blissfulmeal.com/wp-content/uploads/2025/06/20e3613d-61be-4491-a909-a9822bfd6b71-768x768.webp)