
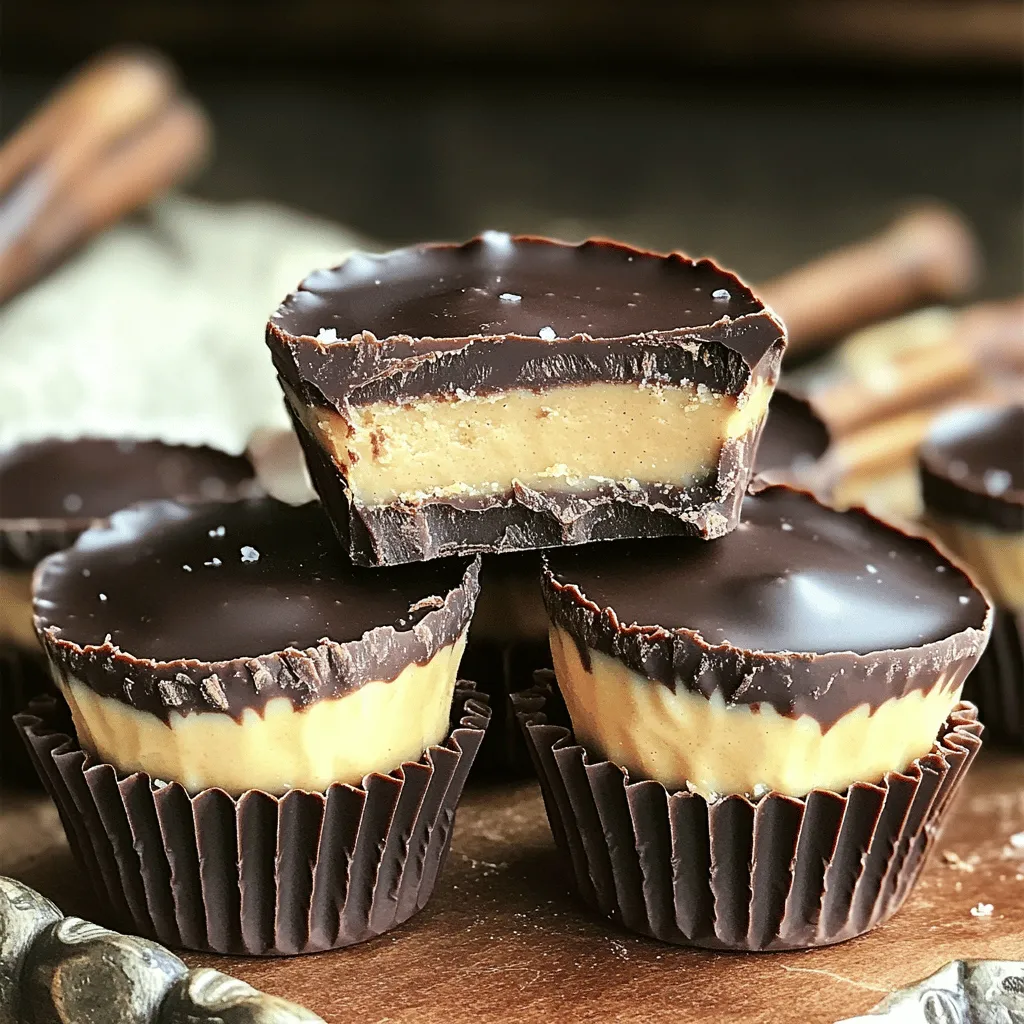
Peanut Butter Chocolate Fudge Cups Irresistible Treat

If you love peanut butter and chocolate, you’re in for a treat! These Peanut Butter Chocolate Fudge Cups combine rich flavors in a delightful way. They’re easy to make and perfect for any sweet tooth. In this post, I’ll guide you through simple steps, tips, and tasty variations. So grab your ingredients and let’s create a luscious dessert that will wow your friends and family. You won’t want to miss this!
Ingredients
The right ingredients make or break a recipe. Here’s what you need for these peanut butter chocolate fudge cups:
– 1 cup natural peanut butter (choose creamy for smoothness or crunchy for texture)
– 1 cup dark chocolate chips (70% cacao for a rich flavor)
– 1/4 cup pure maple syrup (for natural sweetness)
– 1/2 teaspoon pure vanilla extract (to enhance flavor)
– 1/4 teaspoon fine sea salt (to elevate taste)
– 10 to 12 mini cupcake liners (for easy serving)
Choosing quality ingredients is key. Natural peanut butter gives a great taste. Dark chocolate chips add depth and richness. Pure maple syrup offers a sweet touch without extra additives. The vanilla extract enhances flavor, while sea salt brings everything together. Don’t forget the mini cupcake liners; they make serving a breeze!
Step-by-Step Instructions
Preparing the Cupcake Liners
Start by placing mini cupcake liners in a muffin tin. This holds your fudge cups while they chill. Make sure to space them evenly. This makes it easy to serve later.
Melting the Chocolate
In a heat-safe bowl, mix dark chocolate chips with 2 tablespoons of peanut butter. Heat in a microwave for 30 seconds. Stir well after each interval. Stop when the chocolate is smooth and melted. Watch it closely to avoid burning.
Layering the Chocolate
Use a spoon to add a small amount of melted chocolate to each cupcake liner. Fill them about one-third full. Gently tap the muffin tin on the counter. This helps level the chocolate for a neat look.
Chilling the Base
Place the muffin tin in the freezer for about 10 minutes. This lets the chocolate layer harden completely. Check to ensure it is firm before moving on.
Creating the Peanut Butter Mixture
In a separate bowl, mix the remaining peanut butter with maple syrup, vanilla extract, and sea salt. Stir until it’s completely smooth. This mixture is key for the next layer.
Adding the Peanut Butter Layer
After the chocolate layer is set, take the muffin tin from the freezer. Spoon the peanut butter mixture into each cup. Fill them almost to the rim for a rich treat.
Topping with Chocolate
If needed, reheat the leftover melted chocolate until it’s smooth. Drizzle it over the peanut butter layer in each cup. Fill them to the top for that perfect finish.
Final Chilling
Return the muffin tin to the freezer for 15-20 minutes. This step ensures the fudge cups are fully set. They should feel solid when done.
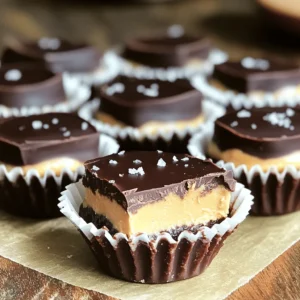
Serving the Fudge Cups
When ready to serve, gently pop the fudge cups out of the tin. Peel away the cupcake liners. Arrange them on a platter for an impressive display. Enjoy your delicious homemade treats!
Tips & Tricks
Choosing the Right Peanut Butter
Pick natural peanut butter for the best flavor. Creamy peanut butter gives a smooth texture. Crunchy peanut butter adds fun bits. Choose what you like best!
Avoiding Chocolate Overheating
Melt chocolate slowly. Use short bursts in the microwave. Stir well between each round. If overheated, chocolate can become grainy. Take your time to keep it smooth.
Ensuring Smooth Peanut Butter Mixture
Combine peanut butter, maple syrup, vanilla, and salt in a bowl. Mix until smooth. This step is key for a creamy filling. No lumps should be present for the best taste.
Perfecting the Layering Process
Fill the cupcake liners carefully. Start with melted chocolate, then add peanut butter. Level each layer gently. Tapping the tin helps even it out. This ensures each bite is balanced.
Variations
Adding Nuts or Seeds
Want to add some crunch? You can mix in chopped nuts or seeds. Try walnuts, almonds, or sunflower seeds. They add texture and flavor. Just fold them into the peanut butter mixture before you layer it in the cups. This small change can make a big difference.
Swapping Flavors (e.g., Almond Butter)
Feel like mixing it up? You can swap peanut butter for almond butter or cashew butter. Each nut butter gives a unique taste. Almond butter adds a hint of sweetness, while cashew butter is creamy and mild. This swap keeps the recipe fun and fresh.
Using Different Chocolate Types
Chocolate lovers can experiment with different types. Use milk chocolate for a sweeter treat. If you like dark chocolate, try 85% cacao for a richer flavor. You can also use white chocolate for a fun twist. Each type brings its own charm to the fudge cups.
Vegan/GF Alternatives
If you’re looking for vegan or gluten-free options, it’s easy! Use a vegan chocolate brand and maple syrup for sweetness. Make sure your peanut butter is pure and gluten-free. These small changes allow everyone to enjoy these tasty treats without worry.
Storage Info
How to Store Peanut Butter Chocolate Fudge Cups
To keep your fudge cups fresh, store them in an airtight container. This will prevent them from drying out and losing their rich taste. Make sure they cool completely before sealing them.
Best Container Types
Use a glass or plastic container with a tight lid. A container that is not too big is best. This will help keep the fudge cups from shifting around. You can also use parchment paper between layers to avoid sticking.
Shelf Life and Freezing Tips
These fudge cups last for about one week in the fridge. If you want to keep them longer, you can freeze them. They stay good for up to three months in the freezer. Wrap each fudge cup in plastic wrap before freezing. This will keep them fresh and tasty. When you want to enjoy them, just take them out and let them thaw in the fridge.
FAQs
Can I make these fudge cups ahead of time?
Yes, you can make these fudge cups ahead of time. They store well in the fridge for up to a week. You can also freeze them for longer storage. Just make sure to wrap them tightly in plastic wrap or place them in an airtight container. When you’re ready to enjoy them, thaw in the fridge for a few hours.
What is the best way to melt chocolate?
The best way to melt chocolate is in the microwave. Use a heat-safe bowl and microwave the chocolate chips in short bursts. Heat for 30 seconds, stir, and repeat until smooth. This method helps keep the chocolate from burning. Stirring often ensures even melting and nice texture.
Can I substitute maple syrup with another sweetener?
Yes, you can substitute maple syrup with honey or agave syrup. Both options will keep your fudge cups sweet. If you prefer a low-calorie option, try a sugar-free syrup. Just remember that different sweeteners may alter the taste and texture slightly.
How can I make these fudge cups healthier?
To make these fudge cups healthier, use natural sweeteners like honey or stevia. You can also use dark chocolate with higher cacao content for less sugar. For a nut-free option, you can swap peanut butter with sunflower seed butter. Adding nuts or seeds can boost nutrition too!
This post covered how to make delicious Peanut Butter Chocolate Fudge Cups. We discussed the ingredients, step-by-step instructions, and tips to perfect your creation. You can also experiment with variations and learn how to store them well. Remember, choosing quality ingredients matters. Making these treats is fun and easy. Enjoy sharing them with friends and family, or savor them on your own! Dive into your kitchen and start creating!

![To make these tasty peach cobbler pancakes, you need some simple ingredients. Here’s what you'll need: - 1 cup all-purpose flour - 1 tablespoon baking powder - 1 tablespoon granulated sugar - 1/2 teaspoon fine sea salt - 1 cup buttermilk (room temperature) - 1 large egg (lightly beaten) - 1 tablespoon pure vanilla extract - 2 tablespoons unsalted butter (melted) - 1 cup fresh peaches (peeled and diced into small pieces) - 1 teaspoon ground cinnamon - 1/4 cup brown sugar (for sprinkling) - Whipped cream (for serving) These ingredients create a delicious mix of flavors. The fresh peaches bring sweetness. The cinnamon adds warmth. Together, they make breakfast feel special. You can find the full recipe at the end, which guides you through each step in detail. Start by gathering your dry ingredients. In a large bowl, sift together: - 1 cup all-purpose flour - 1 tablespoon baking powder - 1 tablespoon granulated sugar - 1/2 teaspoon fine sea salt Sifting helps mix the ingredients well and removes lumps. It also ensures your pancakes are light and fluffy. Now let's mix the wet ingredients. In a separate bowl, beat together: - 1 cup buttermilk (room temperature) - 1 large egg (lightly beaten) - 1 tablespoon pure vanilla extract - 2 tablespoons unsalted butter (melted) Mix them until smooth. The buttermilk adds a nice tang and helps the pancakes rise. Next, pour the wet mixture into the dry ingredients. Gently stir using a spatula or whisk. It's okay if the batter is slightly lumpy; this will make your pancakes fluffy. Then fold in: - 1 cup fresh peaches (peeled and diced) - 1 teaspoon ground cinnamon The peaches and cinnamon will bring out the warm, sweet flavors. Preheat a non-stick skillet or griddle over medium heat. Lightly grease it with a bit of butter. For each pancake, pour about 1/4 cup of batter onto the skillet. Cook for 2-3 minutes. Wait for bubbles to form on top. Then, flip them and cook for another 1-2 minutes until golden brown. As soon as you flip the pancakes, sprinkle a thin layer of brown sugar on top. This will caramelize and add a delightful finish. Serve the pancakes warm. Top them generously with whipped cream. You can add extra peach slices for a fresh touch. A light dusting of ground cinnamon is a great final touch. Stack the pancakes on a plate and enjoy the delicious flavors of peach cobbler in every bite! For the full recipe, check out the [Full Recipe]. To get the best pancake texture, mix your ingredients carefully. Overmixing makes pancakes tough. You want lumps in your batter. This keeps them fluffy and light. Use a spatula to fold in the peaches gently. This helps maintain that perfect texture. Select ripe, juicy peaches for the best flavor. Look for peaches that yield slightly when you press them. Avoid hard or overly soft ones. Fresh peaches enhance the taste and add sweetness. If you can't find ripe peaches, consider using canned peaches in juice. Just drain them well before adding to the batter. Presentation matters when serving Peach Cobbler Pancakes. Stack pancakes high on a round plate. Top with a generous dollop of whipped cream. Arrange extra peach slices around the base. Dust with cinnamon for a nice touch. A sprinkle of brown sugar adds sparkle and flavor. These small steps make your dish look restaurant-quality. Try these tips for a delightful breakfast that impresses! For the full recipe, check out the details above. {{image_4}} You can customize your peach cobbler pancakes with fun add-ins. Try adding chopped nuts like pecans or walnuts for a crunchy bite. Dark chocolate chips create a sweet twist. You can mix in spices too, like nutmeg or ginger, to enhance the flavor. A dash of almond extract can give it a unique taste. Experiment with these options to find your favorite. If peaches are not your favorite, many fruits work well in these pancakes. Fresh blueberries add a burst of flavor and color. Ripe bananas bring sweetness and softness. You could also use diced apples, which pair well with cinnamon. For a tropical twist, try crushed pineapple. Each fruit adds its own charm to the pancakes. To make these pancakes gluten-free, use a gluten-free flour blend. This swap keeps the texture light and fluffy. For a vegan version, replace buttermilk with almond milk mixed with vinegar. Use a flax egg instead of a regular egg: mix one tablespoon of ground flaxseed with three tablespoons of water. These options let everyone enjoy this tasty treat. For the full recipe, check out the instructions above. If you have leftover pancakes, store them in an airtight container. They stay fresh in the fridge for about 3 days. Make sure they cool completely before you seal them. This prevents moisture buildup, which can make them soggy. To reheat pancakes, use a skillet over low heat for the best results. Just place the pancakes in the skillet for about 1-2 minutes on each side. This warms them up nicely. You can also use a microwave. Heat them for about 20-30 seconds. But, they might not be as fluffy when reheated this way. You can freeze pancakes for a quick breakfast. Stack the cooled pancakes with parchment paper between each one. Then, place them in a freezer-safe bag. They can last up to 2 months in the freezer. When you want to eat them, just reheat directly from the freezer. Enjoy this tasty treat any day! For the full recipe, check out the details above. Yes, you can use frozen peaches. Just thaw them first. Drain excess juice to avoid soggy pancakes. Frozen peaches may cook faster, so watch them closely. For fluffier pancakes, avoid overmixing the batter. Mixing too much can make pancakes tough. Another tip is to let the batter rest for about 5 minutes before cooking. This helps the baking powder work better. You can top your pancakes with various items. Try vanilla ice cream for a sweet treat. Fresh berries or chopped nuts also add great flavor. A drizzle of maple syrup can enhance the taste. Each serving has about 250 calories. This includes 8 grams of fat and 4 grams of protein. The pancakes also have around 30 grams of carbs. Adjust toppings for different nutritional values. To make buttermilk, use regular milk. Add 1 tablespoon of vinegar or lemon juice to 1 cup of milk. Let it sit for about 5 to 10 minutes. It will thicken and curdle slightly, creating a perfect substitute for buttermilk. Making Peach Cobbler Pancakes is easy and fun. We covered all the main steps: gathering ingredients, mixing dry and wet, cooking, and serving. I shared tips to make them soft and tasty. Try out different fruits or toppings for more flavor. Store extras in the fridge or freezer for a quick treat. Enjoy these pancakes warm with whipped cream. They are a delicious way to start your day!](https://blissfulmeal.com/wp-content/uploads/2025/06/b77e1913-60af-4680-bcc8-8ad0f2778214-768x768.webp)