Salted Caramel Apple Pies Delicious Dessert Delight

- 2 large apples (such as Granny Smith or Honeycrisp), peeled and thinly sliced - 1 cup packed brown sugar - 1/2 cup unsalted butter - 1/4 cup heavy cream - 1 teaspoon sea salt (plus additional for garnish) - 1 teaspoon pure vanilla extract - 1 teaspoon ground cinnamon - 1 prepared pie crust (store-bought or homemade) - 1 tablespoon fresh lemon juice - 1 egg (for egg wash) - Whipped cream for serving When picking apples, look for firm ones. Firmness shows freshness. Choose apples that are free from bruises. The skin should be smooth and shiny. A good apple has a sweet smell, hinting at its flavor. For pies, Granny Smith adds tartness, while Honeycrisp brings sweetness. Mixing these types boosts flavor and texture. Always buy locally when possible for the best taste. {{ingredient_image_2}} Start by preheating your oven to 350°F (175°C). Grab your prepared pie crust. Gently place it in a pie dish. Make sure to press it along the edges. This will help the crust hold its shape. Set it aside while you get ready for the apples. Next, take two large apples, like Granny Smith or Honeycrisp. Peel and slice them thinly. In a big bowl, mix the apple slices with lemon juice, brown sugar, and ground cinnamon. Toss it all together until the apples are well coated. Let this sit for about 15 minutes. This will make the flavors pop! Now, let’s make the salted caramel. In a medium saucepan, melt unsalted butter over medium heat. Once the butter is melted, add the packed brown sugar. Stir it well and cook for 3 to 5 minutes until it bubbles. Carefully mix in the heavy cream while whisking. Keep whisking until it all blends smoothly. Add sea salt and vanilla extract, then take it off the heat. Let it cool a bit. Take that warm caramel and pour it over the apple mixture. Make sure all the apple slices get coated in that tasty caramel. Gently toss the apples to mix everything well. This step adds a rich flavor that you’ll love. Pour the caramel apple filling into the pie crust. Spread it out evenly. If you have leftover caramel, drizzle it on top for an extra treat. Now, you can add a top crust. Roll out another pie crust, if you want, and cut out fun shapes or create a lattice design. If you cover it fully, make slits for steam to escape. In a small bowl, beat one egg until blended. Use this egg wash to brush over the crust. This gives your pie a shiny look. For a nice touch, sprinkle a bit of sea salt on top. Place the pie in the preheated oven and bake for 40-45 minutes. The crust should be golden and the filling bubbly. If the edges brown too fast, cover them with foil. After baking, let the pie cool for at least 30 minutes. This helps the filling set. Once it’s cool, slice the pie and serve it warm. For a special touch, add whipped cream on each slice. Enjoy every bite of this delicious dessert! A flaky pie crust makes your pie shine. Use cold butter for best results. Here are some tips: - Chill your ingredients: Keep butter and water cold. This helps create layers. - Don’t overwork the dough: Mix just until combined. This keeps it tender. - Roll evenly: Aim for a uniform thickness. This ensures even baking. A soggy bottom can ruin your pie. Here’s how to prevent it: - Pre-bake your crust: Bake the crust for 10 minutes before adding filling. This helps it set. - Use a thick filling: The caramel should not be too runny. This keeps the crust crisp. - Add a layer of flour: Sprinkle flour on the crust before adding apples. This absorbs excess moisture. Having the right tools makes baking easier. Here are the must-haves: - Pie dish: Use a glass or metal dish for even baking. - Rolling pin: A sturdy rolling pin helps shape the dough. - Pastry brush: This is great for applying egg wash on the crust. - Sharp knife: Use a sharp knife or pastry cutter for clean edges. These tips will help you create a delicious salted caramel apple pie every time! Pro Tips Choose the Right Apples: For the best flavor and texture, opt for a mix of tart and sweet apples like Granny Smith and Honeycrisp. This balance enhances the overall taste of your pie. Let the Caramel Cool: Allow the salted caramel to cool slightly before mixing it with the apples. This prevents the apples from becoming too soft and helps maintain their crispness. Prevent a Soggy Bottom: To ensure a crispy crust, consider pre-baking the pie crust for 10 minutes before adding the filling. This helps to create a barrier against moisture. Garnish for Presentation: After baking, sprinkle an extra pinch of sea salt on top of the pie before serving. This adds a touch of elegance and enhances the salted caramel flavor. {{image_4}} Mini salted caramel apple pies are a fun twist on the classic recipe. These little pies are perfect for parties or gatherings. To make them, use a muffin tin instead of a pie dish. Cut your pie crust into small circles. Press each circle into the muffin cups. Fill them with the caramel apple mixture, then cover with another circle of crust. Bake until golden. These mini pies are cute and easy to serve! If you need a gluten-free option, you can use a gluten-free pie crust. Several brands sell ready-made gluten-free crusts. You can also make your own using gluten-free flour. Follow the same steps for the filling and caramel. The taste will be just as good! Guests won’t even know they are gluten-free. For a vegan version, replace the butter and heavy cream. Use coconut oil for the butter. You can swap the heavy cream for coconut cream or almond milk. Make sure your pie crust is vegan, too. There are many store-bought options available. The result will still be a delicious salted caramel apple pie. Everyone will love this dairy-free treat! To store leftover salted caramel apple pies, cover them tightly with plastic wrap. You can also use aluminum foil. This keeps the pie fresh and prevents it from drying out. Place the covered pie in the fridge. It will stay good for up to three days. If you want to keep it longer, freezing works well. To freeze your pie, let it cool completely. Wrap it in plastic wrap, then in aluminum foil. This double wrapping helps protect it from freezer burn. You can freeze the pie for up to three months. When you’re ready to eat it, move the pie to the fridge overnight to thaw. To reheat your salted caramel apple pie, preheat your oven to 350°F. Place the pie on a baking sheet to catch any drips. Heat it for about 15-20 minutes, until warm. If you want a crispy crust, consider baking it without cover. You can also microwave individual slices for a quick treat, but the crust may not stay crisp. Enjoy! Yes, you can use different apples! Granny Smith apples are tart and crisp. Honeycrisp apples add sweetness and crunch. Other good choices include Fuji, Gala, or Braeburn apples. Each type gives the pie its own unique taste and texture. Experiment with your favorites for a fun twist! Salted caramel sauce lasts about two weeks in the fridge. Store it in an airtight jar. The sauce may thicken as it cools. Just warm it up in the microwave or on the stove before using it again. This way, you can enjoy that sweet and salty goodness anytime! Absolutely! You can prepare the pie crust a day in advance. Wrap it tightly in plastic wrap and store it in the fridge. This saves time on baking day. Plus, a chilled crust rolls out easier. It helps you create a perfect pie! Salted caramel apple pies shine on their own but pair well with whipped cream. A scoop of vanilla ice cream is a classic choice. You can also add a sprinkle of sea salt on top for extra flavor. Friends and family will love these delicious options! In this post, we explored how to make a salted caramel apple pie. We covered essential ingredients and tips for selecting fresh apples. You learned step-by-step instructions for baking the pie, plus handy tips and tricks for the best crust. Variations like mini or gluten-free pies were also shared. Finally, we discussed storage and answered common questions. Now you can enjoy this delicious treat, impressing your friends and family. Happy baking!

WANT TO SAVE THIS RECIPE?

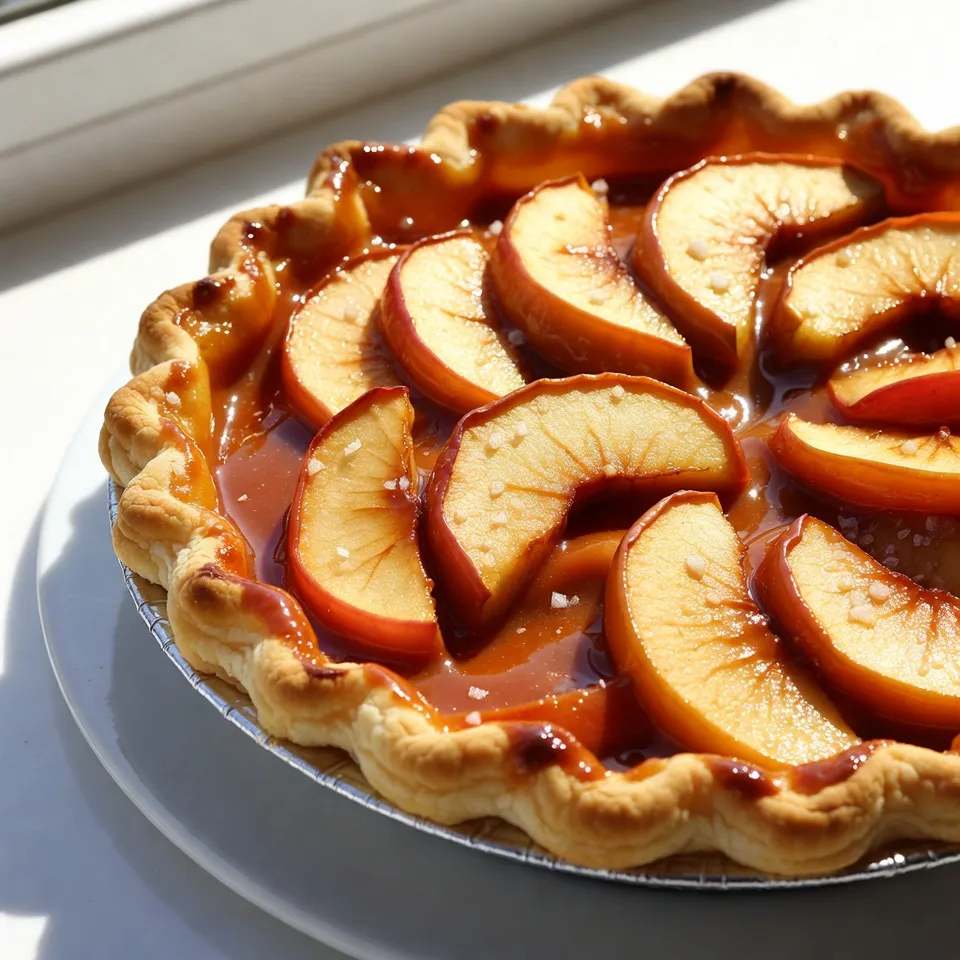
Get ready to treat your taste buds with my Salted Caramel Apple Pies! These pies combine sweet apples with rich caramel, creating a dessert that’s hard to resist. In this post, I’ll guide you through easy steps and share helpful tips to make your pies shine. From selecting the freshest apples to serving suggestions, you’ll have everything you need to impress your friends and family. Let’s dive in!

Why I Love This Recipe

  1. Delicious Flavor Combination: The sweet and tart apples paired with rich salted caramel create an irresistible flavor that delights the taste buds.
  2. Perfect for Any Occasion: This pie is a crowd-pleaser, making it ideal for holidays, gatherings, or a cozy night in.
  3. Simple to Make: With easy-to-follow steps, even novice bakers can create this stunning dessert with confidence.
  4. Customizable Options: Feel free to experiment with different apple varieties or add spices to make it uniquely yours!

Ingredients

List of Ingredients

– 2 large apples (such as Granny Smith or Honeycrisp), peeled and thinly sliced

– 1 cup packed brown sugar

– 1/2 cup unsalted butter

– 1/4 cup heavy cream

– 1 teaspoon sea salt (plus additional for garnish)

– 1 teaspoon pure vanilla extract

– 1 teaspoon ground cinnamon

– 1 prepared pie crust (store-bought or homemade)

– 1 tablespoon fresh lemon juice

– 1 egg (for egg wash)

Optional Ingredients

– Whipped cream for serving

Tips for Selecting Fresh Apples

When picking apples, look for firm ones. Firmness shows freshness. Choose apples that are free from bruises. The skin should be smooth and shiny. A good apple has a sweet smell, hinting at its flavor. For pies, Granny Smith adds tartness, while Honeycrisp brings sweetness. Mixing these types boosts flavor and texture. Always buy locally when possible for the best taste.

Step-by-Step Instructions

Preheat the Oven and Prepare the Pie Crust

Start by preheating your oven to 350°F (175°C). Grab your prepared pie crust. Gently place it in a pie dish. Make sure to press it along the edges. This will help the crust hold its shape. Set it aside while you get ready for the apples.

Marinate and Prepare the Apples

Next, take two large apples, like Granny Smith or Honeycrisp. Peel and slice them thinly. In a big bowl, mix the apple slices with lemon juice, brown sugar, and ground cinnamon. Toss it all together until the apples are well coated. Let this sit for about 15 minutes. This will make the flavors pop!

Make the Salted Caramel Sauce

Now, let’s make the salted caramel. In a medium saucepan, melt unsalted butter over medium heat. Once the butter is melted, add the packed brown sugar. Stir it well and cook for 3 to 5 minutes until it bubbles. Carefully mix in the heavy cream while whisking. Keep whisking until it all blends smoothly. Add sea salt and vanilla extract, then take it off the heat. Let it cool a bit.

Combine Caramel with Apples

Take that warm caramel and pour it over the apple mixture. Make sure all the apple slices get coated in that tasty caramel. Gently toss the apples to mix everything well. This step adds a rich flavor that you’ll love.

Fill the Pie and Prepare the Top Crust

Pour the caramel apple filling into the pie crust. Spread it out evenly. If you have leftover caramel, drizzle it on top for an extra treat. Now, you can add a top crust. Roll out another pie crust, if you want, and cut out fun shapes or create a lattice design. If you cover it fully, make slits for steam to escape.

Egg Wash and Baking Instructions

In a small bowl, beat one egg until blended. Use this egg wash to brush over the crust. This gives your pie a shiny look. For a nice touch, sprinkle a bit of sea salt on top. Place the pie in the preheated oven and bake for 40-45 minutes. The crust should be golden and the filling bubbly. If the edges brown too fast, cover them with foil.

Cooling and Serving Suggestions

After baking, let the pie cool for at least 30 minutes. This helps the filling set. Once it’s cool, slice the pie and serve it warm. For a special touch, add whipped cream on each slice. Enjoy every bite of this delicious dessert!

Tips & Tricks

Tips for Perfecting Your Pie Crust

A flaky pie crust makes your pie shine. Use cold butter for best results. Here are some tips:

Chill your ingredients: Keep butter and water cold. This helps create layers.

Don’t overwork the dough: Mix just until combined. This keeps it tender.

Roll evenly: Aim for a uniform thickness. This ensures even baking.

How to Avoid a Soggy Bottom

A soggy bottom can ruin your pie. Here’s how to prevent it:

Pre-bake your crust: Bake the crust for 10 minutes before adding filling. This helps it set.

Use a thick filling: The caramel should not be too runny. This keeps the crust crisp.

Add a layer of flour: Sprinkle flour on the crust before adding apples. This absorbs excess moisture.

Essential Baking Equipment

Having the right tools makes baking easier. Here are the must-haves:

Pie dish: Use a glass or metal dish for even baking.

Rolling pin: A sturdy rolling pin helps shape the dough.

Pastry brush: This is great for applying egg wash on the crust.

Sharp knife: Use a sharp knife or pastry cutter for clean edges.

These tips will help you create a delicious salted caramel apple pie every time!

Pro Tips

  1. Choose the Right Apples: For the best flavor and texture, opt for a mix of tart and sweet apples like Granny Smith and Honeycrisp. This balance enhances the overall taste of your pie.
  2. Let the Caramel Cool: Allow the salted caramel to cool slightly before mixing it with the apples. This prevents the apples from becoming too soft and helps maintain their crispness.
  3. Prevent a Soggy Bottom: To ensure a crispy crust, consider pre-baking the pie crust for 10 minutes before adding the filling. This helps to create a barrier against moisture.
  4. Garnish for Presentation: After baking, sprinkle an extra pinch of sea salt on top of the pie before serving. This adds a touch of elegance and enhances the salted caramel flavor.

Variations

Mini Salted Caramel Apple Pies

Mini salted caramel apple pies are a fun twist on the classic recipe. These little pies are perfect for parties or gatherings. To make them, use a muffin tin instead of a pie dish. Cut your pie crust into small circles. Press each circle into the muffin cups. Fill them with the caramel apple mixture, then cover with another circle of crust. Bake until golden. These mini pies are cute and easy to serve!

Gluten-Free Salted Caramel Apple Pies

If you need a gluten-free option, you can use a gluten-free pie crust. Several brands sell ready-made gluten-free crusts. You can also make your own using gluten-free flour. Follow the same steps for the filling and caramel. The taste will be just as good! Guests won’t even know they are gluten-free.

Vegan Options

For a vegan version, replace the butter and heavy cream. Use coconut oil for the butter. You can swap the heavy cream for coconut cream or almond milk. Make sure your pie crust is vegan, too. There are many store-bought options available. The result will still be a delicious salted caramel apple pie. Everyone will love this dairy-free treat!

Storage Info

How to Store Leftover Pies

To store leftover salted caramel apple pies, cover them tightly with plastic wrap. You can also use aluminum foil. This keeps the pie fresh and prevents it from drying out. Place the covered pie in the fridge. It will stay good for up to three days. If you want to keep it longer, freezing works well.

Freezing Instructions

To freeze your pie, let it cool completely. Wrap it in plastic wrap, then in aluminum foil. This double wrapping helps protect it from freezer burn. You can freeze the pie for up to three months. When you’re ready to eat it, move the pie to the fridge overnight to thaw.

Reheating Tips

To reheat your salted caramel apple pie, preheat your oven to 350°F. Place the pie on a baking sheet to catch any drips. Heat it for about 15-20 minutes, until warm. If you want a crispy crust, consider baking it without cover. You can also microwave individual slices for a quick treat, but the crust may not stay crisp. Enjoy!

FAQs

Can I use different types of apples?

Yes, you can use different apples! Granny Smith apples are tart and crisp. Honeycrisp apples add sweetness and crunch. Other good choices include Fuji, Gala, or Braeburn apples. Each type gives the pie its own unique taste and texture. Experiment with your favorites for a fun twist!

How long does salted caramel sauce last?

Salted caramel sauce lasts about two weeks in the fridge. Store it in an airtight jar. The sauce may thicken as it cools. Just warm it up in the microwave or on the stove before using it again. This way, you can enjoy that sweet and salty goodness anytime!

Can I make the pie crust ahead of time?

Absolutely! You can prepare the pie crust a day in advance. Wrap it tightly in plastic wrap and store it in the fridge. This saves time on baking day. Plus, a chilled crust rolls out easier. It helps you create a perfect pie!

What to serve with salted caramel apple pies?

Salted caramel apple pies shine on their own but pair well with whipped cream. A scoop of vanilla ice cream is a classic choice. You can also add a sprinkle of sea salt on top for extra flavor. Friends and family will love these delicious options!

In this post, we explored how to make a salted caramel apple pie. We covered essential ingredients and tips for selecting fresh apples. You learned step-by-step instructions for baking the pie, plus handy tips and tricks for the best crust. Variations like mini or gluten-free pies were also shared. Finally, we discussed storage and answered common questions.

Now you can enjoy this delicious treat, impressing your friends and family. Happy bakin

- 2 large apples (such as Granny Smith or Honeycrisp), peeled and thinly sliced - 1 cup packed brown sugar - 1/2 cup unsalted butter - 1/4 cup heavy cream - 1 teaspoon sea salt (plus additional for garnish) - 1 teaspoon pure vanilla extract - 1 teaspoon ground cinnamon - 1 prepared pie crust (store-bought or homemade) - 1 tablespoon fresh lemon juice - 1 egg (for egg wash) - Whipped cream for serving When picking apples, look for firm ones. Firmness shows freshness. Choose apples that are free from bruises. The skin should be smooth and shiny. A good apple has a sweet smell, hinting at its flavor. For pies, Granny Smith adds tartness, while Honeycrisp brings sweetness. Mixing these types boosts flavor and texture. Always buy locally when possible for the best taste. {{ingredient_image_2}} Start by preheating your oven to 350°F (175°C). Grab your prepared pie crust. Gently place it in a pie dish. Make sure to press it along the edges. This will help the crust hold its shape. Set it aside while you get ready for the apples. Next, take two large apples, like Granny Smith or Honeycrisp. Peel and slice them thinly. In a big bowl, mix the apple slices with lemon juice, brown sugar, and ground cinnamon. Toss it all together until the apples are well coated. Let this sit for about 15 minutes. This will make the flavors pop! Now, let’s make the salted caramel. In a medium saucepan, melt unsalted butter over medium heat. Once the butter is melted, add the packed brown sugar. Stir it well and cook for 3 to 5 minutes until it bubbles. Carefully mix in the heavy cream while whisking. Keep whisking until it all blends smoothly. Add sea salt and vanilla extract, then take it off the heat. Let it cool a bit. Take that warm caramel and pour it over the apple mixture. Make sure all the apple slices get coated in that tasty caramel. Gently toss the apples to mix everything well. This step adds a rich flavor that you’ll love. Pour the caramel apple filling into the pie crust. Spread it out evenly. If you have leftover caramel, drizzle it on top for an extra treat. Now, you can add a top crust. Roll out another pie crust, if you want, and cut out fun shapes or create a lattice design. If you cover it fully, make slits for steam to escape. In a small bowl, beat one egg until blended. Use this egg wash to brush over the crust. This gives your pie a shiny look. For a nice touch, sprinkle a bit of sea salt on top. Place the pie in the preheated oven and bake for 40-45 minutes. The crust should be golden and the filling bubbly. If the edges brown too fast, cover them with foil. After baking, let the pie cool for at least 30 minutes. This helps the filling set. Once it’s cool, slice the pie and serve it warm. For a special touch, add whipped cream on each slice. Enjoy every bite of this delicious dessert! A flaky pie crust makes your pie shine. Use cold butter for best results. Here are some tips: - Chill your ingredients: Keep butter and water cold. This helps create layers. - Don’t overwork the dough: Mix just until combined. This keeps it tender. - Roll evenly: Aim for a uniform thickness. This ensures even baking. A soggy bottom can ruin your pie. Here’s how to prevent it: - Pre-bake your crust: Bake the crust for 10 minutes before adding filling. This helps it set. - Use a thick filling: The caramel should not be too runny. This keeps the crust crisp. - Add a layer of flour: Sprinkle flour on the crust before adding apples. This absorbs excess moisture. Having the right tools makes baking easier. Here are the must-haves: - Pie dish: Use a glass or metal dish for even baking. - Rolling pin: A sturdy rolling pin helps shape the dough. - Pastry brush: This is great for applying egg wash on the crust. - Sharp knife: Use a sharp knife or pastry cutter for clean edges. These tips will help you create a delicious salted caramel apple pie every time! Pro Tips Choose the Right Apples: For the best flavor and texture, opt for a mix of tart and sweet apples like Granny Smith and Honeycrisp. This balance enhances the overall taste of your pie. Let the Caramel Cool: Allow the salted caramel to cool slightly before mixing it with the apples. This prevents the apples from becoming too soft and helps maintain their crispness. Prevent a Soggy Bottom: To ensure a crispy crust, consider pre-baking the pie crust for 10 minutes before adding the filling. This helps to create a barrier against moisture. Garnish for Presentation: After baking, sprinkle an extra pinch of sea salt on top of the pie before serving. This adds a touch of elegance and enhances the salted caramel flavor. {{image_4}} Mini salted caramel apple pies are a fun twist on the classic recipe. These little pies are perfect for parties or gatherings. To make them, use a muffin tin instead of a pie dish. Cut your pie crust into small circles. Press each circle into the muffin cups. Fill them with the caramel apple mixture, then cover with another circle of crust. Bake until golden. These mini pies are cute and easy to serve! If you need a gluten-free option, you can use a gluten-free pie crust. Several brands sell ready-made gluten-free crusts. You can also make your own using gluten-free flour. Follow the same steps for the filling and caramel. The taste will be just as good! Guests won’t even know they are gluten-free. For a vegan version, replace the butter and heavy cream. Use coconut oil for the butter. You can swap the heavy cream for coconut cream or almond milk. Make sure your pie crust is vegan, too. There are many store-bought options available. The result will still be a delicious salted caramel apple pie. Everyone will love this dairy-free treat! To store leftover salted caramel apple pies, cover them tightly with plastic wrap. You can also use aluminum foil. This keeps the pie fresh and prevents it from drying out. Place the covered pie in the fridge. It will stay good for up to three days. If you want to keep it longer, freezing works well. To freeze your pie, let it cool completely. Wrap it in plastic wrap, then in aluminum foil. This double wrapping helps protect it from freezer burn. You can freeze the pie for up to three months. When you’re ready to eat it, move the pie to the fridge overnight to thaw. To reheat your salted caramel apple pie, preheat your oven to 350°F. Place the pie on a baking sheet to catch any drips. Heat it for about 15-20 minutes, until warm. If you want a crispy crust, consider baking it without cover. You can also microwave individual slices for a quick treat, but the crust may not stay crisp. Enjoy! Yes, you can use different apples! Granny Smith apples are tart and crisp. Honeycrisp apples add sweetness and crunch. Other good choices include Fuji, Gala, or Braeburn apples. Each type gives the pie its own unique taste and texture. Experiment with your favorites for a fun twist! Salted caramel sauce lasts about two weeks in the fridge. Store it in an airtight jar. The sauce may thicken as it cools. Just warm it up in the microwave or on the stove before using it again. This way, you can enjoy that sweet and salty goodness anytime! Absolutely! You can prepare the pie crust a day in advance. Wrap it tightly in plastic wrap and store it in the fridge. This saves time on baking day. Plus, a chilled crust rolls out easier. It helps you create a perfect pie! Salted caramel apple pies shine on their own but pair well with whipped cream. A scoop of vanilla ice cream is a classic choice. You can also add a sprinkle of sea salt on top for extra flavor. Friends and family will love these delicious options! In this post, we explored how to make a salted caramel apple pie. We covered essential ingredients and tips for selecting fresh apples. You learned step-by-step instructions for baking the pie, plus handy tips and tricks for the best crust. Variations like mini or gluten-free pies were also shared. Finally, we discussed storage and answered common questions. Now you can enjoy this delicious treat, impressing your friends and family. Happy baking!

Salted Caramel Apple Pies

Delicious apple pies filled with salted caramel and topped with a flaky crust.
Prep Time 20 minutes
Cook Time 45 minutes
Total Time 1 hour 5 minutes
Course Dessert
Cuisine American
Servings 8
Calories 300 kcal

Ingredients
  

  • 2 large apples (such as Granny Smith or Honeycrisp), peeled and thinly sliced
  • 1 cup packed brown sugar
  • 1 2 unsalted butter
  • 1 4 cup heavy cream
  • 1 teaspoon sea salt (plus additional for garnish)
  • 1 teaspoon pure vanilla extract
  • 1 teaspoon ground cinnamon
  • 1 prepared pie crust (store-bought or homemade)
  • 1 tablespoon fresh lemon juice
  • 1 egg (for egg wash)
  • 1 optional whipped cream for serving

Instructions
 

  • Preheat the oven to 350°F (175°C) and place the prepared pie crust into a pie dish.
  • In a mixing bowl, combine the sliced apples with lemon juice, brown sugar, and cinnamon. Toss to coat and let marinate for 15 minutes.
  • In a saucepan, melt the butter over medium heat, then add brown sugar and stir until bubbling and smooth. Add heavy cream, whisk, then stir in sea salt and vanilla extract. Remove from heat and let cool slightly.
  • Pour the salted caramel over the marinated apples and toss to coat evenly.
  • Fill the prepared pie crust with the caramel apple mixture, spreading it evenly.
  • If desired, roll out a second pie crust for decorative shapes or a lattice design, making slits for steam to escape.
  • Beat the egg and brush it over the crust for a glossy finish, sprinkling a pinch of sea salt on top.
  • Bake the pie for 40-45 minutes until the crust is golden brown and the filling is bubbling. Cover edges with foil if they brown too quickly.
  • Let the pie cool for at least 30 minutes before slicing. Serve warm, optionally with whipped cream.

Notes

Serve warm with whipped cream for an extra treat.
Keyword apple pie, dessert, salted caramel

WANT TO SAVE THIS RECIPE?

Related Posts