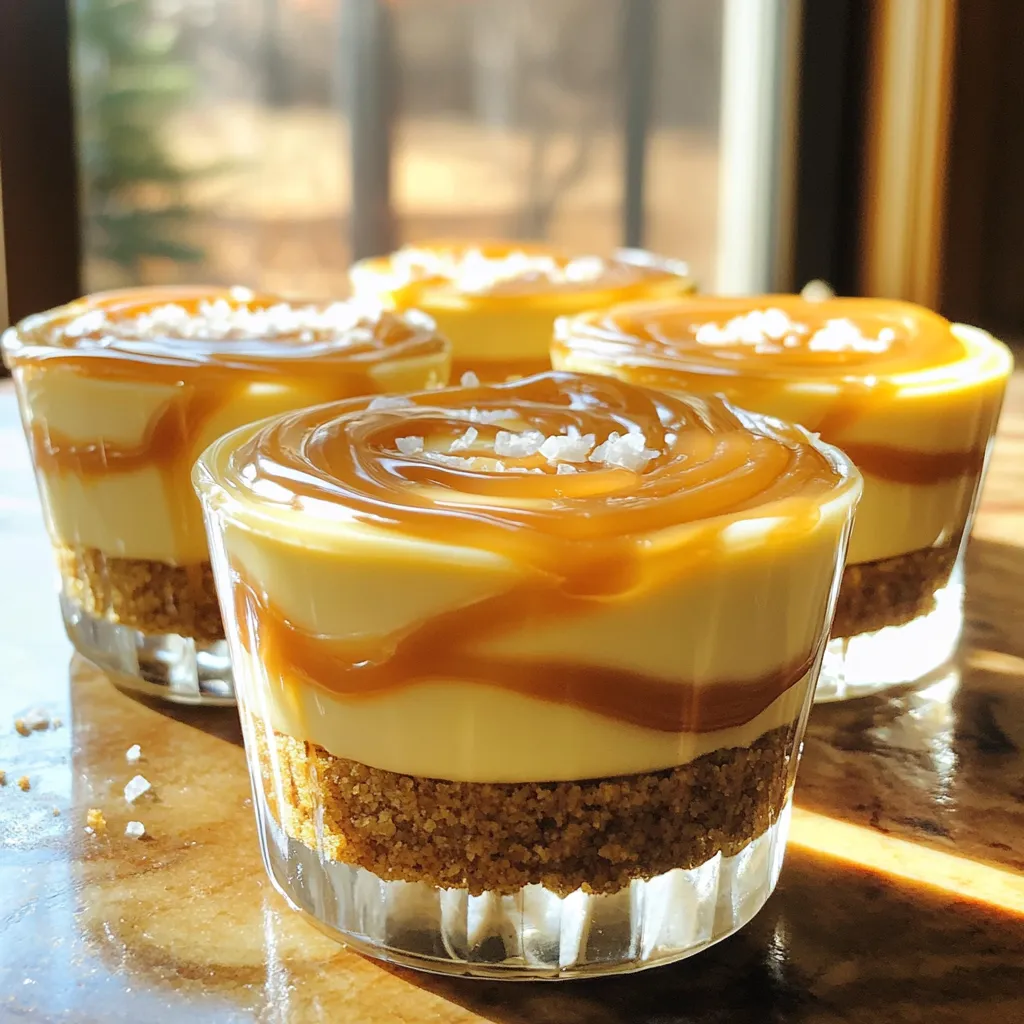
Salted Caramel Cheesecake Cups Irresistible Treats
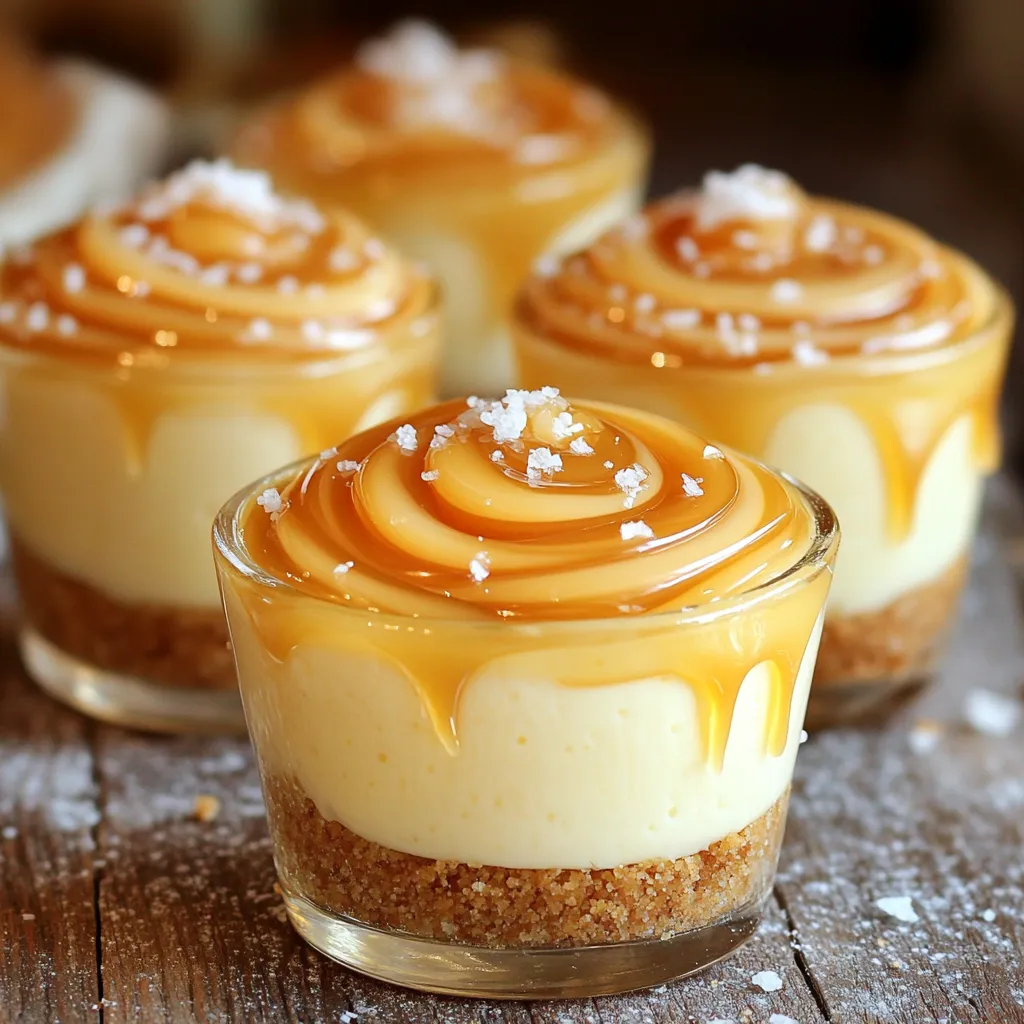
Get ready for a sweet adventure with my Salted Caramel Cheesecake Cups! These little treats pack a big flavor punch, combining creamy cheesecake with rich caramel and a crunchy crust. Perfect for parties or a cozy night in, they’re simple to make and even easier to devour. Follow me as we explore the ingredients, tips, and fun variations to turn these cups into your new favorite dessert. Let’s get started!
Ingredients
List of Necessary Ingredients
– 1 cup graham cracker crumbs
– 4 tablespoons unsalted butter, melted
– 16 oz cream cheese, softened to room temperature
– 1/2 cup granulated sugar
– 1 teaspoon pure vanilla extract
– 1 cup heavy whipping cream
– 1/4 cup salted caramel sauce (plus extra for drizzling)
– A pinch of sea salt
– Optional: whipped cream for an extra topping
To make salted caramel cheesecake cups, you need some simple, tasty ingredients. Each one plays a big role in your cups’ flavor and texture.
First, graham cracker crumbs form the base. They add a nice crunch and sweetness. Melting unsalted butter helps bind the crumbs together. This combination gives a solid foundation for the cheesecake.
Next, the cream cheese is the star. It brings a creamy texture and rich flavor. Be sure to soften it first; this helps it mix well. The granulated sugar adds sweetness, while the pure vanilla extract gives it a warm, inviting taste.
Heavy whipping cream is key for lightness. Whipping it until stiff peaks form makes the filling airy. The salted caramel sauce adds that sweet and salty twist we all love. A pinch of sea salt enhances the flavors, making them pop.
You can also add whipped cream on top for extra indulgence. With these ingredients, you are ready to create a delicious treat that everyone will enjoy.
Step-by-Step Instructions
Preparing the Crust
To start, gather your graham cracker crumbs and melted unsalted butter. In a medium bowl, mix the crumbs with the butter. Stir until the crumbs look like damp sand. This step is key for a tasty crust.
Next, grab your serving cups or small jars. Distribute the crumb mix evenly into the bottoms of each cup. Press it down firmly with the back of a spoon. This will create a solid base for your cheesecake. Set these aside while you move to the next step.
Making the Cheesecake Filling
Now, let’s make the cheesecake filling. In a large bowl, beat the softened cream cheese, granulated sugar, and vanilla extract. Use an electric mixer on medium speed. Mix until it is silky smooth and lump-free. This step is very important for a creamy texture.
In a separate bowl, whip the heavy cream until it forms stiff peaks. This will help the cheesecake feel light. Carefully fold the whipped cream into the cream cheese mix. Do this in three parts to keep it airy and fluffy.
Now, gently stir in the salted caramel sauce. Make sure to mix it well. Add a pinch of sea salt to enhance the flavor.
Assembling the Cheesecake Cups
It’s time to fill the cups! Spoon the creamy cheesecake mixture over the crust in each cup. Fill them about three-quarters full. Leave some space for toppings later.
Cover the cups with plastic wrap. Chill them in the refrigerator for at least 4 hours. This helps the cheesecake set firmly, making it easier to serve.
When you are ready to serve, drizzle more salted caramel sauce over the top of each cup. If you want, add a dollop of whipped cream for extra richness. Enjoy your homemade delights!
Tips & Tricks
Achieving the Perfect Texture
To make the best salted caramel cheesecake cups, start with soft cream cheese. This helps blend it easily with sugar and vanilla. If your cream cheese is cold, it will be lumpy. Set it out for at least an hour before mixing.
Next, whip the heavy cream until it forms stiff peaks. This means it holds its shape well. Gently fold the whipped cream into the cream cheese mix. This step keeps your cheesecake light and fluffy.
Serving Suggestions
Drizzling caramel sauce on top adds a sweet touch. Use a spoon or squeeze bottle for a neat drizzle. Let the caramel flow over the edges for a beautiful look.
For an extra treat, add a dollop of whipped cream on top. This adds a nice contrast to the creamy cheesecake. It makes each bite even more delightful.
Garnishing Ideas
Sprinkle flaky sea salt on the top for a nice crunch. It balances the sweetness of the caramel. This simple touch makes the flavors pop.
You can also get creative with how you present your cups. Use clear cups to show off the layers, or add fresh fruit on top. These small details make your dessert stand out.
Variations
Flavor Alternatives
You can change the flavor of your salted caramel cheesecake cups in fun ways. One great idea is to add fruit purees. For example, try mixing in raspberry or strawberry puree into the cheesecake filling. This adds a fruity twist and makes the cups even more delightful. You can also layer the purees at the bottom before adding the cheesecake.
Another option is to explore different types of caramel. You could use dark caramel for a richer taste or even a coffee-flavored caramel. This will give your cheesecake cups a unique flavor profile. Don’t be afraid to experiment and find what makes your taste buds dance!
Dietary Substitutes
If you need gluten-free options, you can easily swap out the graham cracker crumbs. Use gluten-free cookie crumbs or almond flour instead. Both will give you a delicious crust that holds together well.
For those who follow a vegan diet, you can substitute the cream cheese with a vegan cream cheese made from nuts or soy. Instead of heavy cream, use coconut cream whipped until fluffy. These changes ensure everyone can enjoy these tasty treats without missing out!
Storage Info
Best Practices for Storage
After making these salted caramel cheesecake cups, store any leftovers in the fridge. Use an airtight container to keep them fresh. If you used jars, just cover them with their lids. This keeps the cheesecake cups safe from air and odors.
To maintain the creamy texture, avoid stacking them. If you can, separate them with parchment paper. This helps prevent sticking. Remember to chill them again if they warm up.
Shelf Life
These cheesecake cups can last in the fridge for about 3 to 4 days. After that, the texture and taste may change. If you want to keep them longer, freezing is a great option.
To freeze, place the cups in a freezer-safe container. You can also wrap them tightly with plastic wrap. They can stay fresh in the freezer for up to 2 months. When ready to eat, thaw them in the fridge overnight. Enjoy them cold for the best flavor!
FAQs
Common Preparation Questions
Can I use a different type of cookie for the crust?
Yes, you can switch the crust. Use chocolate cookies or even vanilla wafers. Just crush them the same way as graham crackers. Each type gives a unique flavor.
What if I don’t have heavy cream?
If you lack heavy cream, use whole milk and a bit of butter. Mix 3/4 cup of milk with 1/4 cup of melted butter. This will help create a creamy texture.
Serving and Enjoyment Queries
Can these be made a day in advance?
Absolutely! Making them a day ahead is smart. It helps the flavors blend better. Just keep them covered in the fridge until you serve.
Best way to transport cheesecake cups for a party?
To transport, place the cups in a sturdy container. Use a lid to keep them secure. If you add whipped cream, do it just before serving to keep it fresh.
Ingredient Substitution Inquiries
Can I use low-fat cream cheese?
Yes, low-fat cream cheese works. It may change the texture slightly, but it will still taste great.
What can I substitute for salted caramel sauce?
If you need a substitute, mix brown sugar with butter and a pinch of salt. Cook it until it becomes thick. This will mimic the taste of salted caramel.
These cheesecake cups are simple and fun to make. You learned about the key ingredients, like cream cheese and caramel. We walked through the steps to prepare the crust and fill the cups. Tips helped ensure a smooth texture and perfect taste. You can customize the flavors and store leftovers easily.
Now, it’s time to create your own cheesecake cups. Enjoy the process and share them with others!

![- 2 cups raw almonds - 1 cup granulated sugar - 1/2 cup water - 1 tablespoon pumpkin spice mix - 1/2 teaspoon fine sea salt - 1 teaspoon pure vanilla extract - 1 tablespoon vegetable oil When making Pumpkin Spice Candied Almonds, each ingredient plays a key role. The raw almonds provide a crunchy base and healthy fats. Granulated sugar adds sweetness and helps create the candy coating. Water helps dissolve the sugar, forming a smooth syrup. The pumpkin spice mix brings that cozy fall flavor we all love. Fine sea salt balances the sweetness. Pure vanilla extract adds depth to the flavor. Finally, vegetable oil prevents the almonds from sticking together. - Alternative Nut Options: You can swap almonds for pecans or walnuts if you prefer. Each nut gives a unique taste and texture. - Sugar Substitutes: For a healthier option, use coconut sugar or a sugar alternative like stevia. Adjust the amount based on sweetness. - Homemade Pumpkin Spice Blend: If you lack pumpkin spice mix, you can make your own. Combine 1 teaspoon ground cinnamon, 1 teaspoon ground nutmeg, 1/2 teaspoon ground ginger, and 1/4 teaspoon ground cloves. This mix can bring fresh flavors to your almonds. For the full recipe and to make these tasty treats, refer to the complete directions above. Preheating the Oven First, preheat your oven to 350°F (175°C). This step is key to ensure even baking. A hot oven helps the almonds become golden and crisp. Preparing the Baking Sheet Next, line a baking sheet with parchment paper. This will keep the almonds from sticking. It makes cleanup easy and keeps your almonds intact. Creating the Syrup In a large saucepan, mix 1 cup of granulated sugar with 1/2 cup of water over medium heat. Stir gently until the sugar dissolves. This will create a smooth syrup. Coating the Almonds Now, add 1 tablespoon of pumpkin spice mix, 1/2 teaspoon of fine sea salt, and 1 teaspoon of pure vanilla extract to the syrup. Mix well to blend the flavors. Gradually stir in 2 cups of raw almonds. Make sure each almond gets a nice coating of syrup. Baking and Cooling Process Keep cooking the mixture for about 5-7 minutes. Stir constantly until the syrup thickens and coats the almonds. Remove the pan from heat and stir in 1 tablespoon of vegetable oil. This helps the almonds not stick together. Quickly spread the almonds on the prepared baking sheet in a single layer. Bake for 10-15 minutes, stirring halfway through. Once golden brown, take them out and let them cool completely on the baking sheet. They will become crisp as they cool. After cooling, break apart any clusters and store them in an airtight container. Follow the [Full Recipe] for more details and tips! To get a nice coating on your almonds, stir them well. Mix the almonds in the syrup until they look shiny and sticky. This way, every almond gets its share of flavor. Use a spatula to lift them and make sure they are all coated evenly. If you see some dry spots, keep stirring! Clumping can happen easily with candied almonds. After adding the vegetable oil, spread the almonds out on the baking sheet. Use a spatula to separate them right away. This will help them bake without sticking together. Keep an eye on them while baking, too. A gentle stir halfway through keeps them from clumping up. Want a bolder taste? Feel free to mix in more spices. A pinch of cinnamon or nutmeg can add depth. You can also try cardamom or allspice for new layers of flavor. Just remember to adjust the amount to your taste. A little goes a long way! Flavored extracts can make your almonds pop. Instead of plain vanilla, try almond or maple extract. They bring a unique twist to the taste. Add a few drops when mixing the syrup to give it a special touch. This simple change can elevate your pumpkin spice candied almonds. For the full recipe, check out the detailed steps above! {{image_4}} You can change the classic pumpkin spice flavor in many fun ways. One option is to make chocolate-covered pumpkin spice almonds. Simply melt dark or milk chocolate, then dip your finished almonds into it. Let them cool on parchment paper. This mix of sweet and warm spices makes for a delightful treat. Another tasty choice is spicy maple candied almonds. Replace the pumpkin spice mix with a blend of cayenne pepper and cinnamon. Add maple syrup instead of granulated sugar. This option gives a sweet and spicy twist that is perfect for fall. Adding dried fruits can elevate your pumpkin spice almonds. Try mixing in dried cranberries or raisins after baking. This adds a chewy texture and a burst of sweetness. You can also use chopped dried apples for a true autumn feel. Another great idea is adding sea salt for contrast. Just sprinkle a little fine sea salt over the hot almonds right after baking. The salt balances the sweetness and enhances the overall flavor. This simple addition makes your snack even more enjoyable. For the full recipe, you can refer to the details above. To keep your pumpkin spice candied almonds fresh, use an airtight container. Glass jars or plastic containers work well. Make sure they seal tightly to keep out air and moisture. Store them in a cool, dry place. This helps maintain their crunchy texture and flavor. - Shelf Life Information These almonds can last up to two weeks when stored properly. If you keep them in the fridge, they may last a bit longer. Just remember to let them come back to room temperature before enjoying. If your almonds lose their crunch, you can restore their crispiness. - Restoring Crispiness Preheat your oven to 350°F (175°C). Spread the almonds on a baking sheet. Bake for about 5 minutes or until they feel crisp again. Keep an eye on them to avoid burning. - Using the Oven vs. Microwave The oven is better for reheating. It warms them evenly, keeping that great texture. The microwave can make them chewy, which is not what you want. So, stick with the oven for the best results. Can I use different nuts for this recipe? Yes, you can use other nuts! Pecans and walnuts work well. They absorb flavors nicely and give a unique twist. How do I know when the almonds are done baking? Look for a golden-brown color. The almonds should smell fragrant and feel crispy. Stir them halfway through baking for even toasting. Can I make these in bulk for gifting? Absolutely! This recipe is perfect for making large batches. Just double or triple the ingredients. What’s the best way to package them for gifts? Use clear bags or jars. Add a nice ribbon or tag. This makes them look festive and special. Caloric Count One serving of these almonds has about 200 calories. They are a tasty snack, but watch the portions! Nutritional Benefits of Almonds Almonds offer healthy fats, protein, and fiber. They can help keep your heart healthy and support brain function. Can I make this recipe vegan? Yes! Just skip the vanilla extract or use a plant-based option. The rest of the ingredients are naturally vegan-friendly. What is the best way to enjoy candied almonds? Enjoy them as a snack on their own, or sprinkle them on salads. They also taste great with yogurt or as a topping for desserts. For the full recipe, check the previous sections. You learned how to make pumpkin spice candied almonds. We covered ingredients, steps, and tips to enhance flavor. With some simple swaps, you can customize these treats to your liking. Store them in airtight containers for freshness. Enjoy them yourself or share them as gifts! These almonds are perfect for snacking or as a festive treat. Try out the variations to find your favorite! Happy cooking!](https://blissfulmeal.com/wp-content/uploads/2025/07/2ccd6595-4e99-4fd0-b83a-b672d04ecddc-768x768.webp)