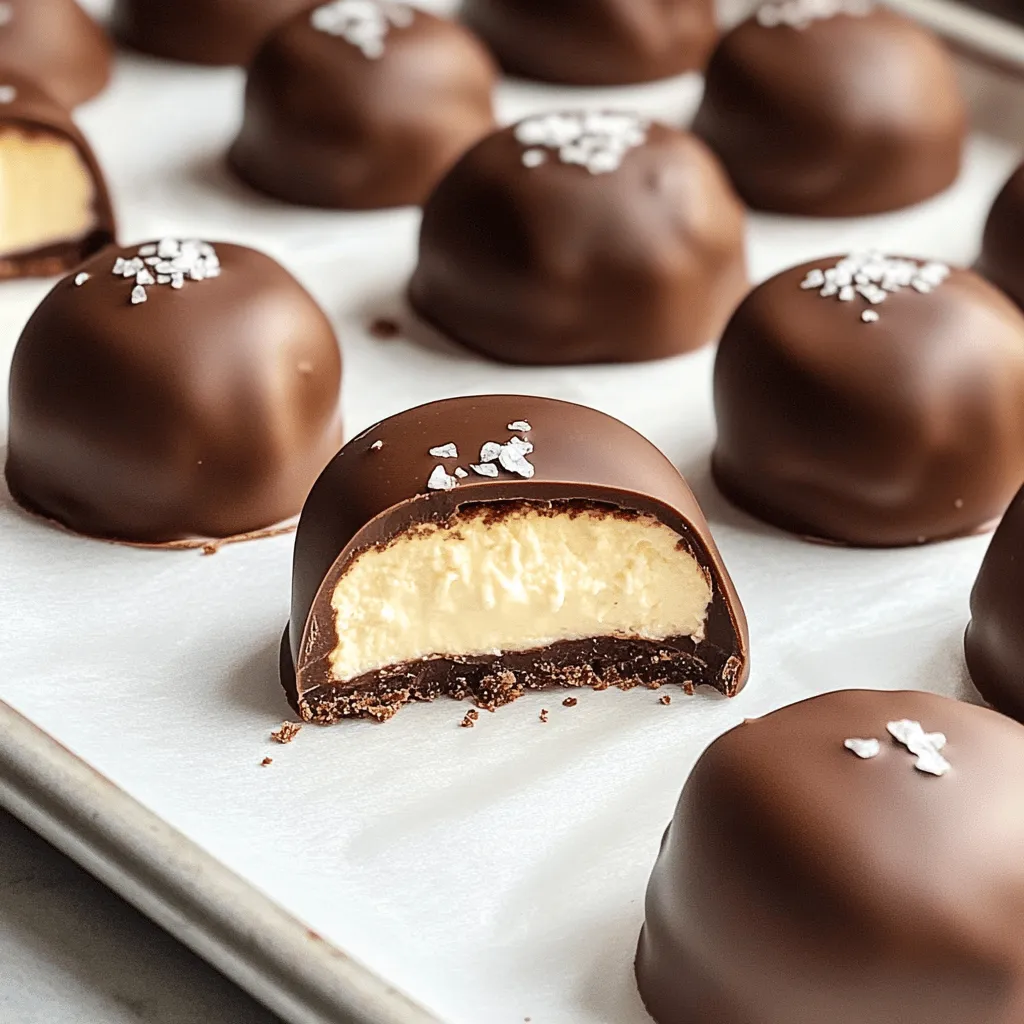
Chocolate Covered Cheesecake Bites Irresistible Dessert
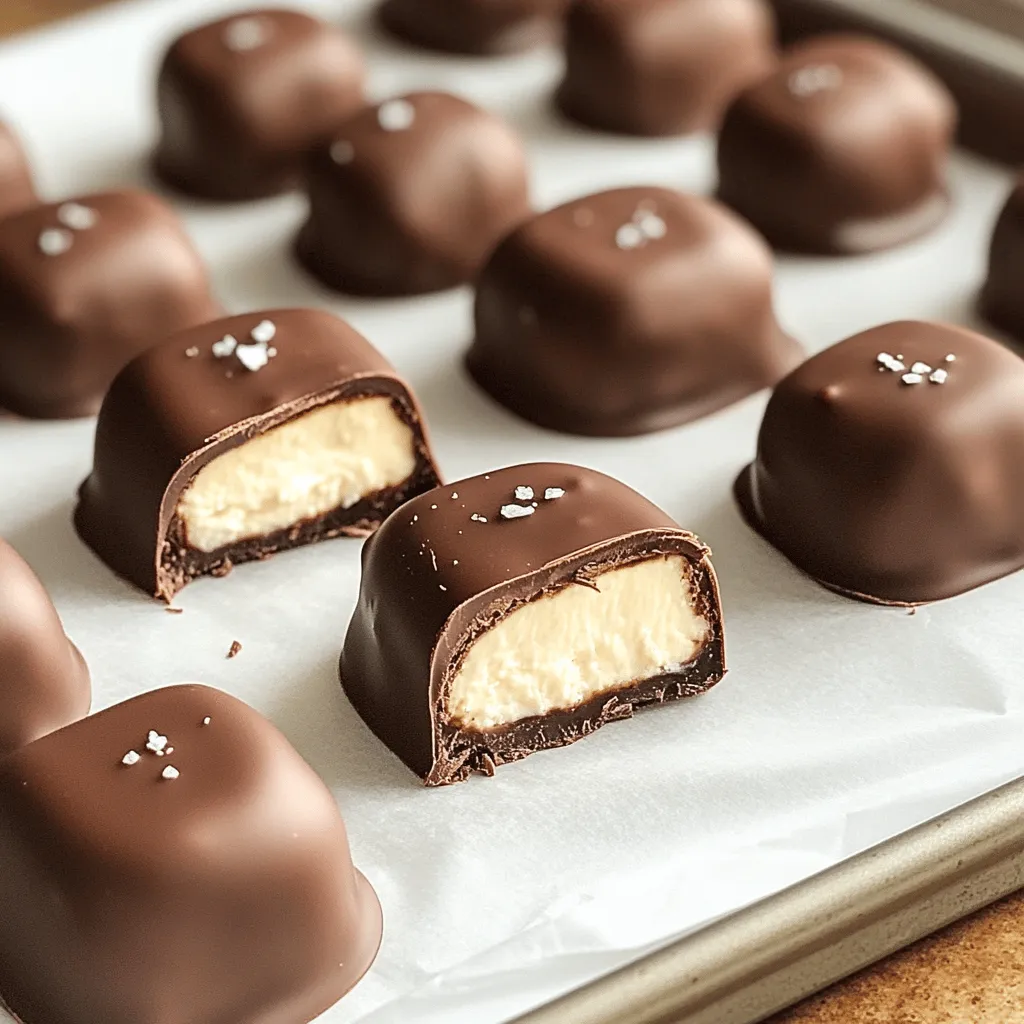
Looking for a dessert that will wow your taste buds? Try these Chocolate Covered Cheesecake Bites! This simple treat combines rich cream cheese and sweet chocolate to create pure bliss. With just a few key ingredients and easy steps, you’ll impress family and friends in no time. Let’s dive into this scrumptious recipe and explore how to make these delightful bites that everyone will love!
Ingredients
Essential Ingredients
– 8 ounces cream cheese, softened to room temperature
– 1/2 cup powdered sugar
– 1 cup semi-sweet chocolate chips
These three ingredients create the base of our rich and creamy cheesecake bites. Cream cheese adds that signature smoothness. The powdered sugar sweetens the mix, making it a dessert delight. The semi-sweet chocolate chips are crucial for that decadent chocolate coating.
Optional Ingredients
– 1 tablespoon coconut oil
– Sea salt for garnish
Coconut oil helps the chocolate melt smoothly. It adds a nice shine to the chocolate coating. A sprinkle of sea salt enhances the flavor, making each bite even better. You can skip these if you want, but I recommend trying them!
Equipment Needed
– Mixing bowls
– Electric mixer
– Baking sheet
You’ll need mixing bowls to blend your ingredients. An electric mixer saves time and helps create a smooth filling. The baking sheet is essential for chilling the bites before coating with chocolate. Using parchment paper makes clean-up easy and prevents sticking.
Step-by-Step Instructions
Mixing the Cheesecake Base
Start with a medium bowl. In this bowl, combine 8 ounces of softened cream cheese, 1/2 cup of powdered sugar, and 1 teaspoon of pure vanilla extract. Use an electric mixer on medium speed. Mix until smooth and creamy. Make sure there are no lumps.
Next, add 1/2 cup of sour cream. Blend it in fully. Then, gently fold in 1 cup of graham cracker crumbs. Use a spatula for this step. Mix until you achieve a smooth and cohesive texture.
Forming the Bites
Prepare a baking sheet by lining it with parchment paper. Now, use a small cookie scoop or your hands to portion the cheesecake mixture. Roll each portion into bite-sized balls, about 1 inch in diameter. Place each ball on the lined baking sheet, spacing them evenly apart.
Once you’ve shaped all the cheesecake bites, put the baking sheet in the freezer. Let them chill for about 30 minutes until they feel firm to the touch.
Coating with Chocolate
While the bites chill, melt the chocolate coating. In a microwave-safe bowl, combine 1 cup of semi-sweet chocolate chips and 1 tablespoon of coconut oil. Microwave this mixture in 30-second intervals. Stir well between each interval until the chocolate is completely melted and glossy.
After the cheesecake bites are firm, take them out of the freezer. Using a fork, dip each bite into the melted chocolate. Make sure each one is evenly coated. Allow any excess chocolate to drip back into the bowl.
Carefully place the chocolate-covered bites back on the parchment-lined baking sheet. If you like, sprinkle a tiny pinch of sea salt on top for an extra flavor boost before the chocolate sets.
Finally, refrigerate the bites for at least 15 minutes. This will let the chocolate coating firm up nicely. Enjoy these delicious treats!
Tips & Tricks
Achieving the Perfect Texture
To get a smooth cheesecake bite, start with softened cream cheese. Beat it well with an electric mixer. Mix until it’s creamy and lump-free. This step is key for a great mouthfeel.
Chilling the mixture is also important. After shaping the bites, freeze them for 30 minutes. This helps them firm up before coating in chocolate. If they are too soft, the coating will not stick well.
Chocolate Coating Tips
To prevent chocolate from seizing, use coconut oil when melting chocolate chips. This oil keeps the chocolate smooth. Microwave the chocolate in short bursts of 30 seconds. Stir the chocolate in between to ensure even melting.
When coating the cheesecake bites, dip each one fully. Use a fork to lift them out, letting excess chocolate drip off. This method gives you an even coating that looks great.
Serving Suggestions
Present your cheesecake bites on a pretty platter. This makes them look more inviting. For a fun touch, sprinkle sea salt on top. You can also add chocolate shavings or fresh berries for extra color. These garnishes not only enhance the look but also the flavor!
Variations
Flavor Additions
You can make these bites even more fun! Start with flavored cream cheese. Options like strawberry or blueberry add a tasty twist. You can also infuse your mix with extracts. Almond or orange extracts give a unique flavor. Just add a little to the cream cheese mix.
Chocolate Variants
Think about the type of chocolate you use. White chocolate offers a sweet and creamy taste. Semi-sweet chocolate adds a rich flavor. You might also try dark chocolate for a bold bite. Each option gives a different twist to your cheesecake bites.
Seasonal Twists
Get creative with seasonal decorations! For holidays, use themed chocolate shapes or colors. You can add seasonal fruits like strawberries in summer or pumpkin in fall. These small changes make your cheesecake bites festive and fun.
Storage Info
How to Store
To keep your chocolate covered cheesecake bites fresh, store them in the fridge. Place them in an airtight container to prevent them from drying out. If you use a glass container, it will also help keep them cool. Make sure to layer parchment paper between the bites if you stack them. This way, they won’t stick together.
Freezing Instructions
You can freeze chocolate covered cheesecake bites for longer storage. First, place them on a baking sheet in a single layer. Freeze them for about an hour until firm. Once frozen, transfer the bites to a freezer-safe container. Be sure to separate layers with parchment paper. To thaw, move them to the fridge for about 2 hours. This will help keep their texture intact.
Shelf Life
These cheesecake bites last about 5 days in the fridge. If you freeze them, they can last up to 3 months. Just make sure to keep them well-wrapped. This way, they stay tasty and fresh for when you want a sweet treat.
FAQs
Can I make these cheesecake bites ahead of time?
Yes, you can prepare these cheesecake bites a day in advance. Simply follow the recipe steps and chill the bites in the freezer. Once set, store them in an airtight container in the fridge. This way, they stay fresh and ready to serve.
What can I substitute for cream cheese?
You can use dairy-free cream cheese for a vegan option. Soft tofu blended until smooth also works well. A cashew cream made from soaked cashews can give a rich flavor too. All these options can bring a different twist to your bites while keeping them delicious.
How do I prevent chocolate from melting too quickly?
Keep the cheesecake bites cold before serving. Use a cool plate or dish to hold them. Serve in a cool area, away from sunlight. If you have to store them, keep them in the fridge until you’re ready to serve. This helps the chocolate stay firm and tasty.
You can create delicious chocolate-covered cheesecake bites by following the steps outlined. First, mix your essential ingredients and form the bites. Then, coat them in chocolate for a tasty treat. Use tips for the perfect texture and storage to enjoy them longer. Try variations for different flavors and seasonal tweaks. Now, you know how to make these fun bites that everyone will love. Get in the kitchen and enjoy your sweet creations!


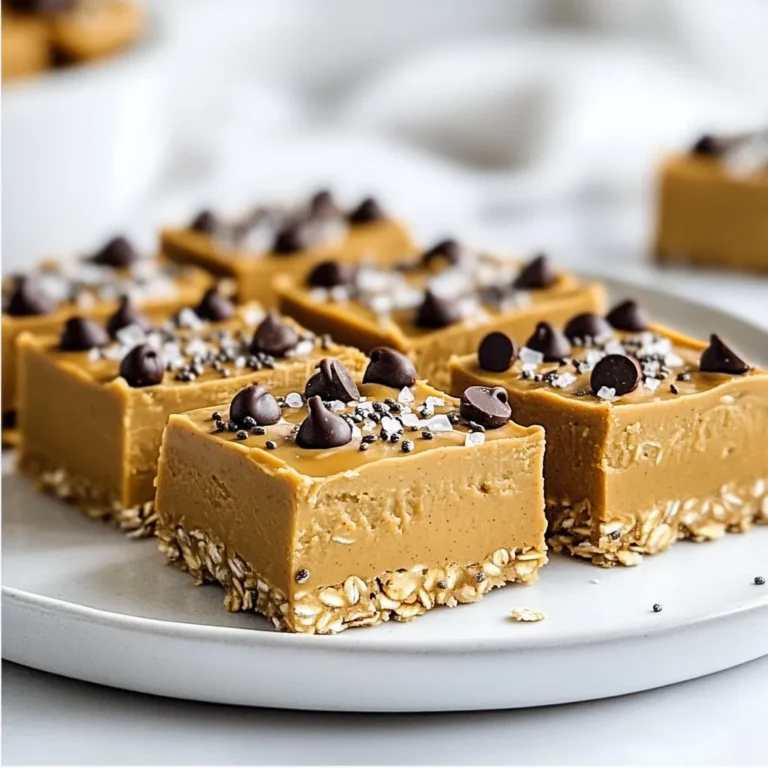
![Peanut Butter Oatmeal Energy Balls need simple, wholesome ingredients. Here’s what you need: - 1 cup rolled oats - 1/2 cup peanut butter (smooth or chunky) - 1/3 cup honey or maple syrup - 1/4 cup chocolate chips (dark or semi-sweet) - 1/4 cup ground flaxseed (optional) - 1/2 teaspoon vanilla extract - A pinch of sea salt - 1/3 cup shredded coconut (optional) These ingredients work together to make a tasty snack. Each ingredient brings unique benefits: - Rolled oats: These provide fiber, which helps keep you full. - Peanut butter: This is rich in protein and healthy fats. It fuels your body. - Honey or maple syrup: Both sweeteners offer quick energy. They add natural sweetness. - Chocolate chips: These give a touch of sweetness and can lift your mood. - Ground flaxseed: This adds omega-3 fatty acids, good for heart health. - Vanilla extract: This enhances flavor and aroma, making it more enjoyable. - Sea salt: Just a pinch balances flavors and can boost hydration. - Shredded coconut: This adds a tropical flair and healthy fats. Together, these ingredients create a balanced snack. You can adapt this recipe based on your taste or needs. Here are some ideas: - Nut butter: Swap peanut butter for almond, cashew, or sunflower seed butter. - Sweeteners: Use agave syrup or brown rice syrup instead of honey. - Chocolate chips: Try dried fruit, like raisins or cranberries, for a fruity twist. - Flaxseed: Chia seeds work well as an alternative for added nutrition. - Coconut: Omit shredded coconut if you prefer a different texture or taste. These substitutions keep the energy balls delicious while fitting your diet. For the full recipe, check out the Peanut Butter Oatmeal Energy Balls 🥜 section. To start, gather your ingredients. You will need rolled oats, peanut butter, honey, and more. In a large bowl, combine 1 cup rolled oats, 1/4 cup ground flaxseed (if you choose), and a pinch of sea salt. Mix these dry items well. This step sets a strong base for flavor and texture. Next, melt the peanut butter and honey together. Put 1/2 cup peanut butter and 1/3 cup honey in a microwave-safe bowl. Heat for 20-30 seconds. After melting, pour it into the dry mix. Add 1/2 teaspoon vanilla extract and 1/4 cup chocolate chips. If you want, you can add 1/3 cup shredded coconut too. Use your hands or a spatula to mix everything. The mix should feel sticky but blend well together. Now, take small amounts of the mix and roll them into balls. Aim for about a tablespoon in size. Put each ball on a lined baking sheet, leaving space between them. This helps them not stick together. Finally, place the baking sheet in the fridge. Let the energy balls chill for at least 30 minutes. This will help them firm up nicely. Once they are set, store them in an airtight container or a ziplock bag. Enjoy as you need! For more details, check the Full Recipe. To achieve the best texture, mix your dry and wet ingredients well. Each energy ball should feel sticky but not too wet. If the mix is too dry, add a splash of water or more honey. If it's too wet, add a bit more oats. This balance ensures they hold together well. Store your energy balls in an airtight container. They will stay fresh in the fridge for about one week. For longer storage, freeze them in a ziplock bag. This way, you can grab a quick snack anytime. Just let them thaw for a few minutes before eating. Make your energy balls look great! Drizzle melted chocolate over the tops for a sweet touch. You can also roll them in shredded coconut for added flair. Serve them on a pretty plate to impress friends or family. These simple ideas make your snack both tasty and fun! For the complete recipe, check out the full recipe. {{image_4}} You can change the flavor of your energy balls easily. Try adding cinnamon for warmth. You can use almond butter instead of peanut butter for a nutty twist. How about a touch of cocoa powder? It adds rich chocolate flavor. You could also mix in dried fruits like cranberries or apricots for sweetness and chewiness. Each change gives a new taste to your snack! If you follow a vegan diet, swap honey for maple syrup. This keeps it plant-based and delicious. For a gluten-free version, ensure your oats are certified gluten-free. This way, everyone can enjoy these energy balls! You can also make them nut-free by using sunflower seed butter instead. This way, kids at school can enjoy them too! You can boost the nutrition of your energy balls with some easy add-ins. Consider mixing in chia seeds or hemp seeds for extra fiber and protein. You can also add protein powder for a post-workout snack. Ground flaxseed is a great addition too; it’s already in the recipe. It gives healthy fats and helps keep you full. These small changes can make a big difference in nutrition! For the full recipe, check out the details above. To keep your Peanut Butter Oatmeal Energy Balls fresh, store them in an airtight container. You can use a glass jar or a ziplock bag. Make sure to separate layers with parchment paper to avoid sticking. Keeping them cool helps maintain taste and texture. If you want to enjoy these energy balls later, freezing is a great option. Simply place the energy balls in a single layer on a baking sheet. Freeze them for about an hour until solid. Then transfer them to a ziplock bag. Remove as much air as possible to prevent freezer burn. In the fridge, these energy balls stay fresh for up to one week. If you freeze them, they can last up to three months. Always label your containers with the date. This way, you will know when you made them and use them at their best. Enjoy these snacks anytime! For the full recipe, check the [Full Recipe]. Peanut Butter Oatmeal Energy Balls stay fresh for about one week in the fridge. Store them in an airtight container. For longer storage, you can freeze them. They can last for up to three months in the freezer. Just thaw before eating! Yes, you can make these energy balls vegan. Use maple syrup instead of honey. Choose natural peanut butter that contains only peanuts. This way, your energy balls will be fully plant-based and just as tasty! If you need a substitute for peanut butter, try almond butter or sunflower seed butter. These options work well and add different flavors. They also provide similar nutrition, keeping your energy balls healthy. I recommend enjoying two to three energy balls as a snack. They are filling, thanks to the oats and nut butter. Listen to your body and adjust based on your hunger! You can definitely customize the ingredients! Add nuts, seeds, or dried fruit for extra flavor and nutrition. You can also change the sweetener to fit your taste. Get creative and make these energy balls your own! For the full recipe, check out the details above. In this article, I covered the key parts of making Peanut Butter Oatmeal Energy Balls. We looked at the important ingredients and their benefits. I shared step-by-step instructions for perfecting your mix. Tips helped you with storage and presentation. I also offered great variations and answers to common questions. Now, you have the tools to make tasty snacks at home. Enjoy making and sharing your energy balls!](https://blissfulmeal.com/wp-content/uploads/2025/06/20e3613d-61be-4491-a909-a9822bfd6b71-768x768.webp)