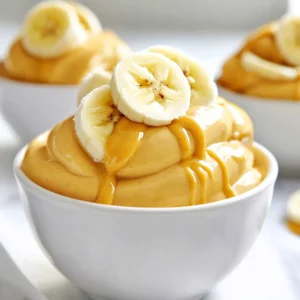
Vegan Peanut Butter Banana Ice Cream Creamy Delight


Craving a sweet treat that’s both creamy and healthy? You’re in the right place! In this guide, I’ll show you how to make Vegan Peanut Butter Banana Ice Cream, a delicious dessert that requires just a few simple ingredients. You’ll love the rich flavor of peanut butter and the natural sweetness from ripe bananas. Get ready to indulge in this guilt-free delight that’s perfect for any day!
Why I Love This Recipe
- Deliciously Creamy: This recipe creates a smooth and creamy dessert that feels indulgent without the guilt.
- Simple Ingredients: All you need are a few wholesome ingredients that you likely already have in your kitchen.
- Customizable Sweetness: You can easily adjust the sweetness to your preference with the optional maple syrup.
- Perfect for Any Occasion: This creamy treat is great for a healthy snack, dessert, or even a post-workout treat!
Ingredients
Main Ingredients
– 3 ripe bananas, peeled, sliced, and frozen
– 1/2 cup natural peanut butter
– 1/4 cup coconut milk
Optional Ingredients
– 1 tablespoon maple syrup
– 1/2 teaspoon pure vanilla extract
– A pinch of sea salt
Equipment Needed
– High-powered blender or food processor
– Parchment-lined baking sheet
– Airtight container
For this vegan peanut butter banana ice cream, you’ll need a few simple items.
Main Ingredients:
Ripe bananas are key. Choose bananas that are yellow and have some brown spots. They will taste sweeter. Next, grab some natural peanut butter. Ensure it’s creamy and made from just peanuts. This will give your ice cream a rich flavor. Lastly, coconut milk adds creaminess. You can also use any plant-based milk you prefer.
Optional Ingredients:
You might want to add maple syrup for extra sweetness. A little vanilla extract adds depth. Finally, a pinch of sea salt balances the sweetness.
Equipment Needed:
Using a high-powered blender or food processor is important. It blends the frozen bananas into a smooth ice cream. A parchment-lined baking sheet helps freeze the banana slices evenly. An airtight container will keep your ice cream fresh in the freezer.
Gather these ingredients and tools, and you’re ready to make a creamy delight!

Step-by-Step Instructions
Preparing the Bananas
Start by peeling your ripe bananas. Cut them into thin, even slices. This helps them freeze faster. Lay the slices flat on a parchment-lined baking sheet. Freeze them for at least 2 hours. This ensures they are solid. Even slicing is key for quick freezing. If they are too thick, they will take longer.
Blending Process
Once your banana slices are frozen, it’s time to blend. Put the frozen banana slices in a high-powered blender. Add natural peanut butter and coconut milk. If you want, add maple syrup, vanilla extract, and a pinch of sea salt. Blend on high speed until smooth. Stop to scrape down the sides as needed. If the mixture is too thick, add more coconut milk. Do this one tablespoon at a time until you get a creamy texture.
Finalizing the Recipe
After blending, taste your ice cream. You may want to adjust the sweetness. If you want it sweeter, add more maple syrup. You can serve it right away for a soft-serve texture. If you prefer it firmer, transfer it to an airtight container. Freeze for about 2 hours. Once it’s set, scoop it into bowls. Enjoy this creamy delight!
Tips & Tricks
Achieving Creamy Consistency
To get that perfect creamy texture, pay close attention to the liquid ratios. Use just enough coconut milk to blend smoothly. If it feels too thick, add a tablespoon more. Always stop to scrape down the sides of the blender. This ensures all the ingredients mix well. You want a smooth, soft-serve ice cream feel. Keep blending until you achieve that dreamy consistency.
Flavor Enhancements
You can have fun by adding more flavors! Try mixing in cocoa powder for a chocolate twist. You can also use other fruits like strawberries or mango. Pairing flavors is key. The nutty taste of peanut butter goes so well with sweet banana. Be bold and explore what you like!
Presentation Ideas
When serving, use chilled bowls for a special touch. Garnish your ice cream with extra banana slices or a drizzle of peanut butter. A sprinkle of crushed nuts adds a nice crunch, too. These little details make your dish look great and taste even better. Enjoy every creamy bite!
Pro Tips
- Use Very Ripe Bananas: The riper the bananas, the sweeter and creamier your ice cream will be. Look for bananas with brown spots for the best flavor.
- Experiment with Add-ins: Feel free to customize your ice cream by adding ingredients like cocoa powder, cinnamon, or even a handful of chocolate chips for a delightful twist.
- Store Properly: To keep your ice cream fresh, make sure to store it in an airtight container, and press a piece of parchment paper directly on the surface before sealing.
- Thaw Before Serving: If your ice cream becomes too firm after freezing, let it sit at room temperature for a few minutes before scooping for easier serving.
Variations
Flavor Variations
You can change the flavor of your ice cream easily. Try adding chocolate or cocoa powder. This gives a rich taste that blends well with peanut butter. Just mix in 2 tablespoons of cocoa powder when you blend. You can also try other fruits. Berries, mango, or even pineapple can add a fun twist. Just freeze and blend them like the bananas.
Texture Variations
Want a different texture? You can add mix-ins like nuts or granola. Chopped peanuts or almonds give a nice crunch. Stir them in after blending, so they stay chunky. If you want a chunkier ice cream, freeze banana pieces longer. Then, blend only until smooth. This keeps some small chunks for a delightful bite.
Dietary Alternatives
If you have nut allergies, you can use different nut butters. Almond or sunflower seed butter works well. Each nut butter will give a unique flavor. You can also make this recipe gluten-free. All the ingredients listed are naturally gluten-free, so you are safe to enjoy.
Storage Info
Storing Leftovers
To store your vegan peanut butter banana ice cream, use an airtight container. This keeps out air and moisture. I recommend freezing it in small portions. This way, you can enjoy it later without wasting any. If you want to keep it fresh, press a piece of plastic wrap against the surface before sealing the lid. It helps reduce ice crystals.
Re-thawing Tips
When you want to enjoy your ice cream again, take it out of the freezer. Let it sit on the counter for about 10 minutes. This softens it nicely. If you find it still too hard, you can use a microwave. Heat it for 10 seconds at a time. Check often to avoid melting too much. To prevent ice crystals, store it tightly sealed and avoid frequent opening.
Shelf Life
In the freezer, this ice cream lasts for about 2 to 3 weeks. After that, the flavor may fade. Look for any changes in texture. If you see ice crystals forming or a strange smell, it’s time to toss it. Always trust your senses; they guide you well in the kitchen!
FAQs
Can I use regular peanut butter?
Yes, you can use regular peanut butter. However, natural peanut butter has a different taste. It has simple ingredients and no added sugar. Regular peanut butter often has added sugar and oils. This can make your ice cream sweeter and richer. If you like that taste, go for it!
Is this recipe customizable for allergies?
This recipe is easy to change for allergies. If you have a nut allergy, use sun butter or seed butter. For a dairy-free version, stick with coconut milk or any plant-based milk. If you’re avoiding sugar, try a sugar substitute. Always check labels to be safe.
How do I make it without a blender?
If you don’t have a blender, use a fork or potato masher. Start with the frozen bananas. Mash them until they are smooth. Then, mix in the peanut butter and other ingredients with a spoon. It will take more time, but you can still enjoy this creamy treat!
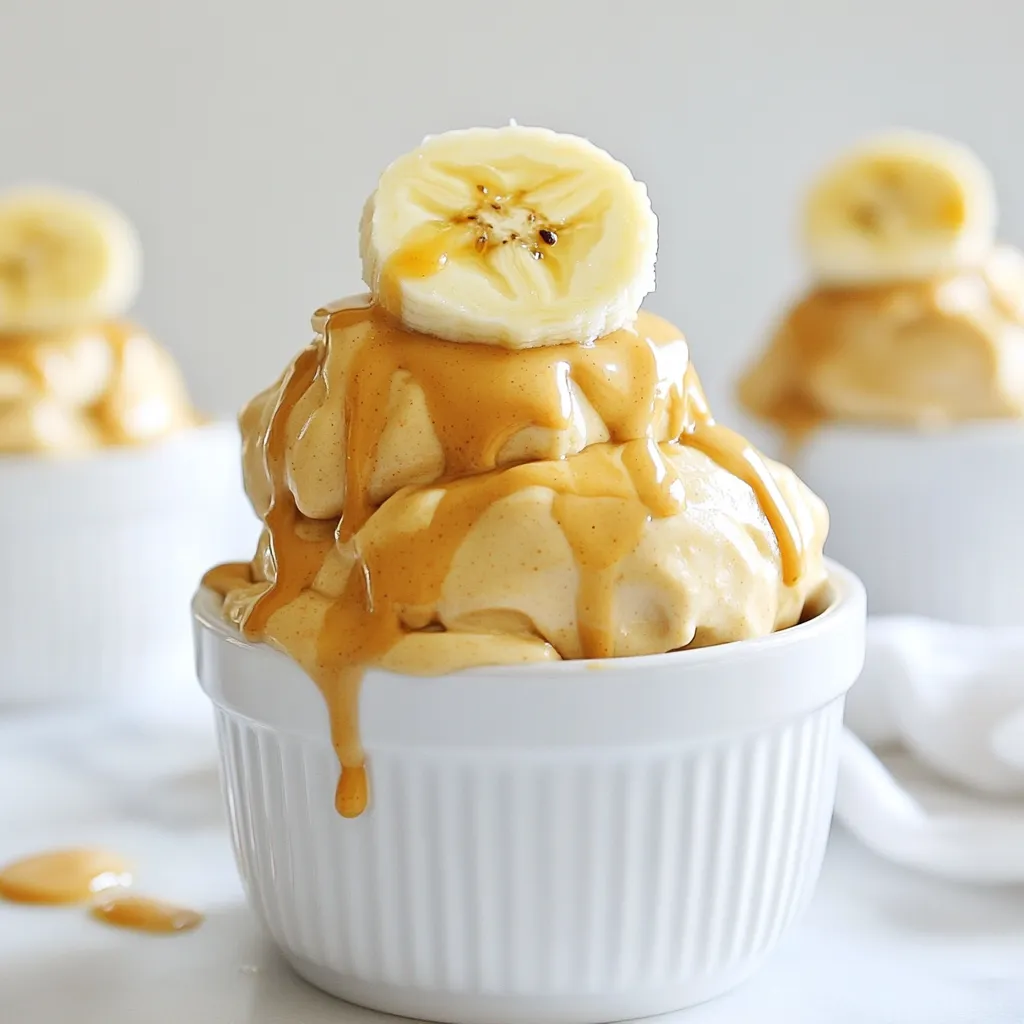
This blog post guided you through making a tasty banana ice cream. You learned about the key ingredients, from ripe bananas to natural peanut butter. I also shared tips for blending and achieving the perfect texture. You can experiment with flavors and customize the recipe to fit your needs. Remember to store your ice cream properly to keep it fresh. With these steps, you can create a delightful treat that satisfies your sweet tooth! Enjoy your ice cream-making adventur
Creamy Vegan Peanut Butter Banana Bliss
Ingredients
- 3 pieces ripe bananas, peeled, sliced, and frozen
- 1/2 cup natural peanut butter
- 1 tablespoon maple syrup (optional)
- 1/2 teaspoon pure vanilla extract
- a pinch sea salt
- 1/4 cup coconut milk (or any preferred plant-based milk)
Instructions
- Prepare the Bananas: Begin by peeling the ripe bananas. Slice them into thin, even rounds for quicker freezing. Lay the banana slices flat on a parchment-lined baking sheet and freeze them for a minimum of 2 hours, or until they are completely solid.
- Blend the Ingredients: Once your banana slices are frozen, transfer them into a high-powered blender or food processor. Add the natural peanut butter, maple syrup (if you choose to add it), pure vanilla extract, a pinch of sea salt, and the coconut milk.
- Blend Until Creamy: Blend the mixture on high speed. Pause occasionally to scrape down the sides of the blender for even mixing. Continue blending until the mixture becomes smooth and creamy, achieving a consistency similar to soft serve ice cream. If the mixture is too thick for your blender, gradually add more coconut milk, one tablespoon at a time, until you reach your ideal consistency.
- Taste and Adjust: After blending, taste your creamy mixture and consider its sweetness. If desired, you can add more maple syrup or a pinch of salt to enhance the overall flavor profile.
- Freeze for Firmness: For a delightful soft-serve experience, you can serve the ice cream immediately in bowls. If you prefer a firmer texture, transfer the mixture into an airtight container and freeze for about 2 hours to allow it to set.
- Scoop and Serve: Once the ice cream reaches your preferred firmness, scoop generous portions into bowls or cones and indulge in this creamy delight!

![- 1 ½ cups all-purpose flour - 1 teaspoon baking powder - ½ teaspoon baking soda - ¼ teaspoon salt - ½ cup unsalted butter, softened to room temperature - 1 cup granulated sugar - 2 large eggs, at room temperature - Zest of 1 large lemon (about 1 tablespoon) - 2 tablespoons freshly squeezed lemon juice - ½ teaspoon pure vanilla extract - 1 cup fresh raspberries, lightly dusted with flour - ¼ cup powdered sugar (for the glaze) - 1 tablespoon freshly squeezed lemon juice (for the glaze) Gathering your ingredients is the first step to baking this delightful lemon raspberry loaf. Start with all-purpose flour; you will need one and a half cups. This flour gives the loaf its structure. Next, grab baking powder (1 teaspoon), baking soda (½ teaspoon), and salt (¼ teaspoon). These leavening agents help the loaf rise and add flavor. You also need unsalted butter (½ cup). Make sure it is softened. This makes it easy to cream with sugar. Speaking of sugar, you will need granulated sugar (1 cup). This gives the loaf sweetness and helps it get light and fluffy. Now, for the eggs, use 2 large eggs, at room temperature. They help bind the loaf together. For a bright flavor, add the zest of 1 large lemon (about 1 tablespoon) and 2 tablespoons of freshly squeezed lemon juice. These add a fresh zing to each bite. Don’t forget pure vanilla extract (½ teaspoon) for a lovely aroma. For the star of the show, you’ll need 1 cup of fresh raspberries. Lightly dust them with flour to keep them from sinking in the batter. Finally, for the glaze, gather powdered sugar (¼ cup) and another tablespoon of freshly squeezed lemon juice. This will create a sweet, tangy finish on top of the loaf. For an extra touch, consider garnishing your slices with fresh raspberries and a sprinkle of lemon zest. With all these ingredients ready, you are set to bake a delicious lemon raspberry loaf. You can find the full recipe above to guide you through each step. First, preheat your oven to 350°F (175°C). This step gets your oven ready for baking. Next, take your 9x5-inch loaf pan and grease it well with butter or cooking spray. Then, line the bottom with parchment paper. This makes it easy to remove the loaf later. In a medium bowl, whisk together the all-purpose flour, baking powder, baking soda, and salt. This step is key. Whisking helps to mix the dry ingredients evenly. It also adds air, making your loaf light and fluffy. In a large bowl, use an electric mixer to cream the softened butter and granulated sugar. Mix them at medium speed for about 2-3 minutes. You want the mixture to be light and fluffy. This creates a nice base for your loaf. Now, add the room-temperature eggs one by one to the butter mix. Be sure to mix well after each egg. Next, add the lemon zest, lemon juice, and vanilla extract. Blend these until the mixture is smooth. Gradually add your dry ingredients to the wet mix. Use a spatula to gently fold them together. Be careful not to overmix. Doing so can make your loaf dense and tough. Take your lightly dusted raspberries and gently fold them into the batter. Use a spatula to do this. The goal is to keep the raspberries intact for a burst of flavor in each slice. Pour the batter into your prepared loaf pan. Smooth the top with a spatula. Place the pan in the oven and bake for 45-50 minutes. A toothpick should come out clean when the loaf is done. Let it cool in the pan for 10 minutes, then move it to a wire rack to cool completely. In a small bowl, whisk together the powdered sugar and 1 tablespoon of lemon juice. Mix until smooth and free of lumps. This glaze will add a sweet touch to your loaf. Once the loaf is cool, drizzle the glaze over it. Let it drip down the sides for a pretty look. Slice the loaf into 8 pieces. You can serve it on a decorative platter with extra raspberries and lemon zest for a nice touch. Enjoy the sweet and tangy flavors! For the full recipe, check out the complete details above. To get the best texture for your lemon raspberry loaf, avoid overmixing. Mixing too much can make your loaf dense. Stir the batter gently until the dry and wet ingredients just blend. Using room temperature ingredients is also key. Cold butter or eggs can lead to uneven mixing. Let your butter and eggs sit out for about 30 minutes before you start. This small step makes a big difference in your loaf's final texture. Want to add extra zest or sweetness? Try using more lemon zest or a splash of vanilla. You can even stir in some lemon extract. It gives a nice boost to the flavor. If you prefer a sweeter loaf, add a bit more sugar. Just remember to balance it with extra lemon juice to keep the flavor bright. What if your loaf sinks or is dry? If it sinks, it might have been underbaked or overmixed. Always check if a toothpick comes out clean before removing it from the oven. For a dry loaf, make sure you measure flour correctly. Too much flour can lead to dryness. Use the spoon-and-level method for accuracy. If your loaf is still dry, consider adding a little more lemon juice to your glaze. This can help boost moisture and flavor. These tips will help you create a delightful lemon raspberry loaf that everyone will love! For the complete recipe, check out the Full Recipe section. {{image_4}} If you want a dairy-free Lemon Raspberry Loaf, use coconut oil instead of butter. For gluten-free options, replace the all-purpose flour with a gluten-free blend. You can also try different fruits. Blueberries or blackberries work well in this loaf. They add a new twist while keeping the flavors bright and fresh. You can enhance the flavor in many ways. Adding fresh herbs like thyme or mint gives a unique taste. Just a pinch can change the whole loaf. You might also try extracts, such as almond or coconut. These can blend nicely with lemon and raspberry. Remember to keep the amounts small, so they don’t overpower the main flavors. Make the loaf seasonal by using fruits that are in season. In summer, you could add peaches or strawberries. In fall, consider using apples or even pumpkin puree for a warm taste. You can also adapt it for holidays. Adding spices like cinnamon or nutmeg gives a festive feel. Each season brings new flavors, making this loaf a year-round delight. For the full recipe, check out the Lemon Raspberry Loaf Delight. To keep your lemon raspberry loaf fresh, wrap it tightly in plastic wrap. You can also use an airtight container. This prevents moisture loss and keeps flavors intact. Store it at room temperature for up to three days. If you want it to last longer, consider refrigerating it. Just remember to bring it back to room temperature before serving. Freezing your loaf is easy. First, let it cool completely. Then, wrap it in plastic wrap and foil. This double layer helps keep it fresh. Place the wrapped loaf in a freezer bag. It will stay good for up to three months. When you are ready to enjoy it, take it out and let it thaw in the fridge overnight. For a quick thaw, leave it out at room temperature for a few hours. The lemon raspberry loaf will last about three days at room temperature. If you keep it in the fridge, it can last up to a week. Watch for signs of spoilage like mold or an off smell. If you see any, it’s best to toss it. When stored well, the loaf stays moist and delicious for days! You can use frozen raspberries instead. They work great in this recipe. Just make sure to thaw and drain them first. You can also use other berries like blueberries or strawberries if you prefer. They all bring a nice flavor to the loaf. Yes, you can prepare the batter a day ahead. Just store it in the fridge before baking. You can also bake the loaf in advance. Allow it to cool completely, then wrap it tightly in plastic wrap. This keeps it fresh for a few days. The loaf is ready when a toothpick comes out clean or with a few crumbs. Another sign is a golden-brown top. Look for a slight spring when you press the top gently. These signs ensure your loaf is perfect. Absolutely! Chopped nuts like walnuts or pecans add a nice crunch. You can also try adding chocolate chips for a sweet twist. Just mix them in gently with the raspberries to keep everything intact. Yes, you can make mini loaves! Use smaller pans and adjust the baking time. Bake for 25-30 minutes, checking for doneness with a toothpick. This makes perfect gifts or treats for sharing. For the full recipe, click here: [Full Recipe]. You now know how to create a delicious raspberry loaf! We covered the key ingredients and step-by-step instructions. Remember to follow the tips for perfect texture and flavor. Don’t hesitate to try variations that fit your taste. Proper storage and freezing techniques will keep your loaf fresh longer. Enjoy experimenting with this versatile recipe. Your next baking adventure awaits!](https://blissfulmeal.com/wp-content/uploads/2025/06/8c24ad57-7895-48a2-a19d-8c1cac6d4489-768x768.webp)